e-ManualTopSite mapHelpGlossary

Category Top

Preface

Digitizing Paper Documents

Scanning the Original and Sending to a Computer

Adding the Scanned Image via Network Scanner onto a Document

Enabling PDF Documents to Be Edited with Adobe Reader (Reader Extensions)

Converting Scanned Documents into the Encrypted Searchable PDF

Printer Driver

Merging and Printing Multiple Documents

Printing a Booklet (Windows)

Printing a Booklet (Mac)

Using Profiles to Print (Windows)

Selecting Presets for Printing (Mac)

Specifying the Printer Driver Default Settings (Windows)

Fax

Temporarily Storing and Viewing Received Image

Handling Junk Faxes

Automatically Forwarding Received Faxes

Automatically Forwarding Received Faxes to a Computer

Forwarding to a Mobile Computing Device

Forwarding Received Faxes

Handling Files with Forwarding Errors

Sharing Received Fax Documents in the Advanced Box

Sharing Sent Fax Documents in the Advanced Box

Checking That the Sent Fax Was Delivered Successfully

Accessing the Fax Function of a Server Machine

E-Mail

Sending an E-mail to Multiple Destinations

Using a Shared Address Book

Internet Fax/Intranet Fax

Sending a Document via Internet Fax

Receiving a Document via Internet Fax

Department ID Management

Setting a Department ID for Copying

Setting the Department ID Management on the Printer Driver

Mail Box and Advanced Box

Storing and Sending a Document

Creating a Personal Space in the Advanced Box (Open to Public by WebDAV)

Creating a Personal Space in the Advanced Box (Open to Public by SMB)

Practically Applying Print Data

Backing Up the Data Stored in the Mail Box

Security

System Management

Copy Security with Forced Document Scan Lock and Secure Watermark

Preventing Other Users to See the Printed Documents

Hard Disk Data Security

Specifying Send/Fax Security Settings

Mail Box Security

Restricting Access to the Machine (IPv4)

Restricting Access to the Machine (IPv6)

Advanced Copying and Printing

Scanning Originals While the Machine Is Processing a Job (Reserve Copy)

Printing and Copying with the Original Background Images

Printing Files Stored in the USB Memory Directly from the Machine

Printing Files Created with Different Applications as a Single File

Creating Address Labels by Scanning Business Cards

Pausing Print Jobs to Change Settings (Hold)

Customizing the Screen Display

Making Favorite Keys Highly Visible

Registering a Series of Frequently Used Functions in One Button (Quick Menu)

Recalling the Quick Menu of Another Machine

Linkage between imageRUNNER ADVANCE Desktop and imageRUNNER ADVANCE

Using Advanced Box (imageRUNNER ADVANCE Desktop)

Importing Received FAX Documents into Library (imageRUNNER ADVANCE Desktop)

Sending Fax from a Computer (imageRUNNER ADVANCE Desktop)

Performing Saddle Stitch Printing (imageRUNNER ADVANCE Desktop)

Performing Complex Tasks at the Touch of a Button: Workflow Composer

Creating a Flow on a Computer (Workflow Composer)

Duplicating/Editing a Flow to Create a Personal Flow (Workflow Composer)

Executing a Flow on the Machine (Workflow Composer)

Top » Practical Workflows » Customizing the Screen Display » Making Favorite Keys Highly Visible
Making Favorite Keys Highly Visible
08JK-2E4
You can change the keys displayed on the touch panel display.
Benefits from Changing the Touch Panel Display
Increase efficiency
You can easily find keys for frequently used functions on the touch panel display and improve operating efficiency.
Reduce the time needed to operate proficiently
Since you can distinguish between frequently used functions and less frequently used functions, you can reduce the load that the user need to retain to operate this machine.
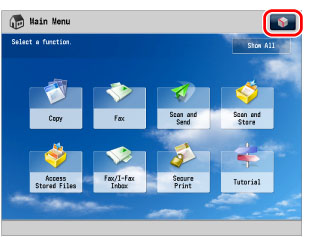
This section describes how to set the four types of keys: [Copy], [Scan and Store], [Fax], and [Secure Print] to display on the touch panel display in that order.
The screens may differ, depending on the model of the machine and on attached optional products.
Required Condition
You are logged in as the administrator.

1.
Press [] on the Main Menu screen.
NOTE
If the Main Menu screen is not displayed, press (Main Menu).
2.
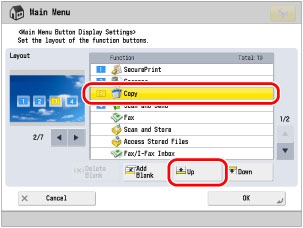
Press [Main Menu Button Display Settings].
3.
Press [] → select the four keys that are displayed on the Main Menu screen.
4.
Select [Copy] → press [Up] to move it to position <1>.
5.
Repeat step 4 to move [Scan and Store] to <2> position, [Fax] to <3> position, and [Secure Print] to <4> position.
6.
Press [OK].
The keys that are displayed on the Main Menu screen are changed.
NOTE
If you press [Show All], all of the keys are displayed and the screen returns to the setting before the change. If you press [Show All] again, only buttons you specified are displayed.
Reference Information
Shortcut Settings for Functions
You can create shortcut key on the Main Menu for the function you are using. You can easily access another function's setting screen. For details, see "Keys Displayed on Each Function Screen."
Main Menu Wallpaper Settings
You can change the wallpaper for the Main Menu. For details, see "Setting the Main Menu Screen."