Setting the Department ID Management on the Printer Driver
Setting the Department ID Management enables you to perform user authentication from the machine.
Benefits from Using the Department ID Management
Cost Management
You can manage the printing cost for each group.
Print Log Management
You can manage the print log for each group.
|
Required Condition
|
|
Printer driver is installed.
Canon Driver Information Assist Service is installed. (For details, see "Printer Driver Installation Guide.")
You are logged in as the administrator.
|
This section describes how to set the Department ID Management on the machine and print from the computer.
The screens may differ, depending on the model of the machine and on attached optional products.
The screens may differ, depending on the operating system of your computer.
Follow the procedures below.
Settings on the Machine
Printing the Document from the Computer
1.
Press

(Settings/Registration) → [Management Settings] → [User Management] → [Department ID Management].
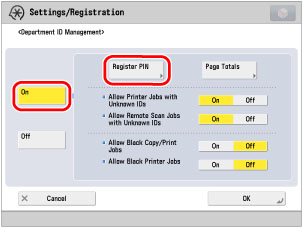
2.
Press [On] → [Register PIN].
If you do not want to register a Department ID or password, proceed to step 1 in "Printing the Document from the Computer."
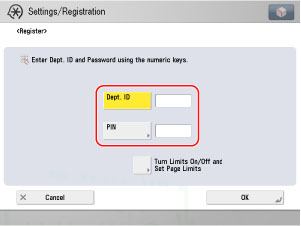
3.
Press [Register].
4.
Use

-

(numeric keys) to enter the Department ID and PIN.
Press [Dept. ID] → enter the Department ID.
Press [PIN] → [PIN] → enter the password.
Press [Confirm] → enter the same number to confirm the password → press [OK].
You cannot register a Department ID or password with only zeros as the number, such as <0> or <00>. If you enter a number that begins with zeros, the leading zeros are ignored. Example: If <02> or <002> is entered, <0000002> is stored.
|
NOTE
|
If you make a mistake when entering a number, press  (Clear) to clear the number → enter the correct number. If you do not want to set a password, you can use the machine by entering only the Department ID.
|
5.
Press [OK] → [OK].
|
NOTE
|
|
If [On] is selected in step 2 in "Settings on the Machine," the Department ID Management is set.
|
Printing the Document from the Computer
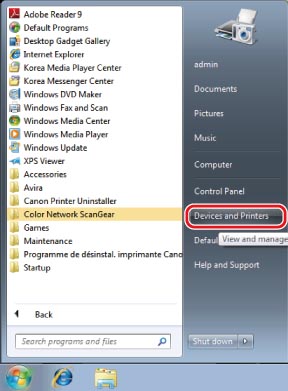
1.
For Windows XP, select [Start] → [Printers and Faxes] (or [Start] → [Control Panel] → [Printers and Other Hardware] → [Printers and Faxes]). For Windows Vista, click [

] (Start) → select [Control Panel] → [Printer]. For Windows 7, click [
] (Start) → [Devices and Printers].
For Windows Vista
For Windows 7
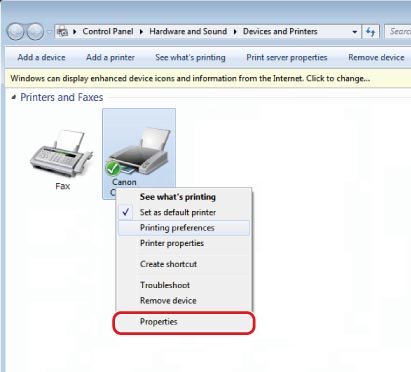
2.
In the [Printer] folder (or the [Printers and Faxes] folder), right-click the printer icon for the printer you want to specify printer settings → click [Properties] (or [Printer properties]).
The printer driver properties dialog box is displayed.
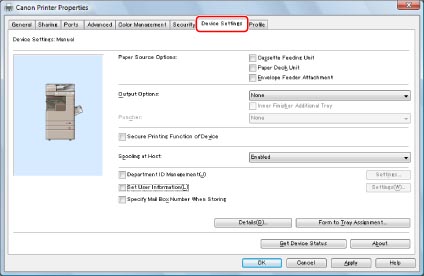
3.
Click the [Device Settings].
The [Device Settings] sheet is displayed.
4.
Select [Department ID Management] → click [Settings].
The [Department ID/PIN Settings] dialog box is displayed.
5.
Select [Allow PIN Setting] → enter the Department ID and PIN that you entered in step 4 in "Settings on the Machine."
|
NOTE
|
|
Click [Verify] to connect to the printer to check whether the registered Department ID and password are correct.
Select [Confirm Department ID/PIN When Printing] to set the information stored in the machine and the timing for authentication.
|
6.
Click [OK].
The [Department ID/PIN Settings] dialog box is closed.
7.
Click [OK].
The printer driver properties dialog box is closed.
8.
Print the document using the printer driver that the Department ID Management has been set.
The machine counts the number of prints for each department.
1.
From the [File] menu of the application software you are using for the document to print → select [Print].
The [Print] dialog box is displayed.
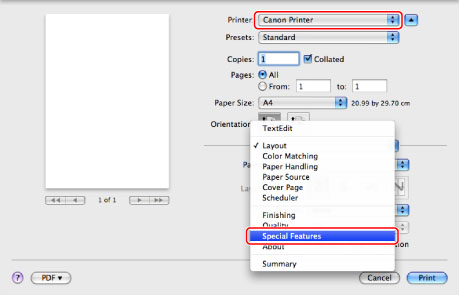
2.
Select the printer to use → select [Special Features].
The [Special Features] preferences panel is displayed.
|
NOTE
|
|
The screen may differ, depending on the type and version of the printer driver and the application software you are using.
|
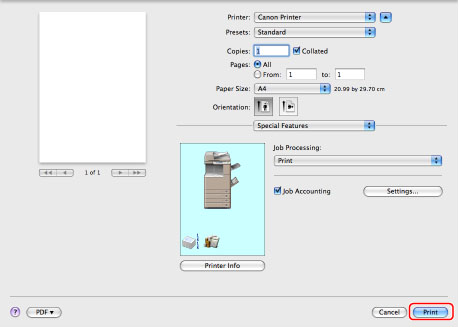
3.
Select [Job Accounting] → click [Settings].
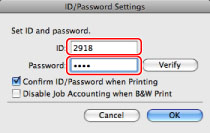
The [ID/Password Settings] dialog box is displayed.
4.
In the [ID/Password Settings] dialog box, enter the Department ID and Password that you entered in step 4 of "Settings on the Machine."
|
NOTE
|
|
Click [Verify] to connect to the printer to check whether the registered Department ID and Password are correct.
Enter eight characters or less (0 to 9, a to z, A to Z) for [ID].
Enter seven numerals or less (0 to 9999999) for [Password], or leave it blank.
If you select [Disable Job Accounting when B&W Print] when printing in black-and-white using a color printer with the Job Accounting Feature set, the document will be excluded from the page count. If you are using the Job Accounting Feature, set [Allow black print jobs] on the machine to 'On'.
|
5.
Click [OK].
The [ID/Password Settings] dialog box is closed.
6.
Click [Print].
The dialog box prompting you to enter the ID and Password is displayed. Enter the ID and Password → click [OK] to start printing. The machine counts the number of prints for each department.