e-ManualTopSite mapHelpGlossary

Category Top

Preface

Digitizing Paper Documents

Scanning the Original and Sending to a Computer

Adding the Scanned Image via Network Scanner onto a Document

Enabling PDF Documents to Be Edited with Adobe Reader (Reader Extensions)

Converting Scanned Documents into the Encrypted Searchable PDF

Printer Driver

Merging and Printing Multiple Documents

Printing a Booklet (Windows)

Printing a Booklet (Mac)

Using Profiles to Print (Windows)

Selecting Presets for Printing (Mac)

Specifying the Printer Driver Default Settings (Windows)

Fax

Temporarily Storing and Viewing Received Image

Handling Junk Faxes

Automatically Forwarding Received Faxes

Automatically Forwarding Received Faxes to a Computer

Forwarding to a Mobile Computing Device

Forwarding Received Faxes

Handling Files with Forwarding Errors

Sharing Received Fax Documents in the Advanced Box

Sharing Sent Fax Documents in the Advanced Box

Checking That the Sent Fax Was Delivered Successfully

Accessing the Fax Function of a Server Machine

E-Mail

Sending an E-mail to Multiple Destinations

Using a Shared Address Book

Internet Fax/Intranet Fax

Sending a Document via Internet Fax

Receiving a Document via Internet Fax

Department ID Management

Setting a Department ID for Copying

Setting the Department ID Management on the Printer Driver

Mail Box and Advanced Box

Storing and Sending a Document

Creating a Personal Space in the Advanced Box (Open to Public by WebDAV)

Creating a Personal Space in the Advanced Box (Open to Public by SMB)

Practically Applying Print Data

Backing Up the Data Stored in the Mail Box

Security

System Management

Copy Security with Forced Document Scan Lock and Secure Watermark

Preventing Other Users to See the Printed Documents

Hard Disk Data Security

Specifying Send/Fax Security Settings

Mail Box Security

Restricting Access to the Machine (IPv4)

Restricting Access to the Machine (IPv6)

Advanced Copying and Printing

Scanning Originals While the Machine Is Processing a Job (Reserve Copy)

Printing and Copying with the Original Background Images

Printing Files Stored in the USB Memory Directly from the Machine

Printing Files Created with Different Applications as a Single File

Creating Address Labels by Scanning Business Cards

Pausing Print Jobs to Change Settings (Hold)

Customizing the Screen Display

Making Favorite Keys Highly Visible

Registering a Series of Frequently Used Functions in One Button (Quick Menu)

Recalling the Quick Menu of Another Machine

Linkage between imageRUNNER ADVANCE Desktop and imageRUNNER ADVANCE

Using Advanced Box (imageRUNNER ADVANCE Desktop)

Importing Received FAX Documents into Library (imageRUNNER ADVANCE Desktop)

Sending Fax from a Computer (imageRUNNER ADVANCE Desktop)

Performing Saddle Stitch Printing (imageRUNNER ADVANCE Desktop)

Performing Complex Tasks at the Touch of a Button: Workflow Composer

Creating a Flow on a Computer (Workflow Composer)

Duplicating/Editing a Flow to Create a Personal Flow (Workflow Composer)

Executing a Flow on the Machine (Workflow Composer)

Top » Practical Workflows » Performing Complex Tasks at the Touch of a Button: Workflow Composer » Executing a Flow on the Machine (Workflow Composer)
Executing a Flow on the Machine (Workflow Composer)
08JK-2EJ
You can execute a flow you have created on a machine with Workflow Composer installed.
Required Condition
Workflow Composer is installed in the machine you are using.
Users of the machine you are using are managed with the SSO-H authentication system.
Shared folder for file transmission is created on the computer you are using (the folder name must be the same as the login user name).
This section describes how to log in to the machine you are using as 'John', and execute a Personal flow.
The screens may differ, depending on the model of the machine and on attached optional products.
Follow the procedures below.
Executing a Personal Flow
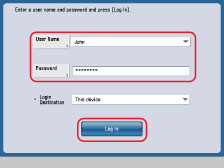
1.
Enter [User Name] and [Password] on the Log In screen of a machine with Workflow Composer installed → press [Log In]
As an example, 'John' is used for [User Name], and 'password' is used for [Password].
The Main Menu screen is displayed.
2.
Place the 11" x 17" original on the feeder or the platen glass.
3.
Press [Workflow Composer] on the Main Menu screen.
4.
Press [Personal] → [Reduce paper size/send/print].
5.
Check the flow settings → press [Start].
The 11" x 17" original is reduced to LGL size, and two-sided printing is performed. The original is also converted to a PDF file, which is sent to the file server.
Check that the PDF was sent to the following folder, as specified in the settings of the flow:
\\file-server\sales\John
NOTE
Before executing the flow, you must create the shared folder, \sales\John in the file server, for the PDF to be sent according to the settings of the flow.