Forwarding Received Faxes
Only one forwarding condition can be set for each sender. By setting forwarding conditions for multiple senders, faxes from different senders can be forwarded to and stored in separate computers.
You can set a maximum of 1,000 forwarding conditions with your imageRUNNER ADVANCE machine.
To minimize errors when forwarding documents, it is important to accurately set the fax number.
|
Example:
|
To set the machine to forward faxes received from Company A to Person X's computer, Company B to Person Y's computer, and Company C to Person Z's computer, specify the following three forwarding conditions.
|
|
|
Fax Number: [Equals]: registered number for Company A's fax; Forwarding Destination: Person X's computer
Fax Number: [Equals]: registered number for Company B's fax; Forwarding Destination: Person Y's computer
Fax Number: [Equals]: registered number for Company C's fax; Forwarding Destination: Person Z's computer
|
|
Example:
|
To forward all received faxes sent from within New York City, specify the following forwarding condition.
|
|
|
Number: [Begins with]: 212
|
|
Example:
|
To forward all received faxes, specify the following forwarding condition.
|
|
|
Fax Number: [Disregarded]
|
|
Example:
|
To set the machine to forward faxes received from Company A to Person X's computer, Company B to Person Y's computer, and all other faxes to the General Affairs Division computer to view/sort, specify the following forwarding conditions.
|
|
|
Fax Number: [Equals]: registered number for Company A's fax; Forwarding Destination: Person X's computer
Fax Number: [Equals]: registered number for Company B's fax; Forwarding Destination: Person Y's computer
Forward w/o Conditions: General Affairs Division computer
|
Use Forward w/o Conditions to set a forwarding destination for received faxes that do not match any specified forwarding conditions. This mode enables you to set the file name, select the file format, print when forwarding, and receive notification of forwarding completion.
[Disregarded] differs from Forward w/o Conditions in that all received faxes are forwarded, regardless of whether the faxes match any specified forwarding conditions. This means that if you set [Disregarded], faxes that match a forwarding condition are forwarded to two destinations.
Benefits of Using Profiles
Enables uniform management of faxes that cannot be forwarded to the addressee.
Extracts faxes without a specific addressee. This is particularly useful for junk faxes which can be received and viewed without printing, enabling you to save on machine running costs such as paper, toner, and maintenance.
The Send function is available for use.
Setting Forward w/o Conditions
Essentially, the settings are the same as when registering a forwarding condition. However, you do not set a condition name, fax number, or forwarding time.
You can operate this procedure using the touch panel display or the Remote UI.
The screens may differ, depending on the model of the machine and on attached optional products.
Using the Touch Panel Display
1.
Press

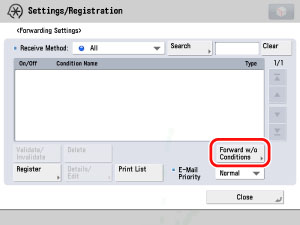
(Settings/Registration) → [Function Settings] → [Receive/Forward] → [Common Settings] → [Forwarding Settings] → [Forward w/o Conditions].
Specify the receive method, forwarding destination, file name, file format, and other settings → press [OK].
2.
Forward w/o Conditions is displayed on the forwarding settings screen. Select Forward w/o Conditions → press [Validate/Invalidate] and set it to 'On'.
You can specify the settings using the Remote UI.
1.
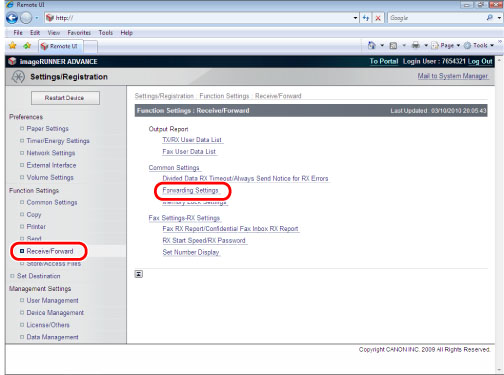
Access the Remote UI → click [Settings/Registration] → [Receive/Forward] → [Forwarding Settings].
2.
Click [Forwarding without Conditions] → specify the receive method, forwarding destination, forwarding done notice, and other settings.
[Enable This Forwarding Condition] is equivalent to the [Validate/Invalidate] button in the forwarding settings screen on your imageRUNNER ADVANCE machine.
Forwarding by Fax Line (Optional)
If the Super G3 2nd Line Fax Board is installed, you can specify different forwarding settings for each fax line (Fax Lines 1 and 2).
|
Example:
|
If the fax lines for the Administration and Accounting Divisions are different.
|
|
|
Fax Line 1: 0000-1111 (Administration Division)
Fax Line 2: 0000-2222 (Accounting Division)
|
Faxes addressed to each division are forward to the computer of the respective division.
This screen only appears if the Super G3 2nd Line Fax Board is installed.
You can set the fax number, subaddress, and password as forwarding conditions.
|
NOTE
|
|
You can set a maximum number of 1,000 forwarding conditions with the Super G3 2nd Line Fax Board installed. This number is a total of [Fax: Line Shared], [Fax: Line 1], and [Fax: Line 2].
You cannot set 1,000 forwarding conditions for each line.
|