Copy Security with Forced Document Scan Lock and Secure Watermark
You can implement security measures such as Document Scan Lock or Secure Watermark to help prevent unauthorized copying and information leakage. These modes can be set by administrator so that it is always reflected on the output by the general users.
This mode enables you to embed text, such as "CONFIDENTIAL," the date and time, or custom characters on the output so that the embedded text appears when the copies are copied. You can prevent unauthorized copying by the third party because you can distinguish between the original and copies of originals.
|
Original
|
|
Copy A
(Secure Watermark Is Set)
|
|
Copy B
(Copy of Copy A)
|
|
|
|
|
|
|
|
Original
|
|
Copy C
([Print Vertically] Is Selected)
|
|
Copy D
(Copy of Copy C)
|
|
|
|
|
|
|
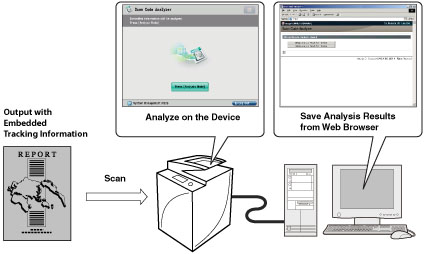
This mode enables you to embed scan lock information and tracking information on the copies/prints to restrict job operation. When the output with embedded information is scanned, the machine restricts operation according to the specified settings of embedded scan lock information.
With this settings, you can restrict unauthorized copying/printing, and also analyze embedded information on the output and find out who, when, and with which machine the copy or print was made.
You can embed the information using the TL code or QR code.
|
|
Original
|
Copy/Print
|
Output
|
Copy/Store/Print
|
Jobs are restricted.
|
|
TL Code
|
|
|
|
|
|
|
|
|
|
The dots are printed in the background of output.
|
|
|
|
|
Original
|
Copy/Print
|
Output
|
|
|
|
QR Code
|
|
|
|
|
|
|
|
|
|
A QR code is printed at the specified print position on the output.
The illustration of the QR code is a sample image.
|
|
|
This section describes how to set the Forced Secure Watermark function and Document Scan Lock function using the QL code to embed information.
|
Required Condition
|
|
You are logged in as the administrator.
The Secure Watermark is activated.
The Document Scan Lock Kit is activated.
|
Follow the procedures below.
Selecting the Code for Document Scan Lock
Specifying the Document Scan Lock Operational Settings (QR code)
Setting Forced Document Scan Lock mode and Secure Watermark
Adjusting the QR Code Print Position
Selecting the Code for Document Scan Lock
|
IMPORTANT
|
|
After changing the code to use, restart the machine.
|
1.
Press

(Settings/Registration) → [Function Settings] → [Common] → [Document Scan Lock Operational Settings].
2.
Press [Use Document Scan Lock].
3.
Select [Use QR Code] → press [OK].
Specifying the Document Scan Lock Operational Settings (QR code)
1.
Press
(Settings/Registration) → [Function Settings] → [Common] → [Document Scan Lock Operational Settings].
2.
Press [Document Scan Lock QR Code Settings].
3.
Specify the device operations when a QR code is detected.
Select [A Mode (Standard)].
If the QR code with [Prohibit All] is scanned, the job is canceled.
4.
Select whether to restrict functions which affect the Document Scan Lock function.
Select [Off].
5.
Press [OK].
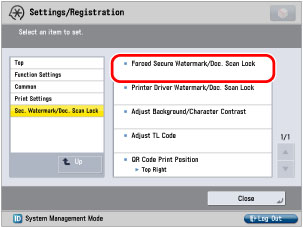
Setting Forced Document Scan Lock Mode and Secure Watermark
1.
Press
(Settings/Registration) → [Function Settings] → [Common] → [Print Settings] → [Secure Watermark/Document Scan Lock].
2.
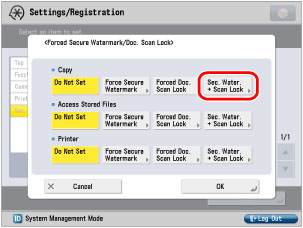
Press [Forced Secure Watermark/Doc. Scan Lock].
3.
Press [Sec. Water. + Scan Lock] for <Copy>.
4.
Specify the watermark settings.
Set each item as follows:
Press [Watermark] → press the <Watermark Type> drop-down list → select [CONFIDENTIAL].
Select [54.0 pt] for <Size>.
Select [Magenta] for <Color>.
Select [None] for <Background Pattern>.
Press [White Letters on Colored Bkg.].
5.
Press [Next].
6.
Select the document scan lock conditions.
Select [Prohibit All] → press [OK].
Specify the settings for <Access Stored Files> and <Printer> as well.
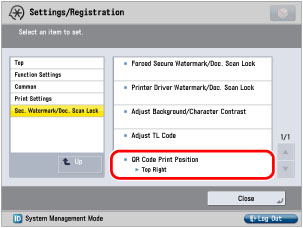
Adjusting the QR Code Print Position
1.
Press
(Settings/Registration) → [Function Settings] → [Common] → [Print Settings] → [Secure Watermark/Document Scan Lock].
2.
Press [QR Code Print Position].
3.
Adjust the print position.
Select 'Top Right' → press [OK].
The Forced Secure Watermark and Forced Document Scan Lock using the QL code are now set. When copying, printing, or scanning an original on this machine, the watermark and the document scan lock information are embedded on the output. If the output is scanned, the job is canceled by the embedded QR code. Even if machines without Document Scan Lock function copy the output, the watermark "CONFIDENTIAL" appears, which helps prevent unauthorized copying.
You can analyze embedded tracking information in the TL code or QR code printed on the output, and find out who, when, and with which machine the document was output. When using the QR code, you can embed two generation tracking information, the first and the last, or the original and the latest, on the output.
For more information, see the manual for Document Scan Code Analyzer for MEAP.