Creating a Flow on a Computer (Workflow Composer)
You can register a combination of functions frequently used for routine, repetitive office tasks in a single flow button.
Benefits of Workflow Composer Editor
Create flows on your computer
You can create and edit flows on your computer, enabling other users to access the touch panel display of the machine.
Manage flows for multiple machines on your computer
By registering multiple machines, you can manage the flows for all target machines from a central computer.
Benefits of Using Environment Variables
Define variables for user information
You can specify user information, such as the Department ID, user name, or e-mail address, as an environment variable. For example, if you are sending a file to a file server, you can specify the user name for the destination folder name. When creating the flow, by defining an environment variable for [Folder Path], the user name will be adopted for the destination folder name.
|
Required Condition
|
|
The machine and computer you are using are connected to the network.
Workflow Composer is installed in the machine you are using.
Workflow Composer Editor is installed in the computer you are using.
|
This section describes how to create a flow for the following operations using Workflow Composer Editor:
Reduce an 11" x 17" original to LGL size.
Send a file to a file server.
Follow the procedures below.
Registering a Machine
Creating a Flow
Uploading a Flow
1.
Double-click the Workflow Composer Editor icon on the desktop.
Workflow Composer Editor launches, and the Basic Features Screen is displayed.
|
NOTE
|
|
For Windows XP, click [Start] → [All Programs] → [Canon Workflow Composer] → [Workflow Composer Editor].
For Windows Vista/7, click [  ] (Start) → [All Programs] → [Canon Workflow Composer] → [Workflow Composer Editor]. |
2.
From the [Target] menu, select [Add Target]. You can also perform this step by clicking [

] (Add Target) on the [Targets] toolbar.
The [Add Target] dialog box is displayed.
3.
Specify the machine information → click [OK].
Select the type of the machine for [Target Destination].
Select [IP address] or [Host name] → enter the machine's IP address (IPv4 or IPv6) or host name.
Click [Acquire Info.] → select an encryption method for [Encryption Algorithm].
The machine is now registered in the [Target] list.
|
NOTE
|
|
Only register machines installed with Workflow Composer.
|
Create a flow to use on a registered machine.
1.
Select a machine from the [Targets] list.
2.
From the [Flows] menu, select [Create]. You can also perform this step by clicking [

] (Create) on the [Downloaded Flows] toolbar.
The [Create] dialog box is displayed.
3.
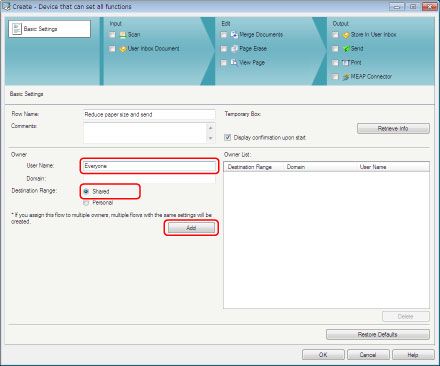
Enter 'Reduce paper size and send' for [Flow Name].
4.
Enter 'Everyone' for [User Name] under [Owner] → select [Shared] for [Destination Range] → click [Add].
Users are added to [Owner List].
5.
Select [Scan] for [Input].
6.
Select [For Sending] for [Scan Type].
7.
Select [Preset Zoom] for [Copy Ratio Settings] → select [Inch Sizes] for [Size Grouping] → select [73% (11x17 -> LGL, 11x15 -> LTR)] for [Copy Ratio].
8.
Select [Send] for [Output].
9.
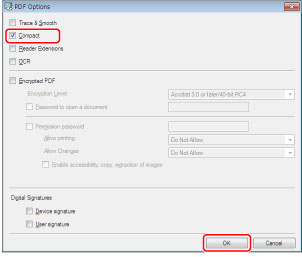
Select [PDF] for [File Format] → click [Set (2)].
10.
Select [Compact] → click [OK].
11.
Click [New Address].
The [New Address - To] dialog box is displayed.
12.
Click the [File] tab.
13.
Enter '\\file-server' for [Host Name].
14.
For [File Path], enter '\sales\%' → select [%loginname%] from the list that is displayed when you enter '%'.
|
NOTE
|
|
'%loginname%' is an environment variable. If you log in to the machine using an authentication system, the variable is replaced with the login user's name
|
15.
Enter the user name and password to use for logging in to the computer specified for [Host Name], in [User] and [Password].
16.
Click [Add Address] → click [OK].
If a confirmation dialog box appears, click [OK].
17.
Click [OK].
A new flow is created.
Upload your flow to the machine.
1.
Select your flow ([Reduce paper size and send]) for [Downloaded Flows] list.
2.
Select [Upload] from the [Flows] menu. You can also perform this step by clicking [

] (Upload) on the [Downloaded Flows] toolbar.
The [Upload] dialog box is displayed.
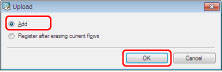
3.
Confirm that [Add] is selected → click [OK].
4.
If the [Authentication] dialog box is displayed, enter the System Manager ID for [User Name] → enter the System PIN for [Password] → click [OK].
Your flow is uploaded to the machine.