Using Profiles to Print (Windows)
Printer driver settings for various types of printing are provided in Profiles by default. You can specify print settings according to your needs simply by selecting an item from the list of profiles. In addition to the settings provided by default, you can register frequently used settings.
Benefits of Using Profiles
Reducing effort for specifying settings
If you frequently use the same print settings, you can register the settings as a profile to eliminate the effort spent specifying the settings each time.
Preventing misprints
You can prevent misprints occurring due to mistakes made when specifying settings.
|
Required Condition
|
|
The printer driver is installed.
|
This section describes the procedure for registering the settings for printing two pages on one sheet (2 on 1) with a watermark reading "COPY", and selecting the registered profile to perform printing.
The screens may differ, depending on the model of the machine and on attached optional products.
The screens may differ, depending on the operating system of your computer.
Follow the procedures below.
Registering a Profile
Selecting a Profile for Printing
1.
From the [File] menu of the application software you are using to print the document, select [Print] to display the [Print] dialog box → select the printer to use → click [Properties].
|
NOTE
|
|
The print screen may differ, depending on the application software you are using.
|
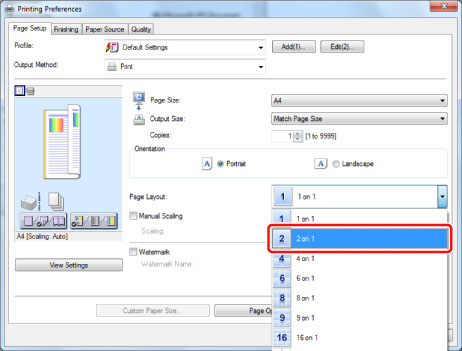
2.
In the [Page Setup] sheet, select [2 on 1] from [Page Layout].
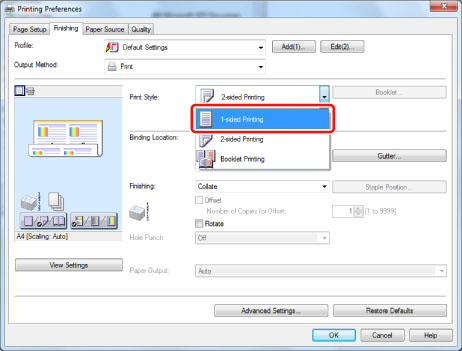
3.
In the [Finishing] sheet, select [1-sided Printing] from [Print Style].
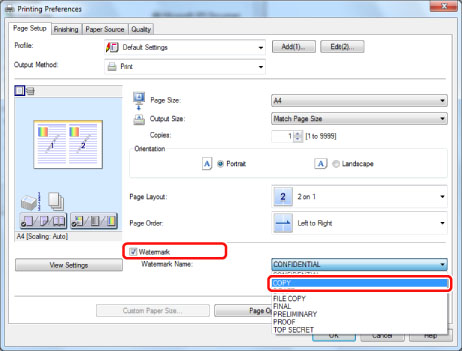
4.
In the [Page Setup] sheet, select [Watermark] → [COPY].
5.
Click [Add].
The [Add Profiles] dialog box is displayed.
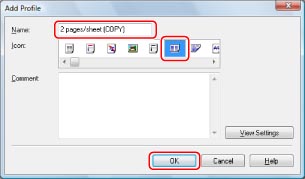
6.
Enter a name, for example '2 pages/sheet (COPY)', in [Name] → select [

] for [Icon] → click [OK].
Specify [Comment] as necessary.
Selecting a Profile for Printing
1.
From the [File] menu of the application software you are using to print the document, select [Print] to display the [Print] dialog box → select the printer to use → click [Properties].
|
NOTE
|
|
The print screen may differ, depending on the application software you are using.
|
2.
Select [2 pages/sheet (COPY)] from [Profile] → click [OK].
3.
In the [Print] dialog box, click [OK].
The document is printed with two pages on each sheet of paper (2 on 1) with a "COPY" watermark printed on each page.