Setting a Department ID for Copying
Using a Department ID you can manage the following three items:
This section describes how to authenticate users by setting the Department ID Management.
How to restrict the numbers of prints/scans, and specify page count settings will also be explained.
The screens may differ, depending on the model of the machine and on attached optional products.
|
Required Condition
|
|
You are logged in as the administrator.
|
Department ID Management Settings on the Machine
You can operate this procedure using the touch panel display or the Remote UI.
Using the Touch Panel Display
1.
Press

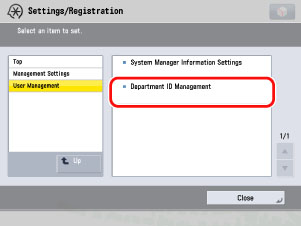
(Settings/Registration) → [Management Settings] → [User Management] → [Department ID Management].
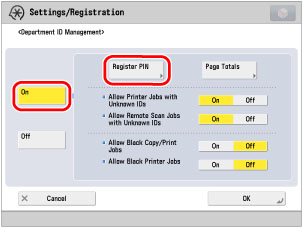
2.
Press [On] → [Register PIN].
3.
Press [Register].
4.
Enter the seven digit Department ID and PIN using

-

(numeric keys) → press [OK].
|
(1)
|
Press [Dept. ID] → enter the Department ID.
|
|
(2)
|
Press [PIN].
|
|
(3)
|
Press [PIN] → enter the PIN.
|
|
(4)
|
Press [Confirm] → enter the same number to confirm the PIN → press [OK].
|
You cannot register a Department ID or PIN with only zeros as the number, such as <0> or <00>. If you enter a number that begins with zeros, the leading zeros are ignored. Example: If <02> or <002> is entered, <0000002> is stored.
|
NOTE
|
If you make a mistake when entering a number, press  (Clear) to clear the entire number → enter the correct number. If you do not want to set a PIN, you can use the machine by entering only the Department ID.
|
5.
Press [OK].
You can register the Department ID using the Remote UI.
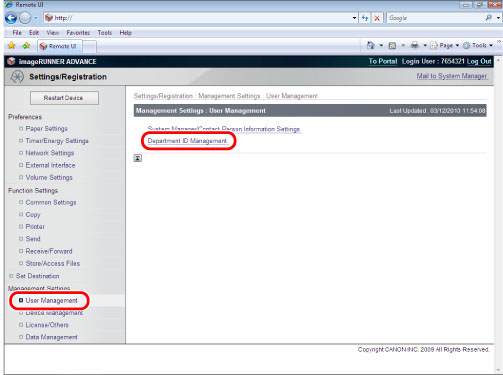
1.
Access the Remote UI → click [Settings/Registration] → [User Management] → [Department ID Management].
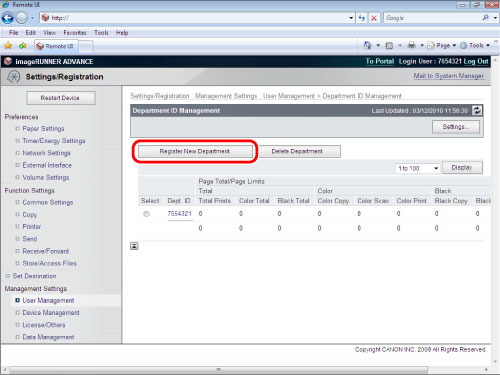
2.
Click [Register New Department].
3.
Enter the Department ID and PIN → enter the same Department ID and PIN for confirmation → click [OK].
Unlimited Black-and-White
You can set to monitor only color outputs, and allow an unlimited number of the cheaper black-and-white outputs, using Department ID Management. By setting Department ID Management, the default screen of your imageRUNNER ADVANCE becomes the login screen.
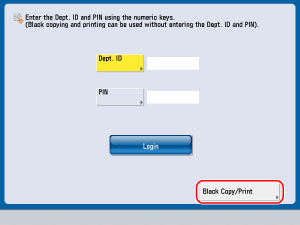
If <Allow Black Copy/Print Jobs> is set to 'On', [Black Copy/Print] is displayed under the Department ID entry field. Pressing [Black Copy/Print] enables you to print black-and-white document without entering the Department ID. If you press [Black Copy/Print] and attempt to use the color copy mode, the display returns to the screen for entering the Department ID and PIN.
This mode enables you to restrict users from using certain functions, excluding the Copy and Print functions, that are subjects to the Department ID Management.
For more information, see
"Limiting Functions."Reserving a Copy Job and ID Entry
Essentially, you can use only one ID to log in to the machine at a time. However, as an exception, you can use another ID to reserve a copy job.
Example:
While the machine is processing a copy job for Department A, if you press

(Log In/Out) on the control panel, the screen for entering the Department ID and PIN is displayed even if the machine is in the operation.
If the original has been scanned, you can enter the ID for Department B and reserve a copy job.
Total Page Count Settings
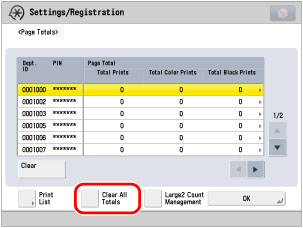
You can display or print a list of how much paper was used by each department.
You can check how much paper is used for color copy, scan, and print jobs and black-and-white copy, scan, and print jobs.
You can operate this procedure using the touch panel display or the Remote UI.
Using the Touch Panel Display
1.
Press
(Settings/Registration) → [Management Settings] → [User Management] → [Department ID Management].
2.
[On] → [Page Totals].
3.
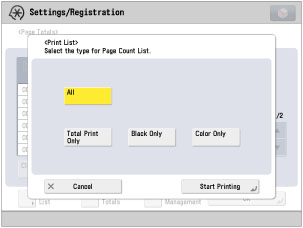
Press [Print List] to print the counter information for the departments currently displayed on the touch panel display.
4.
To reset the counter information for each department, select the department → press [Clear].
5.
To reset the counter information for all the departments, press [Clear All Totals].
|
NOTE
|
|
The unit for the counter is "pages." Copying/printing a 2-sided sheet is counted as '2' pages.
Unless you press [Clear] for clearing counter information, the machine keeps counting the pages scanned, copied, and printed, and displays those numbers on the counter screen.
If you want to record counter information for every month, press [Clear All Totals] on a specified day of every month. Do not forget to record the counter information of the previous month before pressing the button for clearing the totals. You cannot stop the counter.
|
You can perform the same operation using the Remote UI.
1.
Access the Remote UI → click [Settings/Registration] → [User Management] → [Department ID Management].
2.
To reset the counter information for each department, select the department → click [Clear Count].
3.
To reset the counter information for all the departments, click [Settings...] on the Department ID Management screen → click [Clear All Counts].
The Page Limits mode enables you to specify the maximum number of pages each department is allowed to copy/scan/print. The machine stops operation when the counter reaches the specified number. You can set page limits for:
Total (Color/B&W/All)
Copy (Color/B&W)
Scan (Color/B&W)
Print (Color/B&W)
You can operate this procedure using the touch panel display or the Remote UI.
Using the Touch Panel Display
1.
Press
(Settings/Registration) → [Management Settings] → [User Management] → [Department ID Management].
2.
Press [On] → [Register PIN] → [Register].
3.
Specify Department ID and PIN → press [Turn Limits On/Off and Set Page Limits].
The [Turn Limits On/Off and Set Page Limits] screen is displayed.
You can perform the same operation from the Remote UI.
You can specify the settings using the Remote UI.
1.
Access the Remote UI → click [Settings/Registration] → [User Management] → [Department ID Management] → [Register New Department].
2.
Select the items for which you want to set a page limit restriction → enter the page limit.
|
NOTE
|
|
If the number reaches the limit, the function that reached the limit cannot be used unless the Page Limits mode is disabled or the page limit is changed.
Even if the machine is in the middle of large volume operation, the machine stops processing when the counter reaches the page limit.
When you scan documents to be sent via fax, if [Black Scan Limit] reaches the page limit, the fax job is canceled.
|
If you install a Card Reader, you can link a card with the machine's Department ID Management function. By inserting a card, the card number is automatically registered as a Department ID. ID and password information stored on the card can be used instead of a Department ID/password.
You can manage totals and set page limits for color copy, scan, and print jobs and black-and-white copy, scan, and print jobs for each card.