e-ManualTopSite mapHelpGlossary

Category Top

Preface

Digitizing Paper Documents

Scanning the Original and Sending to a Computer

Adding the Scanned Image via Network Scanner onto a Document

Enabling PDF Documents to Be Edited with Adobe Reader (Reader Extensions)

Converting Scanned Documents into the Encrypted Searchable PDF

Printer Driver

Merging and Printing Multiple Documents

Printing a Booklet (Windows)

Printing a Booklet (Mac)

Using Profiles to Print (Windows)

Selecting Presets for Printing (Mac)

Specifying the Printer Driver Default Settings (Windows)

Fax

Temporarily Storing and Viewing Received Image

Handling Junk Faxes

Automatically Forwarding Received Faxes

Automatically Forwarding Received Faxes to a Computer

Forwarding to a Mobile Computing Device

Forwarding Received Faxes

Handling Files with Forwarding Errors

Sharing Received Fax Documents in the Advanced Box

Sharing Sent Fax Documents in the Advanced Box

Checking That the Sent Fax Was Delivered Successfully

Accessing the Fax Function of a Server Machine

E-Mail

Sending an E-mail to Multiple Destinations

Using a Shared Address Book

Internet Fax/Intranet Fax

Sending a Document via Internet Fax

Receiving a Document via Internet Fax

Department ID Management

Setting a Department ID for Copying

Setting the Department ID Management on the Printer Driver

Mail Box and Advanced Box

Storing and Sending a Document

Creating a Personal Space in the Advanced Box (Open to Public by WebDAV)

Creating a Personal Space in the Advanced Box (Open to Public by SMB)

Practically Applying Print Data

Backing Up the Data Stored in the Mail Box

Security

System Management

Copy Security with Forced Document Scan Lock and Secure Watermark

Preventing Other Users to See the Printed Documents

Hard Disk Data Security

Specifying Send/Fax Security Settings

Mail Box Security

Restricting Access to the Machine (IPv4)

Restricting Access to the Machine (IPv6)

Advanced Copying and Printing

Scanning Originals While the Machine Is Processing a Job (Reserve Copy)

Printing and Copying with the Original Background Images

Printing Files Stored in the USB Memory Directly from the Machine

Printing Files Created with Different Applications as a Single File

Creating Address Labels by Scanning Business Cards

Pausing Print Jobs to Change Settings (Hold)

Customizing the Screen Display

Making Favorite Keys Highly Visible

Registering a Series of Frequently Used Functions in One Button (Quick Menu)

Recalling the Quick Menu of Another Machine

Linkage between imageRUNNER ADVANCE Desktop and imageRUNNER ADVANCE

Using Advanced Box (imageRUNNER ADVANCE Desktop)

Importing Received FAX Documents into Library (imageRUNNER ADVANCE Desktop)

Sending Fax from a Computer (imageRUNNER ADVANCE Desktop)

Performing Saddle Stitch Printing (imageRUNNER ADVANCE Desktop)

Performing Complex Tasks at the Touch of a Button: Workflow Composer

Creating a Flow on a Computer (Workflow Composer)

Duplicating/Editing a Flow to Create a Personal Flow (Workflow Composer)

Executing a Flow on the Machine (Workflow Composer)

Top » Practical Workflows » Security » Mail Box Security
Mail Box Security
08JK-2CL
You can set a PIN for your Mail Box to help prevent unauthorized users from viewing data stored in the Mail Box.
Benefits of Mail Box Security
Helps prevent the leakage of confidential information.
This section describes how to set a PIN for your Mail Box, and store a document in the Mail Box.
The screens may differ, depending on the model of the machine and on attached optional products.
Follow the procedures below.
Setting a Mail Box PIN
Storing a Document in a Mail Box
Setting a Mail Box PIN
You can operate this procedure using touch panel display or the Remote UI.
Using the Touch Panel Display
1.
Press (Settings/Registration) → [Function Settings] → [Store/Access Files] → [Mail Box Settings] → [Set/Register Mail Boxes].
2.
Select the Mail Box for which you want to set a PIN.
3.
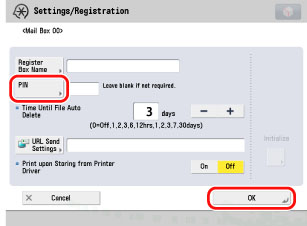
Press [PIN] →enter a seven digit PIN for the Mail Box → press [OK] → [Close].
The PIN for the Mail Box is now set.
Using Remote UI
You can specify the settings using the Remote UI.
1.
Access the Remote UI → click [Access Received/Stored Files] → [Mail Box].
2.
Click the number of the Mail Box for which you want to set a PIN → press [Settings...].
3.
Enter a PIN for the Mail Box → click [OK].
The PIN for the Mail Box is now set.
Storing a Document in a Mail Box
1.
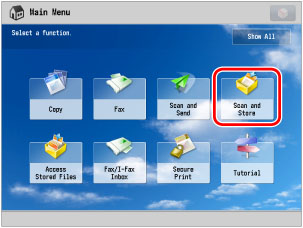
Press [Scan and Store] on the Main Menu screen.
NOTE
If the Main Menu screen is not displayed, press (Main Menu).
2.
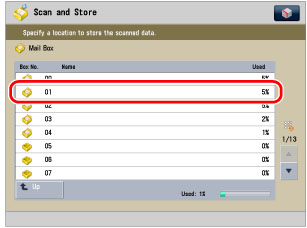
Press [Mail Box] → select the Mail Box in which you want to store the document.
3.
Enter the PIN using  - (numeric keys) → press [OK].
4.
Place your originals on the feeder or the platen glass → press [Scan].
5.
Specify the necessary settings → press (Start).
The document is stored in the Mail Box.