Preventing Information Leakage
There are many possibilities connected to information leakage regarding documents and data handling; such as when you have left behind your original or output on the machine after you have made a copy or printed, or when a transmission error has occurred when you have tried to send your file or document.
On this machine, you can create a PDF with digital signature that verifies the data creator and that the data has not been altered.
To minimize the possibility of information leakage, this machine can be equipped with several security features, such as the Secure Watermark and Document Scan Lock modes to prevent unauthorized copying, the Limit New Destinations mode to prevent unauthorized send, and the Destination Confirmation mode to prevent transmission error.
Also, by specifying restrictions on the display of the Address Book or the Status Monitor/Cancel screen on the touch panel display of the machine, you can prevent unauthorized use of the machine or browsing by the unauthorized user.
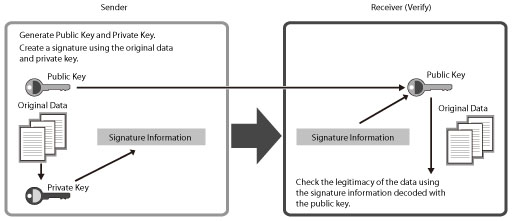
This mode displays the signature on the digital document, which indicates the source and therefore the legitimacy of the document. By using the public key encryption method, you can verify the data creator and that the data has not been altered.
The structure of a digital signature is indicated below. By comparing the encrypted data from the sender with the public key, the receiver can check the legitimacy of the sender and data.
(See "Digital Signatures.")You can create the following types of digital signature PDF on this machine.
Device Signature
User Signature
Besides the digital signature, you can create an encrypted PDF by registering a password to the PDF to prevent unauthorized browsing by a third party.
(See "Encrypting PDF Files.")Rights Management Server Settings
This machine can link with Adobe LiveCycle Rights Management to generate PDF files that have viewing and other privileges managed. For information on the settings for connecting to an Adobe LiveCycle Rights Management server, see
"Setting a Rights Management Server."For instructions on generating a PDF file using the Rights Management server, see
"Applying a Policy" in Scan and Send and
"Applying a Policy" in Scan and Store.
Preventing Output Information Leakage
The following modes can be set by administrator so that it is always reflected on the output by the general users.
This mode enables you to embed text, such as "CONFIDENTIAL," the date and time, or custom characters on the output so that the embedded text appears when the copies are copied. You can prevent unauthorized copying by the third party because you can distinguish between the original and copies of originals.
(See "Forced Secure Watermark/Document Scan Lock.")
|
Original
|
|
Copy A
(Secure Watermark Is Set)
|
|
Copy B
(Copy of Copy A)
|
|
|
|
|
|
|
|
Original
|
|
Copy C
([Print Vertically] Is Selected)
|
|
Copy D
(Copy of Copy C)
|
|
|
|
|
|
|
This mode enables you to restrict (which means to lock) the scan job of the document when copying or printing.
Using the TL code or QR code, you can embed scan lock information on the background of the copies/prints. Scan lock information controls the operational condition how the machine restricts scan jobs. When the output with embedded scan lock information is scanned, the machine detects embedded information and restricts unauthorized copying and printing.
|
Original
|
|
Output with Embedded TL Code
(Scan Lock Information)
|
|
Jobs are restricted.
|
|
|
Copy/Print
|
|
Copy/Store/Print
|
|
|
|
Embed Scan Lock Information
|
Output with Embedded QR Code
(Scan Lock Information)
|
|
|
|
|
|
|
You can also embed tracking information such as the user name, date/time, and device name for the operation job. By scanning the output, you can analyze the embedded information on the output and find out by whom, when, and with which machine the copy or print was made.
Also, you can embed Secure Watermark on the output so that the embedded text appears when the document is copied or printed.
(See "Forced Secure Watermark/Document Scan Lock.")Copy Set Numbering Extension Mode
This mode enables you to print the user name, the date and time, and custom characters in addition to the copy set number when copying/printing. By printing the copy set number and other information, you can prevent unauthorized copying by a third party.
(See "Copy Set Numbering Options.")Only Allow Encrypted Print Jobs Mode
The Encrypted Secure Print is a mode that strengthens the security by encrypting print data on a computer and decoding the encryption on the machine. This mode helps prevent the contents of your printed documents from being seen by other users and prevent leakage of confidential information. For instructions on using Secured Print and Encrypted Secure Print, see
"Secure Print." For information on the optional products required to use Encrypted Secure Print, see
"Optional Products Required for Each Function."Also, you can set the machine to only receive encrypted secured print jobs from computers.
With this setting, you can prevent leaving behind or losing outputs since output is only possible when the password is entered.
(See "Accepting Only Encrypted Secure Printing.")Preventing Information Leakage from Sending
You can prevent information leakage that occurs during sending such as entering a wrong destination by confirming the entry of destination or restricting new destinations/domain. (See
"Restricting the Send Function" and
"Setting the Address Book.")
Control Panel Display Restrictions
You can restrict the browsing and the use of the Status Monitor/Cancel screen and Address Book by specifying settings for each function.
(See "Setting the Control Panel Display.")