Adjusting the QR Code Print Position
You can adjust the print position for the embedding QR code.
This mode can be set when the Document Scan Lock function is available for use. For information on the optional products required to use the Document Scan Lock function, see "Optional Products Required for Each Function."
The size of the print area is 1 1/4" (30 mm) square including a margin. You can select the print area from the four corners.
IMPORTANT
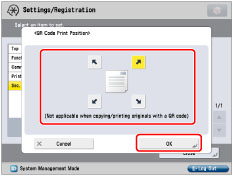
Avoid overlapping the QR code with texts, images, staples, binding holes, page numbering, copy set numbering, watermarks, and date printing.
The QR code print position may be displaced or the image may be cut off if you use other functions as the same time, such as erase frame, shift, and gutter functions.
If the QR code is already printed on the original, the embedding QR code is placed at the same position. However, if the QR code in the original is not detected, the QR code is not overwritten.
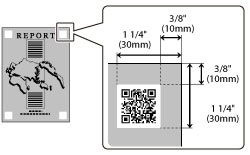
If the QR code is printed outside the print area, a part of the QR code may remain.
When using Book 2 Pages mode, QR code is printed on either right or left page.
1.
Press (Settings/Registration).
2.
Press [Function Settings] → [Common] → [Print Settings].
3.
Press [Document Scan Lock Settings].
If the Secure Watermark is activated, press [Secure Watermark/Document Scan Lock].
4.
Press [QR Code Print Position].
5.
 Adjust the print position → press [OK].
You can select from top left, top right, bottom left, or bottom right.
» Security » Preventing Information Leakage » Forced Secure Watermark/Document Scan Lock » Document Scan Lock Settings (QR Code) » Adjusting the QR Code Print Position
06RH-25C