e-ManualTopSite mapHelpGlossary

Category Top

Increasing Security

Restricting Access by Authentication

Administrator Settings

Specifying the System Manager Settings

Department ID Management

Specifying Department ID Management

Checking/Printing/Clearing Page Totals

Accepting Jobs with Unknown Department IDs

Accepting B&W Copy and Print Jobs without Entering a Department ID

User Setting Information Management (User Setting Information Management Service)

Logging In to the User Setting Information Management Service Page

Deleting the User Setting Information

User Access Control for Advanced Box

Logging In to the User Management Page

Registering/Editing the User Information of User Access Control for Advanced Box

Editing User Information by General Users

Authentication Log Management for the Advanced Box

Authentication Method Settings for Sending Operations

Specifying Personal Folders

Registering Personal Folders for Each User

Setting Up the Home Folder and Personal Folders

Registering Folders Designated by Login Service as Personal Folders

Specifying Authentication Method for LDAP Server

Specifying Authentication Method for Rights Management Server

Specifying Authentication Method for SMTP Server

Specifying Authentication Method for File Server

Specifying Authentication Method for Advanced Box

Simple Authentication Settings for Secure Print

Setting to Disable Integrated Authentication

Network Security

Key Pair and Server Certificate Settings for Encrypted SSL Communication

Generating a Key Pair and Server Certificate

Registering a Key Pair File and Server Certificate File Installed from a Computer

Editing Key Pairs and Server Certificates

Registering/Editing a CA Certificate File

Verifying Certificate Validity Using Certificate Revocation List

Using an Encryption Method That Complies with FIPS 140-2

Advanced Box Settings

Specifying the Advanced Box Settings

Setting the Network

MEAP Settings

Using the SSL

Printing Installed Application Information

Preventing Information Leakage

Digital Signatures

Setting/Confirming a Key Pair and Device Certificate

Confirming a Key Pair and User Certificate

Checking a Device Signature/User Signature Certificate

Setting a Rights Management Server

Forced Secure Watermark/Document Scan Lock

Secure Watermark (Forced Secure Watermark/Printer Driver Secure Watermark)

Adjusting the Secure Watermark Contrast

Selecting the Code for Document Scan Lock (TL Code/QR Code)

Document Scan Lock Settings (TL Code)

Specifying the Document Scan Lock Operational Settings
Setting the Document Scan Lock Mode (TL Code)
Adjusting the TL Code

Document Scan Lock Settings (QR Code)

Specifying the Document Scan Lock Operational Settings (QR Code)
Setting the Document Scan Lock Mode (QR Code)
Setting the Document Scan Lock Mode and Secure Watermark (QR Code)
Adjusting the QR Code Print Position

Copy Set Numbering Options

Accepting Only Encrypted Secure Printing

Restricting the Send Function

Setting the Address Book

Mail Box Settings

Specifying Settings for All Mail Boxes

Specifying the Mail Box Security Settings

Setting the Control Panel Display

Specifying Management Settings for the Hard Disk

Completely Erasing Unnecessary Data from the Hard Disk

Initializing All Data/Settings

TPM Settings

Device Management

Using the USB Port

Device Information Settings

Specifying Device Information Delivery Settings

Registering/Deleting/Printing Delivery Destinations

Setting Automatic Delivery

Setting Manual Delivery

Setting the Receiving Machine

Checking/Printing the Communication Log

Limiting Functions

Limiting Functions When the Security Key Is Turned OFF

Remote UI

Clearing the Message Board

Retrieving Audit Logs

Available Administrator Settings Table (Touch Panel Display)

IEEE 2600 Security Standard

Top » Security » Restricting Access by Authentication » Specifying the System Manager Settings
Specifying the System Manager Settings
06RH-231
You can set an ID and a PIN for the System Manager.
IMPORTANT
As a default, System Manager settings (System Manager ID/System PIN) are set on the machine. Thus, the administrator must log in by entering the System Manager ID and the System PIN. The default setting for both the System Manager ID and System PIN is '7654321'. It is recommended that you change both the System Manager ID and System PIN.
Some items on the Settings/Registration screen may be restricted for general users. Items that a user does not have operating privileges for are grayed out and cannot be selected on the touch panel display. Items that a user does not have operating privileges for are not displayed on the Remote UI.

1.
Press (Settings/Registration).
2.
Press [Log In] → enter the System Manager ID and System PIN → press [OK].
3.
Press [Management Settings] → [User Management] → [System Manager Information Settings].
4.
Specify each setting → press [OK].
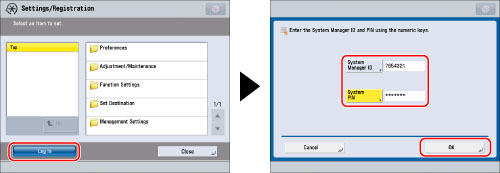
[System Manager ID]:
Press [System Manager ID] → enter numeric characters (up to seven digits) using - (numeric keys). You must set a System Manager ID in order to manage the operations of the machine.
[System PIN]:
Press [System PIN] → press [PIN] → enter numeric characters (up to seven digits) for the System PIN using - (numeric keys). Press [Confirm] → enter the same number to confirm the PIN → press [OK].
Even if you enter fewer than seven digits, zeros are added to the start of the number, and a seven digit number is set. However, the zeros at the start of the number can be omitted when logging in. For example, even if you enter <2>, <02>, or <002>, the PIN is set as <0000002>. However, you can log in by entering <2>, <02>, or <002>.
You cannot register a System Manager ID or System PIN comprised of only zeros, such as <0> or <00>.
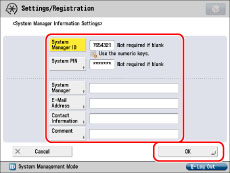
[System Manager]:
Press [System Manager] → enter the System Manager's name → press [OK].
[E-Mail Address]:
Press [E-Mail Address] → enter the System Manager's e-mail address → press [OK].
[Contact Information]:
Press [Contact Information] → enter the contact information for the System Manager → press [OK].
[Comment]:
Press [Comment] → enter any comment for the System Manager → press [OK].
NOTE
If you make a mistake when entering a number or character, press (Clear) to clear your entry.

IMPORTANT
If you are using Department ID Management as the login service for the machine, the operations that general users can perform on the Settings/Registration screen are restricted. To operate all the items on the Settings/Registration screen, enter the System Manager ID and System PIN to log in as an administrator.
If SSO-H is used as the login service, the available Settings/Registration items vary according to the type of user role (privileges). By logging in to the machine using a user name and password, the System Administrator (Administrator) can operate the Settings/Registration screen without restrictions. For information on setting user roles (privileges), see "Setting the User Information for SSO-H."
For information on the Settings/Registration items available with administrator privileges, see "Available Administrator Settings Table (Touch Panel Display)" and "Available Administrator Settings Table (Remote UI)."
If the Copy Card Reader-F1 is attached after you changed the System Manager ID and System PIN, the System Manager ID and System PIN will be returned to the default setting of '7654321'.
NOTE
If the Copy Card Reader-F1 is attached, the numbers 1 to 1,000 cannot be used for the System Manager ID. Numbers 1 to 1,000 are reserved for control cards by default.
For instructions on entering characters, see "Entering Characters from the Touch Panel Display." 
The maximum number of digits that you can store for the System Manager ID and System PIN is seven.