e-ManualTopSite mapHelpGlossary

Category Top

Increasing Security

Restricting Access by Authentication

Administrator Settings

Specifying the System Manager Settings

Department ID Management

Specifying Department ID Management

Checking/Printing/Clearing Page Totals

Accepting Jobs with Unknown Department IDs

Accepting B&W Copy and Print Jobs without Entering a Department ID

User Setting Information Management (User Setting Information Management Service)

Logging In to the User Setting Information Management Service Page

Deleting the User Setting Information

User Access Control for Advanced Box

Logging In to the User Management Page

Registering/Editing the User Information of User Access Control for Advanced Box

Editing User Information by General Users

Authentication Log Management for the Advanced Box

Authentication Method Settings for Sending Operations

Specifying Personal Folders

Registering Personal Folders for Each User

Setting Up the Home Folder and Personal Folders

Registering Folders Designated by Login Service as Personal Folders

Specifying Authentication Method for LDAP Server

Specifying Authentication Method for Rights Management Server

Specifying Authentication Method for SMTP Server

Specifying Authentication Method for File Server

Specifying Authentication Method for Advanced Box

Simple Authentication Settings for Secure Print

Setting to Disable Integrated Authentication

Network Security

Key Pair and Server Certificate Settings for Encrypted SSL Communication

Generating a Key Pair and Server Certificate

Registering a Key Pair File and Server Certificate File Installed from a Computer

Editing Key Pairs and Server Certificates

Registering/Editing a CA Certificate File

Verifying Certificate Validity Using Certificate Revocation List

Using an Encryption Method That Complies with FIPS 140-2

Advanced Box Settings

Specifying the Advanced Box Settings

Setting the Network

MEAP Settings

Using the SSL

Printing Installed Application Information

Preventing Information Leakage

Digital Signatures

Setting/Confirming a Key Pair and Device Certificate

Confirming a Key Pair and User Certificate

Checking a Device Signature/User Signature Certificate

Setting a Rights Management Server

Forced Secure Watermark/Document Scan Lock

Secure Watermark (Forced Secure Watermark/Printer Driver Secure Watermark)

Adjusting the Secure Watermark Contrast

Selecting the Code for Document Scan Lock (TL Code/QR Code)

Document Scan Lock Settings (TL Code)

Specifying the Document Scan Lock Operational Settings
Setting the Document Scan Lock Mode (TL Code)
Adjusting the TL Code

Document Scan Lock Settings (QR Code)

Specifying the Document Scan Lock Operational Settings (QR Code)
Setting the Document Scan Lock Mode (QR Code)
Setting the Document Scan Lock Mode and Secure Watermark (QR Code)
Adjusting the QR Code Print Position

Copy Set Numbering Options

Accepting Only Encrypted Secure Printing

Restricting the Send Function

Setting the Address Book

Mail Box Settings

Specifying Settings for All Mail Boxes

Specifying the Mail Box Security Settings

Setting the Control Panel Display

Specifying Management Settings for the Hard Disk

Completely Erasing Unnecessary Data from the Hard Disk

Initializing All Data/Settings

TPM Settings

Device Management

Using the USB Port

Device Information Settings

Specifying Device Information Delivery Settings

Registering/Deleting/Printing Delivery Destinations

Setting Automatic Delivery

Setting Manual Delivery

Setting the Receiving Machine

Checking/Printing the Communication Log

Limiting Functions

Limiting Functions When the Security Key Is Turned OFF

Remote UI

Clearing the Message Board

Retrieving Audit Logs

Available Administrator Settings Table (Touch Panel Display)

IEEE 2600 Security Standard

Top » Security » Preventing Information Leakage » Forced Secure Watermark/Document Scan Lock » Adjusting the Secure Watermark Contrast
Adjusting the Secure Watermark Contrast
06RH-251
You can adjust the contrast value for the text and background when copying/printing with the Secure Watermark mode. The Secure Watermark effect can be tested by making a copy of a sample print.
Specify the following settings in [Adjust Background/Character Contrast]:
[Relative Contrast]: Adjusts the relative contrast of the hidden text and the background.
[Standard Value Set.]: Sets the density of the background.
[Latent Area Density]: Sets the density of the text.
This setting can be specified when the Secure Watermark function is available for use. For information on the optional products required to use the Secure Watermark function, see "Optional Products Required for Each Function."
1.
Press (Settings/Registration).
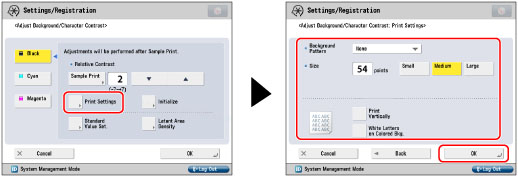
2.
Press [Function Settings] → [Common] → [Print Settings].
3.
Press [Secure Watermark Settings] → [Adjust Background/Character Contrast].
If the Document Scan Lock Kit is activated, press [Secure Watermark/Document Scan Lock].
4.
Select the color to adjust → press [Print Settings] → specify each setting → press [OK].
You can set the background pattern, text size, color, and print orientation.
5.
Press [Sample Print] → select the paper to use for the sample print → press [Start Printing].
The sample print is output.
IMPORTANT
Load A3, A4, LTR, or 11" x 17" size regular or heavy paper when making sample prints.
NOTE
The sample print includes the hidden text and the background for each relative contrast value.
The area within the frame on the sample print is the output sample for the currently set relative contrast value.
As the default setting, [White Letters on Colored Bkg.] is not selected in the Print Settings screen for printing a sample print. If you select [White Letters on Colored Bkg.], set [Standard Value Set.] for the density of the text and [Latent Area Density] for the density of the background.
6.
Copy the sample print.
Check the result of the secure watermark settings.
If you do not want to adjust the contrast for the text/background, proceed to step 9.
7.
Compare the sample print and the copy → set the value for the best sample print for [Relative Contrast] using or .
NOTE
Adjust [Relative Contrast] while comparing the difference between [Standard Value Set.] and the current [Latent Area Density], by referring to the sample print.
If you increase the value for [Relative Contrast], the background gets denser, and if you decrease the value, the background gets lighter. When [White Letters on Colored Bkg.] is set, if you increase the value for [Relative Contrast], the background gets denser, and if you decrease the value, the background gets lighter.
The setting range for the relative contrast value differs according to the standard value settings, as indicated below:
Standard Value
Settings
Relative Contrast Value
1
0 to +7
4
-3 to +7
8 to 56
-7 to +7
60
-7 to +4
64
-7 to 0
If you want to adjust the density of the background:
If you want to adjust the density of the text (latent image):
If you want to adjust the density of the background:
Press [Standard Value Set.] → [Sample Print].
To specify the print settings, press [Print Settings] → specify each setting → press [OK].
Select the paper to use for the sample print → press [Start Printing].
A standard value sample print is output.
Refer to the print result → set the value for the secure watermark image which has the most even contrast for the inner and outer squares using or .
NOTE
If you increase the value for [Standard Value Set.], the background gets denser, and if you decrease the value, the background gets lighter. When [White Letters on Colored Bkg.] is selected, if you increase the standard value, the background gets denser, and if you decrease the value, the background gets lighter.
When changing the adjustment area on the sample print for the relative contrast, specify settings for [Standard Value Set.].
Press [OK].
If you want to adjust the density of the text (latent image):
Press [Latent Area Density] → set the density using [-] or [+].
NOTE
If you changed [Standard Value Set.], adjust [Latent Area Density] so that the density of the inner square set in [Standard Value Set.] for the standard value sample print gets closer.
To set a background density that differs from the most even secure watermark image in the standard value sample print, it is necessary to adjust [Latent Area Density] to a density close to the background density.
If you increase the value for [Latent Area Density], the text gets denser, and if you decrease the value, the text gets lighter. When [White Letters on Colored Bkg.] is selected, if you increase the value for [Latent Area Density], the background gets denser, and if you decrease the value, the background gets lighter.
Press [OK].
8.
If you changed [Standard Value Set.] and [Latent Area Density], repeat steps 4 to 7 to adjust [Relative Contrast].
If you did not change the settings, proceed to step 9.
9.
Press [OK].
The contents of the settings changed in [Adjust Background/Character Contrast] are retained until the next time the settings are changed.