Setting the Document Scan Lock Mode and Secure Watermark (QR Code)
The Administrator can specify the QR code for the Forced Document Scan Lock mode and the Printer Driver Document Scan Lock mode.
Forced Document Scan Lock mode:
QR code is always embedded for copy and print jobs by general users.
Printer Driver Document Scan Lock mode:
You can select whether to embed QR code for each print job which is operated by general users from the printer driver.
You can set the Document Scan Lock and the Secure Watermark at the same time.
When using the QR code, you can automatically embed tracking information that enables you to analyze by whom, when, and with which machine the document was output.
For information on the optional products required to use this function, see "Optional Products Required for Each Function."
IMPORTANT
This function is displayed if the QR code is selected as the code for Document Scan Lock mode. (See "Selecting the Code for Document Scan Lock (TL Code/QR Code).")
The Document Scan Lock mode does not guarantee restriction of unauthorized copying. You may not be able to restrict unauthorized copying or analyze tracking information, depending on the combination of settings and the output, such as a document with an image on the entire page.
Please note that Canon will not be held responsible for any damages caused by the use of the Document Scan Lock mode or the inability to use the Document Scan Lock mode.

1.
Press (Settings/Registration).
2.
Press [Function Settings] → [Common] → [Print Settings].
3.
Press [Document Scan Lock Settings].
If the Secure Watermark is activated, press [Secure Watermark/Document Scan Lock].
4.
Select the Document Scan Lock mode.
To select the Forced Document Scan Lock mode:
To select the Printer Driver Document Scan Lock mode:
To select the Forced Document Scan Lock mode:
Press [Forced Document Scan Lock].
If the Secure Watermark is activated, press [Forced Secure Watermark/Doc. Scan Lock].
Press [Set] for the function (<Copy>/<Access Stored Files>/<Printer>) to set the Forced Document Scan Lock mode.
If the Secure Watermark is activated, press [Sec. Water. + Scan Lock] for the function (<Copy>/<Access Stored Files>/<Printer>) to set the Forced Document Scan Lock mode.
To select the Printer Driver Document Scan Lock mode:
Press [Printer Driver Document Scan Lock].
If the Secure Watermark is activated, press [Printer Driver Watermark/Doc. Scan Lock].
Press [Set].
If the Secure Watermark is activated, press [Sec. Water. + Scan Lock].
5.
Set the Secure Watermark.
Select the type of secure watermark to embed (Watermark, Date, Copy Set Numbering, Serial Number, or ID/User Name).
To select Watermark:
To select Date:
To select Copy Set Numbering:
To select Serial Number:
To select ID/User Name:
To select Watermark:
Press [Watermark] → press the <Watermark Type> drop-down list → select the watermark type.
If you select [Custom] from the <Watermark Type> drop-down list, press [Enter] → enter the desired text → press [OK].
NOTE
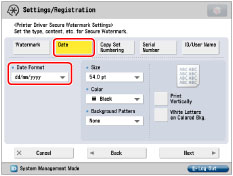
For instructions on entering characters, see "Entering Characters from the Touch Panel Display." If you have registered characters in [Register Characters for Page No./Watermark] in [Function Settings] (Settings/Registration), you can select the characters from the list.
To select Date:
Press [Date] → press the <Date Format> drop-down list → select the format of the date.
To select Copy Set Numbering:
Press [Copy Set Numbering] → set the starting number.
To select Serial Number:
Press [Serial Number].
NOTE
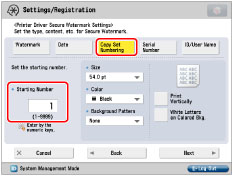
The Serial Number, which appears at the bottom left of the screen when you press (Counter Check) on the control panel, is printed.
To select ID/User Name:
Press [ID/User Name].
NOTE
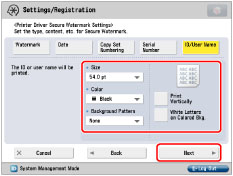
If a login service has been set, the Department ID and user name of the user who is currently logged in to the machine are printed.
The watermark "CONFIDENTIAL" is printed if a login service is not set.
6.
Set the background pattern, size, and text color → press [Next].
NOTE
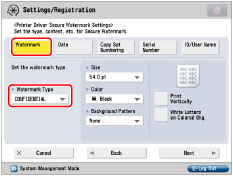
To print a pattern on the background of copy, select the background pattern from the Background Pattern drop-down list.
You can select [36.0 pt], [54.0 pt], or [72.0 pt] for the size of the text.
You can select magenta, cyan, or black for the color of the text.
To change the print orientation for characters, press [Print Vertically].
To use white letters on a colored background, press [White Letters on Colored Bkg.].
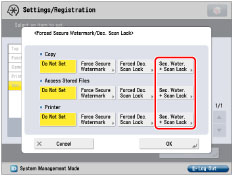
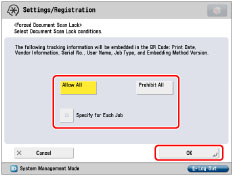
7.
Select the Document Scan Lock conditions → press [OK].
[Allow All]:
You can embed QR code which enables documents to be copied.
[Prohibit All]:
You can embed QR code which restricts copying documents. You cannot copy documents when [Prohibit All] is detected.
[Specify for Each Job]:
If you set this setting, you can select whether to embed QR code for each job from the Options screen in Copy and Access Stored Files functions.
IMPORTANT
When using the QR code, you can automatically embed tracking information that enables you to analyze by whom, when, and with which machine the document was output.
» Security » Preventing Information Leakage » Forced Secure Watermark/Document Scan Lock » Document Scan Lock Settings (QR Code) » Setting the Document Scan Lock Mode and Secure Watermark (QR Code)
06RH-25A