|
IMPORTANT
|
|
Before the TPM setting is activated, the System Manager must check that the default settings of the System Manger ID and System PIN (System Manger Settings) are changed. If the default settings of the System Manager ID and System PIN are not changed, user other than the administrator can backup and the TPM backup key may be taken. Since TPM key can only be backed up once, you cannot restore the TPM key.
Backup the TPM key immediately on to the USB memory after the TPM setting is activated.
For security reasons, you can only backup the TPM key once. Store the USB memory with the backup data in a safe place. Also, write down the password set when backing up and keep it in a safe place.
The security provided by TPM does not guarantee complete protection of the data and hardware. Note that Canon will not be liable for any failure or damages resulting from the use of this mode.
Insert the USB memory straight into the USB port. If the USB memory is inserted in an angle or if you insert a USB memory type not compliant with USB standard, the USB port may be damaged.
Do not remove the USB memory during backing up or restoring data. Doing so may cause damage to the USB memory, USB port, or the data inside of the USB memory. Also if the USB memory is removed when restoring, the machine may be damaged.
To use the USB memory, press [Preferences] (Settings/Registration) → [External Interface] → [USB Settings] → [Off] for <Use MEAP Driver for External USB Device>.
|
 (Settings/Registration).
 |
NOTE
|
|
If the TPM setting is activated, it may take longer to start the machine.
|
(Settings/Registration). 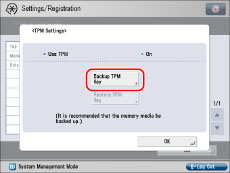
|
IMPORTANT
|
|
Before backing up, make sure that writing is allowed for the memory media connected to the machine.
Do not connect any other memory media.
|
(Settings/Registration). 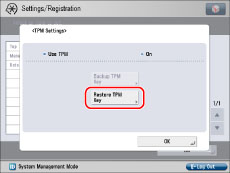
|
IMPORTANT
|
|
Before restoring, make sure that the memory media you used for backing up is connected to the machine.
Do not connect any other memory media.
|
|
IMPORTANT
|
|
Restoring of the TPM key recovers access to the HDD/SRAM that became inaccessible due to TPM chip failure, and does not recover the HDD/SRAM itself.
If initialization is performed following the steps for "Initializing All Data/Settings," all of the data encrypted by the TPM key is completely erased and the TPM setting becomes inactive.
For the backup of the TPM key, it is recommended that you use a USB memory with free space of 10 MB or more.
You can use the USB memory that is commercially available.
The FAT32 file system is supported for USB memory.
The following USB memory and usage are not supported.
USB memory with a security function or a memory card reader that connects via USB
Using the USB memory with an extension cable
Using the USB memory via a USB hub
USB memory not compliant with the USB standard
You may not be able to use properly, depending on the USB memory you are using.
When you are using USB memory, the machine cannot enter the Sleep mode. Also, the Auto Sleep Weekly Timer settings are ignored.
You cannot access the machine during backing up or restoring data in the USB memory.
The data on the machine is backed up on the USB memory after it has been encrypted. You cannot manage or browse the backed up data on the computer.
You cannot back up the TPM key for the following cases:
USB memory is write protected
USB memory is not connected
More than one USB memory is connected
Not enough free space in the connected USB memory
TPM key does not exist on the machine
You cannot restore the TPM key for the following cases:
USB memory is not connected
More than one USB memory is connected
A TPM key does not exist on the USB memory
The TPM key on the USB memory is not correct
|
|
NOTE
|
|
The setting is effective only after you restart the machine (the main power switch is turned OFF, and then back ON). For instructions on restarting the machine (turning the main power switch OFF, and then ON), see "Main Power and Energy Saver Key."
|
