Top Site mapHelpGlossary Site mapHelpGlossary | |
 Category Top
 Sending/Receiving a FaxMain Features for Sending FaxesOverview of This FunctionAdditional LinesThings You Must Do Before Using This MachineFlow of Sending Fax OperationsSending Fax Documents ManuallyCanceling a JobSpecifying DestinationsSpecifying Destinations Using the Address Book (Local)Specifying Destinations Using the Address Book (Remote)Specifying Destinations Using the Address Book (LDAP Server)Entering a New Fax NumberSpecifying Destinations Using One-Touch ButtonsRecalling Previous Settings and Sending a FaxFavorite SettingsChecking/Editing/Deleting the Information for a DestinationStoring New AddressesStoring Fax NumbersStoring Group AddressesStoring Addresses Obtained via an LDAP ServerStoring/Editing/Deleting One-Touch ButtonsRegistering/Editing/Deleting Favorite SettingsRegistering/Editing Favorite SettingsChecking Favorite SettingsEditing a Name/CommentDeleting Favorite SettingsChecking/Editing/Deleting a Stored AddressAssigning ShortcutsSetting the ResolutionSpecifying/Registering Scan SizesSwitching to Direct SendingSetting Original Type2-Sided OriginalAdjusting Density ManuallyAdjusting Background DensityAdjusting the Image SharpnessErase FrameSelecting the Sender's Name When Sending a FaxSelecting the Telephone Line When Sending a FaxDelayed SendPreviewPrinting the TX ReportProcessing Received DocumentsReceiving DocumentsSetting the Memory Lock ModeForwarding Received DocumentsAvailable Paper SizesSending with a SubaddressUsing a PIN CodeFax Information ServicesWhen Problems OccurTrouble Sending Fax DocumentsTrouble Receiving Fax DocumentsTrouble in Other SituationsQuestions & AnswersSending a Fax from a Computer (Windows)System RequirementsBefore Sending a Fax from a ComputerInstallationSetting the Fax OptionsFaxing FundamentalsFaxingSpecifying the Default Fax SettingsViewing HelpUsing Subaddresses for Secure TransmissionSetting the Fax Send TimeAttaching a Cover SheetRegistering a Profile for FaxingSelecting a Profile for FaxingRegistering a Person in an Address BookRegistering a Group in an Address BookImporting Address Book EntriesExporting Address Book EntriesChanging the Address Book Export Destination
 Sending a Fax from a Computer (Mac OS)System RequirementsBefore Sending a Fax from a ComputerInstallationSetting the Fax OptionsVerifying the Fax InformationManually Setting the Fax OptionsFaxing FundamentalsFaxingViewing HelpOutputting Multiple Pages on One SheetSetting the Output RangeUsing Subaddresses for Secure TransmissionSetting the Fax Send Time
 Attaching a Cover SheetEditing Address BooksDisplaying an Address Book (Mac OS X 10.5)Displaying an Address Book (Mac OS X 10.6 and later)Adding/Editing Address Information (Cards)Importing an Address BookExporting an Address Book
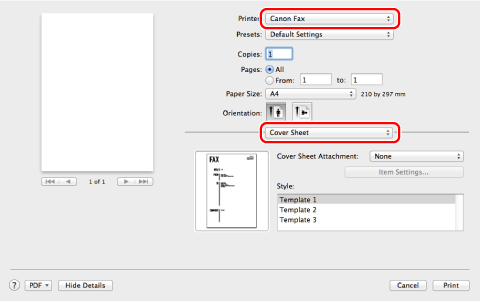


|
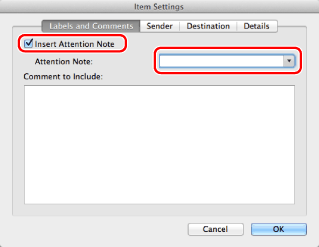
NOTE
|
|
The destination information specified in the address book is automatically printed on the cover sheet.
|
|
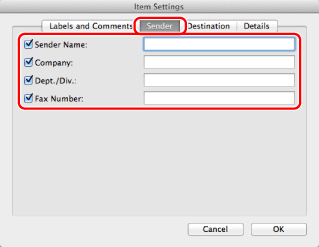
NOTE
|
|
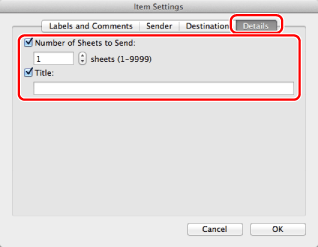
The number of pages sent is not automatically calculated. The number of pages entered in this tab is displayed on the cover sheet.
|
|
NOTE
|
|
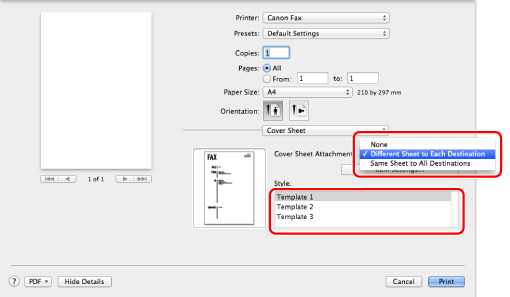
The maximum number of destinations you can send a fax to at any one time differs depending on whether a cover sheet is attached to the fax. For details, refer to the Readme file.
The display may vary according to the operating system and fax driver version you are using.
|
| Copyright CANON INC. 2015 | Disclaimers CopyrightTrademarksThird Party SoftwareOffice LocationsUSRM2-5563-00 CopyrightTrademarksThird Party SoftwareOffice LocationsUSRM2-5563-00 |
|---|
 Expand all
 Collapse all
 Search options