e-ManualTopSite mapHelpGlossary

Category Top

Clearing Paper Jams

Locations of Paper Jams

Main Unit

Right Cover of the Machine

Right Cover of the Machine (When the Multi-drawer Paper Deck-A1 is attached)

Left Cover of the Machine

Left Cover of the Machine (When the Buffer Pass Unit-J1 is attached)

Fixing Transport Unit

Paper Sources

Multi-purpose Tray

Paper Drawers 3 and 4

Paper Drawers (Right/Left)

Paper Deck Unit-C1/POD Deck Lite-A1 (Optional)

Front Cover of the Multi-drawer Paper Deck-A1 (Optional)

Paper Decks of the Multi-drawer Paper Deck-A1 (Optional)

Duplex Color Image Reader Unit-F1 (Optional)

Buffer Pass Unit-J1

Document Insertion Unit-H1 (Optional)

Professional Puncher Integration Unit-B1 (Optional)

Paper Folding Unit-G1 (Optional)

Staple Finisher-K1 (Optional)

Booklet Finisher-K1 (Optional)

Inside the Front Cover

Saddle Stitcher Unit

Document Insertion/Folding Unit-G1/Document Insertion Unit-J1 (Optional)

Insertion Unit

Inside the Insertion Unit

Folding Unit

External 2/3 Hole Puncher-A1 (Optional)

Staple Finisher-L1/Booklet Finisher-L1 (Optional)

Inside the Top Cover

Output Area

Front Cover of the Booklet Finisher-L1

Saddle Stitcher Unit of the Booklet Finisher-L1

Reducing the Frequency of Paper Jams

Clearing Staple Jams (For Optional Products)

Locations of Staple Jams

Stapler Unit of the Staple Finisher-K1/Booklet Finisher-K1

Saddle Stitcher Unit of the Booklet Finisher-K1

Staple Finisher-L1/Booklet Finisher-L1

Saddle Stitcher Unit of the Booklet Finisher-L1

If Memory Becomes Full During Scanning

If OCR (Text Searchable) Performs Inadequately

Printer/Fax Driver Troubleshooting

Service Call Message

List of Error Messages

General

Fax

Scan and Send

Scan and Store/Access Stored Files

Quick Menu

Printer

Network/Security

MEAP

User Setting Information Management

List of Error Codes without Messages

Top » Problem Solving » Clearing Paper Jams » Booklet Finisher-K1 (Optional) » Saddle Stitcher Unit
Saddle Stitcher Unit
08JK-0LL
Follow the procedure described below, while referring to the location of the paper jam and the directions that appear on the touch panel display, to remove the jammed paper.
NOTE
The following illustration indicates the location of the paper jam. Please refer to it to remove the jammed paper.
*Front Guide
**Delivery Guide

1.
Open the front cover of the finisher.
2.
Open the guide (F-C1).
3.
Open the guide (F-C2).
4.
Remove any jammed paper.
1. Turn the lower dial (F-C3) in the direction of the arrow (counterclockwise).
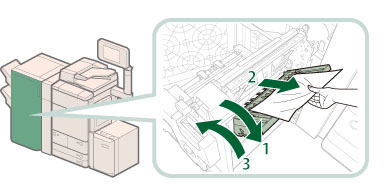
Jammed paper is fed to the guide (F-C2).
2. Remove any jammed paper.
3. Close the guide (F-C2).
CAUTION
When closing the guide, be careful not to get your fingers caught, as this may result in personal injury.
5.
Close the guide (F-C1).
CAUTION
When closing the guide, be careful not to get your fingers caught, as this may result in personal injury.
6.
If the lamp is ON, while pushing in the dial (F-C4), turn it in the direction of the arrow (counterclockwise) until the lamp turns off.
* Lamp
If the lamp is OFF, proceed to step 7.
7.
Remove output sheets from the booklet tray.
8.
Pull out the saddle stitcher unit (F-C5).
9.
Remove any jammed paper from the right cover of the saddle stitcher unit (F-C6).
1. Open the right cover (F-C6).
2. Remove any jammed paper.
3.Close the right cover (F-C6).
CAUTION
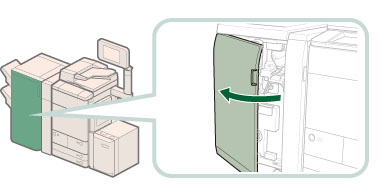
When closing the cover, be careful not to get your fingers caught, as this may result in personal injury.
10.
If parts of the paper are left on top of the feeding belt, open the guide, and remove any parts of the paper left.
1. Open the delivery guide, and remove any jammed paper.
2. Close the delivery guide.
CAUTION
When closing the guide, be careful not to get your fingers caught, as this may result in personal injury.
IMPORTANT
This procedure is only required if the Inner Booklet Trimmer-A1 is not attached.
11.
Push the saddle stitcher unit (F-C5), and close the front cover of the finisher.
1. Gently push the saddle stitcher unit (F-C5) back into the machine.
Always make sure to push the saddle stitcher unit in as far as it can go.
2. Close the front cover of the finisher.
CAUTION
When returning the saddle stitcher unit to its original position or closing the cover, be careful not to get your fingers caught, as this may result in personal injury.
12.
Follow the instructions on the screen.
NOTE
The screen indicating the directions on how to clear the paper jam is displayed repeatedly until the paper jam is cleared.