e-ManualTopSite mapHelpGlossary

Category Top

Clearing Paper Jams

Locations of Paper Jams

Main Unit

Right Cover of the Machine

Right Cover of the Machine (When the Multi-drawer Paper Deck-A1 is attached)

Left Cover of the Machine

Left Cover of the Machine (When the Buffer Pass Unit-J1 is attached)

Fixing Transport Unit

Paper Sources

Multi-purpose Tray

Paper Drawers 3 and 4

Paper Drawers (Right/Left)

Paper Deck Unit-C1/POD Deck Lite-A1 (Optional)

Front Cover of the Multi-drawer Paper Deck-A1 (Optional)

Paper Decks of the Multi-drawer Paper Deck-A1 (Optional)

Duplex Color Image Reader Unit-F1 (Optional)

Buffer Pass Unit-J1

Document Insertion Unit-H1 (Optional)

Professional Puncher Integration Unit-B1 (Optional)

Paper Folding Unit-G1 (Optional)

Staple Finisher-K1 (Optional)

Booklet Finisher-K1 (Optional)

Inside the Front Cover

Saddle Stitcher Unit

Document Insertion/Folding Unit-G1/Document Insertion Unit-J1 (Optional)

Insertion Unit

Inside the Insertion Unit

Folding Unit

External 2/3 Hole Puncher-A1 (Optional)

Staple Finisher-L1/Booklet Finisher-L1 (Optional)

Inside the Top Cover

Output Area

Front Cover of the Booklet Finisher-L1

Saddle Stitcher Unit of the Booklet Finisher-L1

Reducing the Frequency of Paper Jams

Clearing Staple Jams (For Optional Products)

Locations of Staple Jams

Stapler Unit of the Staple Finisher-K1/Booklet Finisher-K1

Saddle Stitcher Unit of the Booklet Finisher-K1

Staple Finisher-L1/Booklet Finisher-L1

Saddle Stitcher Unit of the Booklet Finisher-L1

If Memory Becomes Full During Scanning

If OCR (Text Searchable) Performs Inadequately

Printer/Fax Driver Troubleshooting

Service Call Message

List of Error Messages

General

Fax

Scan and Send

Scan and Store/Access Stored Files

Quick Menu

Printer

Network/Security

MEAP

User Setting Information Management

List of Error Codes without Messages

Top » Problem Solving » Clearing Paper Jams » Document Insertion Unit-H1 (Optional)
Document Insertion Unit-H1 (Optional)
08JK-0LC
If a paper jam occurs inside the Document Insertion Unit-H1, a screen indicating prompting you to remove the jammed paper how to clear the jam appears on the touch panel display. Follow the procedure described below, while referring to the directions that appear on the touch panel display, to remove the jammed paper.
IMPORTANT
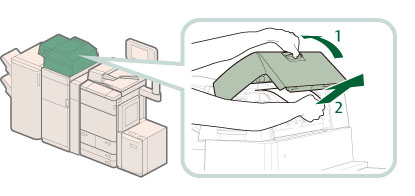
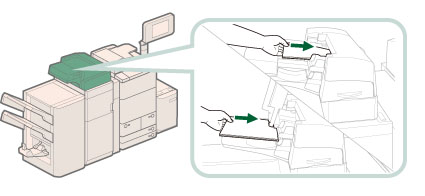
The part of the Document Insertion Unit-H1 may interfere with the finisher when clearing jams. Lift up the insertion unit before removing jams from the finisher.
NOTE
The following illustration indicates the location of the paper jam. Please refer to it to remove the jammed paper.
*Front Cover
The Document Insertion Unit-H1 is an optional product.

1.
Remove the paper that is not jammed from the Document Insertion Unit-H1.
2.
Remove any paper jammed in the upper cover (I-I1) of the document insertion unit.
1. Open the upper cover (I-I1) of the document insertion unit.
2. Remove any jammed paper.
3.
Remove any paper jammed in the guide (I-I2).
1. Open the guide (I-I2).
2. Remove any jammed paper.
4.
Close the guide (I-I2) and the upper cover (I-I1).
1. Close the guide (I-I2).
2. Close the upper cover (I-I1).
CAUTION
When closing the guide and upper cover, be careful not to get your fingers caught, as this may result in personal injury.
5.
Open the document insertion unit.
6.
Remove any paper jammed in the guide (I-13).
1. Open the guide (I-13).
2. Remove any jammed paper.
7.
Close the guide (I-13) and the document insertion unit.
1. Close the guide (I-13).
2. Close the document insertion unit.
CAUTION
When closing the guide and the document insertion unit, be careful not to get your fingers caught, as this may result in personal injury.
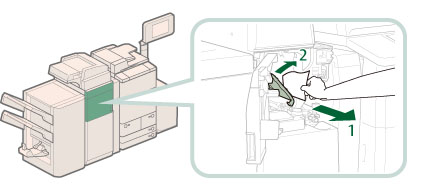
8.
Open the front cover of the Document Insertion Unit-H1.
9.
Open the guide (I-A1).
CAUTION
When opening the guide (l-A1), be careful not to get your fingers caught, as this may result in personal injury.
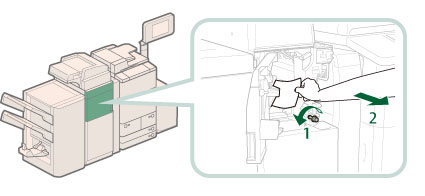
10.
Remove any paper jammed in the guide (I-A1).
1. Remove any jammed paper.
2. Close the guide (I-A1).
CAUTION
When closing the guide, be careful not to get your fingers caught, as this may result in personal injury.
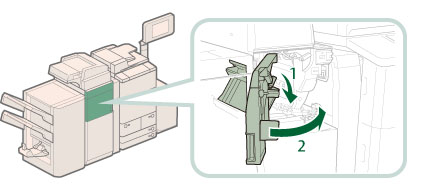
11.
Open the guide (I-A2).
CAUTION
When opening the guide (l-A2), be careful not to get your fingers caught, as this may result in personal injury.
12.
Turn the dial (I-A3), and remove any jammed paper.
1. Turn the dial (I-A3) in the direction of the arrow (counterclockwise).
2. Remove any jammed paper.
13.
Close the guide (I-A2) and the front cover.
1. Close the guide (I-A2).
2. Close the front cover.
CAUTION
When closing the guide and the cover, be careful not to get your fingers caught, as this may result in personal injury.
NOTE
If the paper jam message is displayed even after the paper jam is cleared, check whether there is any paper left by opening the entrance guide.
14.
Reload the paper into the document insertion unit.
15.
Follow the instructions on the screen.
NOTE
The screen indicating the directions on how to clear the paper jam is displayed repeatedly until the paper jam is cleared.