You can manually specify basic copy ratios, or set them automatically.
You can set a copy (zoom) ratio from 25% to 400% if you place the original on the platen glass, or from 25% to 200% if you place the original in the feeder.
|
IMPORTANT
|
|
Place your original horizontally when enlarging in the following ways with a preset zoom: Placing an original horizontally means setting the original with the longer side sideways. (See "Orientation.")
LTR → 11" x 17", LGL
STMT → 11" x 17"
|
1.
Press [Copy].
2.
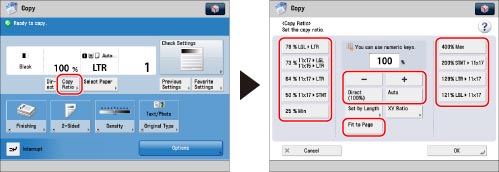
Press [Copy Ratio] → set the copy ratio as necessary.
|
IMPORTANT
|
|
[Select Paper] must be set to [Auto].
|
You can use preset copy (zoom) ratios to enlarge or reduce standard size originals to other standard sizes.
Select the copy ratio.
You can enlarge or reduce originals by any copy ratio in 1% increments. The same copy ratio is used for the horizontal and vertical axes.
Press [-] or [+] to specify the copy ratio.
You can automatically enlarge or reduce an original to a specified paper size. The same copy ratio is used for the horizontal and vertical axes.
Press [Auto].
|
IMPORTANT
|
|
If you set [Auto], manually select a paper size. If you do not select a paper size, the copy ratio is automatically set to match the paper loaded in Paper Drawer 1 or the right paper deck of the main unit.
|
This mode slightly reduces the original when copying to paper of the same size. This enables you to avoid unwanted cropping at the edges of large images and text.
Press [Fit to Page].
3.
Press [OK].
|
IMPORTANT
|
|
For information on the modes which cannot be set in combination with this mode, see "Combination of Functions Chart."
If you are reducing 11" x 17" originals to LTR size with [Auto Orientation] set to 'Off', load LTRR paper in a paper drawer or the multi-purpose tray.
You cannot copy highly transparent originals, such as transparencies, in the Auto Zoom mode. Use the Preset Zoom or Zoom by Percentage mode instead.
To use [Auto], your originals must conform to one of the following standard paper sizes:
11" x 17", LGL, LTR, LTRR, STMT, or STMTR (You can place STMTR originals only on the platen glass.)
|
|
NOTE
|
|
If the output size differs from your specified copy ratio, you can adjust it using [Fine Adjust Zoom] in [Adjustment/Maintenance] (Settings/Registration). (See "Fine Adjust Zoom.")
The reduction ratios when [Fit to Page] is specified are:
11" x 17"/LGL: approximately 98%
LTR: approximately 97%
STMT: approximately 96%
To return the ratio to 100%, press [Direct (100%)].
|