|
|
Top ContentsHelpGlossary ContentsHelpGlossary |
||
|---|---|---|---|
|
Category
|
|
 Category TopOverview of This FunctionFlow of Copy OperationsCanceling a Copy JobReserved CopyingCopy SampleRecalling Previous Copy Jobs (Previous Settings)
 Storing, Recalling, and Deleting Favorite Settings (Favorite Settings)Storing Favorite SettingsRecalling and Deleting Favorite SettingsAssigning ShortcutsChanging and Canceling Copy SettingsInterrupt ModeChanging Basic Copy RatiosZoom by LengthSetting the X and Y Axes IndependentlyPaper SelectionBook→2 PagesTwo-Sided CopyingCollating CopiesBooklet ModeJob BuildN on 1Add CoverInserting SheetsDifferent Size OriginalsAdjusting Density ManuallyAdjusting Background DensitySelecting the Original TypeInserting Sheets When Copying Onto TransparenciesAdding a Secure WatermarkDocument Scan LockPage NumberingCopy Set NumberingAdjusting the Image SharpnessErase FrameWatermark PrintingDate PrintingShifting the Original ImageGutter ModePrint & CheckInverting Images (Nega/Posi)Repeat ImagesMerge Job BlocksJob Done NoticeMirror ImageStore in Mail BoxSuperimpose ImageCascade CopyVarious Features of the Express Copy Basic Features ScreenOperating the Express Copy Basic Features ScreenSetting Shortcuts on the Express Copy Basic Features ScreenAppendix

|
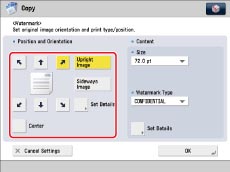
[Upright Image]:
|
Press this if you are placing originals upright.
|
|
[Sideways Image]:
|
Press this if you are placing originals sideways.
|
|
Upright Image
|
Sideways Image
|
|||
 |
 |
 |
 |
 |
|
Vertical Placement
|
Horizontal Placement
|
Vertical Placement
|
Horizontal Placement
|
|
|
NOTE
|
|
If you set any two of [Page Numbering], [Copy Set Numbering], or [Print Date] to print in the same position, a confirmation message appears when you press
 (Start). (Start). |
|
IMPORTANT
|
|
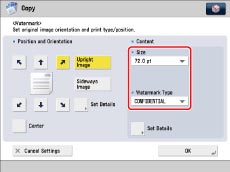
Text that you enter in [Custom] is not automatically saved. If you want to register text to be selected with watermarks whenever necessary, press [Register] → enter the text to be registered.
|
|
NOTE
|
|
You can also select text that has been registered in [Register Characters for Page No./Watermark]. (See "Registering/Editing/Deleting User-Defined Text for Page Numbers and Watermarks.")
|
|
IMPORTANT
|
|
For information on the modes which cannot be set in combination with this mode, see "Combination of Functions Chart."
Printing performance may not be optimal, depending on the original content and combination of settings.
If you use [Watermark] with [Add Cover] or [Insert Sheets], numbers will not be printed on the inserted pages.
|
| © CANON Inc. 2011 All Rights Reserved. | Disclaimer CopyrightTrademarksOffice LocationsUSRM1-9634-00 CopyrightTrademarksOffice LocationsUSRM1-9634-00 |
|---|