e-ManualTopSite mapHelp

Category Top

Overview of This Function

Registering Custom Paper Types

Changing the Name

Changing the Basis Weight

Changing the Size

Changing the Finishing Type

Changing the Type

Changing the Color

Setting the Second Side of Two-Sided Page

Adjusting the Creep (Displacement) Correction

Changing the Fiber Direction

Adjusting the Level of Curl Correction

Adjusting Fan Level for Paper Separation

Adjusting Paper Conveyance for 2-Sided Printing

Adjusting the Image Position

Correct Image Misalignment

Adjusting the Skew Correction Level of the Fed Paper

Correct Distortion (Parallelogram)

Correct Distortion (Trapezoid)

Adjusting the Zoom Ratio of the Image

Adjusting Left Edge Alignment of the Image

Adjusting Lead Edge Alignment of the Image

Automatically Correcting the Back Side Lead Edge Alignment of the Image

Adjusting Front/Back Side Edge Alignment of the Image by Scanning the Guide Sheet

Adjusting the Lead Edge/Tail End Margins

Adjusting the Total Amount of Toner

Adjusting the Secondary Transfer Voltage

Adjusting the Secondary Transfer Antistatic Bias

Adjusting the Image Clear Level of the ITB (Intermediate Transfer Belt)

Adjusting Secondary Transfer Belt Speed

Adjusting the Gloss and Fine Black

Adjusting the Saddle Stitch Position

Adjusting the Saddle Stitch Fold Placement

Adjusting the Saddle Fold Placement

Adjusting the Position of Punch Holes

Changing the Tail End White Patch Correction

Disabling Tail End Toner Correction

Adjusting the Primary Transfer Voltage

Adjusting Lead Edge Secondary Transfer Voltage

Deleting Custom Paper Types

Top » Paper Type Management » Adjusting the Image Position » Adjusting Front/Back Side Edge Alignment of the Image by Scanning the Guide Sheet
Adjusting Front/Back Side Edge Alignment of the Image by Scanning the Guide Sheet
0S9Y-1RY
If the images on the front and back sides are misaligned with each other, you can adjust the alignment of the images by scanning the test pages with the guide sheet.
IMPORTANT
Clean the platen glass and the underside of the feeder before adjustment. (See "Originals Cannot Be Scanned Properly (Cleaning the Platen Glass).")
In order to use this function, the guide sheet is required. For more information, contact your local authorized Canon dealer.
Before adjustment, print the guide sheet (A3 or 11" x 17") under the following conditions. Accurate adjustment may not be possible if the guide sheet is not printed correctly.
Select the same size as the guide sheet.
Use paper with a weight of more than 200 g/m2.
Set the zoom ratio as 100%.

1.
Press (Settings/Registration).
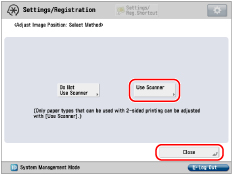
2.
Press [Preferences] → [Paper Settings] → [Paper Type Management Settings].
3.
Select the paper type that you want to edit from the list → press [Details/ Edit].
4.
Press [Change] for <Adjust Image Position>.
5.
Press [Use Scanner].
6.
Enter the number of test page to make → press [Next].
NOTE
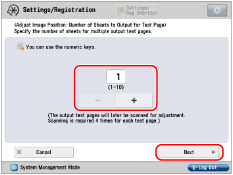
The larger the number of output test pages, the more accurate the adjustment is.
If specifying multiple output test pages, make sure that all of the test pages are scanned in the order they are output. If the order is changed or the scanning process is not performed successively, the adjustment may not be made correctly.
7.
Select the paper source that contains the paper type to adjust → press [Start Printing].
The test page is printed.
8.
Place the guide sheet on the platen glass, and align the arrow of the sheet with the arrow on the platen glass.
9.
Align the mark on the test page for the first scan operation with the mark on the guide sheet.
10.
Close the feeder → press [Start Scanning].
NOTE
Open and close the feeder gently. Make sure that the guide sheet remains aligned when closing the feeder.
11.
Turn the test page upside down, and align the mark on the test page for the second scan operation with the mark on the guide sheet → press [Start Scanning].
12.
Turn the test page over, and align the mark on the test page for the third scan operation with the mark on the guide sheet →press [Start Scanning].
13.
Turn the test page upside down, and align the mark on the test page for the fourth scan operation with the mark on the guide sheet→press [Start Scanning].
14.
Adjustment is complete.
If you have specified multiple output test pages, repeat steps 9 to 13 for all of the output test pages. In this case, adjustment is complete when all of the test pages have been scanned.
Make sure that the test pages are scanned in the order they are output.