e-Manual TopContentsHelpGlossary
Category
Top » Fax » Using PC Fax » Useful Fax Functions (PC Fax) » Attaching a Cover Sheet (PC Fax)

Category Top

Using the Fax Functions

Preparing to Use the Fax Functions

Registering Destinations in the Address Book

Basic Sending Procedure

Basic Procedures for Sending Faxes

Specifying Destinations

Changing the Scan Settings (Fax)

Canceling Fax Jobs

Redialing (Manual Redialing)

Attention (Manual Redialing)

Useful Features

Notifying the Recipient of an Incoming Fax by Telephone (Manual Sending)

Attention (Manual Sending)

Push-button Telephone for Tone Dialing

Attention (Push-button Telephone for Tone Dialing)

Sending a Fax Abroad (Adding Pauses)

Sending to Multiple Destinations at a Time (Sequential Broadcast)

Attention (Sequential Broadcast)

Changing the Default Fax Settings

Changing Fax Settings (Settings that Can Be Specified Using the [Menu] Button)

Configuring Send Settings

Register Unit Telephone Number
Select Line Type
Off-Hook Alarm
Change Defaults
Register Unit Name (Fax)
ECM TX
Pause Time
Auto Redial
Sender ID
Check Dial Tone Before Sending

Configuring System Settings

TX Start Speed
Address Book PIN
Restrict New Destinations
Allow Fax Driver TX
Restrict History TX
Fax No. Confirmation Re-Entry
Restrict Sequential Broadcast

Receiving Faxes

RX Mode

Changing the Receive Mode

Advanced Settings for the Fax/Tel Auto Switch Mode

Forwarding Fax Documents

Setting Document Transfer (Automatic Forwarding)

Configurating Operations for Transfer Errors

Re-forwarding/Printing/Deleting Documents in Which Transfer Is Failed

Forwarding Received Faxes Stored in Memory to Other Destinations (Manual Forwarding)

Managing Faxes Stored in Memory

Checking and Canceling Fax Jobs

Combining and Printing the Received Documents You Saved

Checking and Deleting Received Faxes

Checking the History of Received/Sent Faxes

Changing Fax Settings (Settings that Can Be Specified Using the [Menu] Button)

Configuring Receiving Settings

ECM RX
Incoming Ring
Remote RX
Auto RX Switch
2-Sided Printing
Reduce RX Size
RX Page Footer
Continue Printing When Toner Is Low

Configuring System Settings

RX Start Speed
Memory Lock Settings
Select Country/Region

Using PC Fax

Preparation to Use PC Faxing

System Requirements (PC Fax)

Where to Find Help (PC Fax)

Faxing Fundamentals (PC Fax)

Faxing (PC Fax)

Specifying the Default Fax Settings (PC Fax)

Setting Up the Fax Configuration (PC Fax)

Viewing the Online Help (PC Fax)

Useful Fax Functions (PC Fax)

Attaching a Cover Sheet (PC Fax)

Using the Address Book (PC Fax)

Registering a Profile for Faxing

Selecting a Profile for Faxing

Registering a Person in an Address Book (PC Fax)

Registering a Group in an Address Book (PC Fax)

Importing Address Book Entries (PC Fax)

Exporting Address Book Entries (PC Fax)

Changing the Address Book Export Destination (PC Fax)

Collapse all|Expand all
Attaching a Cover Sheet (PC Fax)
07K4-09W
To attach a cover sheet to the fax, follow the procedure below.
1.
Click [Cover Sheet].
NOTE
See "Faxing (PC Fax)" on how to display the fax driver screen.
2.
Select an option for attaching the cover sheet from [Cover Sheet Attachment].
3.
Select a template from [Style].
You can register a preferred cover sheet beforehand. For details, view the online help. (See "Viewing the Online Help (PC Fax).")
4.
If you want to specify the items to include on the cover sheet, click [Settings].
If you do not specify the items to include on the cover sheet, proceed to Step 11.
5.
Select items you want to print on the cover sheet regarding the sender -> enter the information.
NOTE
You can save the information entered in the [Sender] sheet in a file by clicking [Save Sender]. Then, when you send a fax, you can import the information by using [Import Sender], instead of entering the sender information each time you send a fax.
6.
Click [Destination] -> select items you want to print on the cover sheet regarding the destination.
NOTE
The information of the destinations specified in the [Sending Settings] sheet prints on the cover sheet.
7.
Specify a logo or signature if necessary.
Click [Logo] or [Signature].
Select [Print with Logo] or [Print with Signature] to include a logo or signature on the cover sheet.
Click [Browse] -> specify the magnification and position of the selected logo or signature.
8.
If you want to include a title or the number of sheets that you are going to send in the cover sheet, click [Details] -> select items you want to include -> specify the information.
NOTE
The number of sheets is not counted automatically. The number which you entered manually is shown on the cover sheet.
9.
Click [OK].
10.
If you want to insert an attention note, select [Insert Attention Note] -> select a note from [Attention Note].
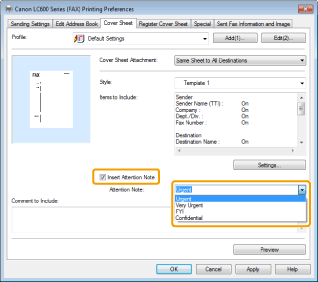
You can also enter the characters you want to insert. You can enter up to 30 characters.
Enter any other information in [Comment to Include] as necessary.
11.
If you want to check the preview image on the cover sheet, click [Preview].
12.
Click [OK].
The specified cover sheet is attached to the fax when the fax is sent.
NOTE
The number of recipients to which you can send simultaneously depends on how a cover sheet is attached. For details, see the online help. (See "Viewing the Online Help (PC Fax).")
The display may differ according to the operating system and system environment.