e-Manual TopContentsHelpGlossary
Category
Top » Fax » Using the Fax Functions » Basic Sending Procedure » Changing the Scan Settings (Fax)

Category Top

Using the Fax Functions

Preparing to Use the Fax Functions

Registering Destinations in the Address Book

Basic Sending Procedure

Basic Procedures for Sending Faxes

Specifying Destinations

Changing the Scan Settings (Fax)

Canceling Fax Jobs

Redialing (Manual Redialing)

Attention (Manual Redialing)

Useful Features

Notifying the Recipient of an Incoming Fax by Telephone (Manual Sending)

Attention (Manual Sending)

Push-button Telephone for Tone Dialing

Attention (Push-button Telephone for Tone Dialing)

Sending a Fax Abroad (Adding Pauses)

Sending to Multiple Destinations at a Time (Sequential Broadcast)

Attention (Sequential Broadcast)

Changing the Default Fax Settings

Changing Fax Settings (Settings that Can Be Specified Using the [Menu] Button)

Configuring Send Settings

Register Unit Telephone Number
Select Line Type
Off-Hook Alarm
Change Defaults
Register Unit Name (Fax)
ECM TX
Pause Time
Auto Redial
Sender ID
Check Dial Tone Before Sending

Configuring System Settings

TX Start Speed
Address Book PIN
Restrict New Destinations
Allow Fax Driver TX
Restrict History TX
Fax No. Confirmation Re-Entry
Restrict Sequential Broadcast

Receiving Faxes

RX Mode

Changing the Receive Mode

Advanced Settings for the Fax/Tel Auto Switch Mode

Forwarding Fax Documents

Setting Document Transfer (Automatic Forwarding)

Configurating Operations for Transfer Errors

Re-forwarding/Printing/Deleting Documents in Which Transfer Is Failed

Forwarding Received Faxes Stored in Memory to Other Destinations (Manual Forwarding)

Managing Faxes Stored in Memory

Checking and Canceling Fax Jobs

Combining and Printing the Received Documents You Saved

Checking and Deleting Received Faxes

Checking the History of Received/Sent Faxes

Changing Fax Settings (Settings that Can Be Specified Using the [Menu] Button)

Configuring Receiving Settings

ECM RX
Incoming Ring
Remote RX
Auto RX Switch
2-Sided Printing
Reduce RX Size
RX Page Footer
Continue Printing When Toner Is Low

Configuring System Settings

RX Start Speed
Memory Lock Settings
Select Country/Region

Using PC Fax

Preparation to Use PC Faxing

System Requirements (PC Fax)

Where to Find Help (PC Fax)

Faxing Fundamentals (PC Fax)

Faxing (PC Fax)

Specifying the Default Fax Settings (PC Fax)

Setting Up the Fax Configuration (PC Fax)

Viewing the Online Help (PC Fax)

Useful Fax Functions (PC Fax)

Attaching a Cover Sheet (PC Fax)

Using the Address Book (PC Fax)

Registering a Profile for Faxing

Selecting a Profile for Faxing

Registering a Person in an Address Book (PC Fax)

Registering a Group in an Address Book (PC Fax)

Importing Address Book Entries (PC Fax)

Exporting Address Book Entries (PC Fax)

Changing the Address Book Export Destination (PC Fax)

Collapse all|Expand all
Changing the Scan Settings (Fax)
07K4-06X
This section describes how to change the following scan settings to send a fax.
For the instructions on how to send a fax, see "Basic Procedures for Sending Faxes."
Resolution
Specify the resolution.
Higher resolutions result in better image quality but require longer transmission times.
<200 x 100 dpi (Normal)>
For faxes that contain text
<200 x 200 dpi (Fine)>
For faxes that contain fine text
<200 x 200 dpi (Photo)>
For faxes that contain photographs
<200 x 400 dpi (Superfine)>
Achieves an even finer resolution than (Fine)
<400 x 400 dpi (Ultrafine)>
Achieves an even finer resolution than (Superfine)
Density
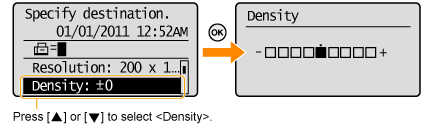
Specify the density.
[]
Decrease the density.
[]
Increase the density.
2-Sided Original
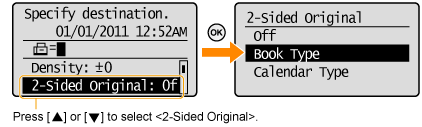
Set the scan settings for 2-sided original documents.
<Off>
The direction of 2-sided original documents are not set.
<Book Type>
Select this setting if the top and bottom of the images are the same on both pages.
<Calendar Type>
Select this setting if the top and bottom of the images on each page are opposite each other.
Sharpness
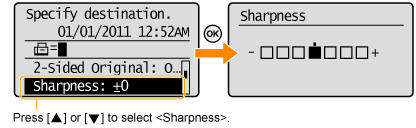
Adjust this setting to emphasize the outline of the image or decrease the contrast.
[]
To clearly capture halftone photos, adjust this setting to the appropriate level on the <-> scale. This can counteract the effect of moiré patterns (uneven gradation and striped patterns).
[]
To clearly capture text or lines, adjust this setting to the appropriate level on the <+> scale. It is best suited for scanning blueprints and very weak pencil manuscripts.