
 -
-  (numeric keys),
  , and
, and  . You can also specify several numbers in succession, and send the original to several destinations in a single operation (Sequential Broadcast). - (numeric keys), , and . You can also specify several numbers in succession, and send the original to several destinations in a single operation (Sequential Broadcast).
 - (numeric keys), , and .
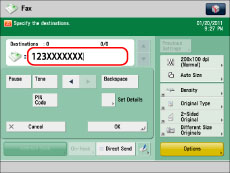 - (numeric keys), , and . - (numeric keys), , and .
|
IMPORTANT
|
|
If you want to attach a subaddress to your send job, make sure that the recipient's fax machine supports ITU-T (International Telecommunication Union - Telecommunication Standardization Sector) standard subaddresses. (See "Sending with a Subaddress.")
|
- (numeric keys), , and . - (numeric keys), , and .|
IMPORTANT
|
|
If you want to attach a subaddress to your send job, make sure that the recipient's fax machine supports ITU-T (International Telecommunication Union - Telecommunication Standardization Sector) standard subaddresses. (See "Sending with a Subaddress.")
|
|
IMPORTANT
|
|
You cannot insert a pause at the beginning of a number.
|
|
NOTE
|
|
If you enter a pause at the end of the number, the pause is always 10 seconds long.
|