e-ManualTopSite mapHelpGlossary

Category Top

Sending/Receiving a Fax

Main Features for Sending Faxes

Overview of This Function

Additional Lines

Things You Must Do Before Using This Machine

Flow of Sending Fax Operations

Sending Fax Documents Manually

Canceling a Job

Specifying Destinations

Specifying Destinations Using the Address Book (Local)

Specifying Destinations Using the Address Book (Remote)

Specifying Destinations Using the Address Book (LDAP Server)

Entering a New Fax Number

Specifying Destinations Using One-Touch Buttons

Recalling Previous Settings and Sending a Fax

Checking/Editing/Deleting the Information for a Destination

Storing New Addresses

Storing Fax Numbers

Storing Group Addresses

Storing Addresses Obtained via an LDAP Server

Storing/Editing/Deleting One-Touch Buttons

Checking/Editing/Deleting a Stored Address

Assigning Shortcuts

Setting the Resolution

Specifying/Registering Scan Sizes

Switching to Direct Sending

Setting Original Type

2-Sided Original

Book → 2 Pages

Different Size Originals

Adjusting Density Manually

Adjusting Background Density

Adjusting the Image Sharpness

Changing the Zoom Ratio

Erase Frame

Job Build

Selecting the Sender's Name When Sending a Fax

Selecting the Telephone Line When Sending a Fax

Delayed Send

Preview

Finished Stamp

Job Done Notice

Processing Received Documents

Receiving Documents

Setting the Memory Lock Mode

Forwarding Received Documents

Available Paper Sizes

Sending with a Subaddress

Using a PIN Code

Fax Information Services

When Problems Occur

Trouble Sending Fax Documents

Trouble Receiving Fax Documents

Trouble in Other Situations

Questions & Answers

Sending a Fax from a Computer (Windows)

System Requirements

Before Sending a Fax from a Computer

Installation

Setting the Fax Options

Faxing Fundamentals

Faxing

Specifying the Default Fax Settings

Viewing the Online Help

Using Subaddresses for Secure Transmission

Setting the Fax Send Time

Attaching a Cover Sheet

Registering a Profile for Faxing

Selecting a Profile for Faxing

Registering a Person in an Address Book

Registering a Group in an Address Book

Importing Address Book Entries

Exporting Address Book Entries

Changing the Address Book Export Destination

Sending a Fax from a Computer (Mac)

System Requirements

Before Sending a Fax from a Computer

Installation

Setting the Fax Options

Verifying the Fax Information
Manually Setting the Fax Options

Faxing Fundamentals

Faxing

Viewing the Online Help

Outputting Multiple Pages on One Sheet

Setting the Output Range

Using Subaddresses for Secure Transmission

Setting the Fax Send Time

Attaching a Cover Sheet

Registering a Person in an Address Book

Registering a Group in an Address Book

Importing an Address Book

Exporting an Address Book

Top » Fax » Sending/Receiving a Fax » Storing New Addresses » Storing Group Addresses
Storing Group Addresses
06RH-0SX
The Group Address feature enables you to create a group.
You can register up to 256 destinations in a group address.
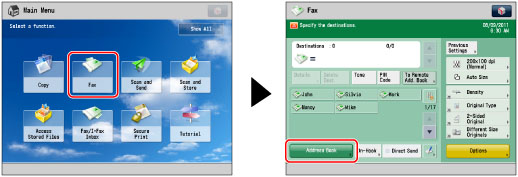
1.
Press [Fax] → [Address Book].
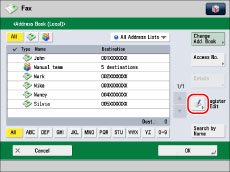
2.
Press [Register/Edit].
3.
Press [Register New Dest.].
4.
Select [Group].
5.
Press [Name].
6.
Enter a name for the destination → press [OK].
NOTE
The first character that you enter for the name is used for sorting the destination list when you press keys, such as [ABC], [DEF], and [GHI], on the Address Book screen. If [Search by Name] is pressed on the Address Book screen, a screen for narrowing the search in the Address Book appears.
7.
Press the drop-down list → select an address list from Address List 1 to 10.
Address lists are a convenient way to classify destinations.
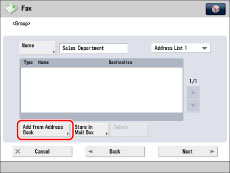
8.
Press [Add from Address Book].
To store destinations in a group address, the destinations must be stored in the address list that contains the group address.
If you select [Store in Mail Box], select the mail box → press [OK]. You can register only one mail box in a group address.
9.
Select the destination → press [OK].
You can select a destination and press [Details] to confirm the detailed information for the destination. Press [OK] to return to the previous screen.
To cancel a selected destination, select the destination again.
For instructions on searching for destinations registered in the Address Book, see "Address Book Screen."
NOTE
To delete a destination, select the destination to delete → press [Delete].
10.
Press [OK].
If you are managing Address Book access numbers, perform the procedure in step 9 of "Storing Fax Numbers."
11.
Press [Close] → [OK].

NOTE
If you want to store a group address, you can only select destinations registered in the same Address List.