|
|
Top ContentsHelpGlossary ContentsHelpGlossary |
||
|---|---|---|---|
|
Category
|
|
 Category TopPreface
 Digitizing Paper DocumentsScanning the Original and Sending to a ComputerAdding the Scanned Image via Network Scanner onto a DocumentEnabling PDF Documents to be Edited with Adobe Reader (Reader Extensions)Converting Scanned Documents into the Encrypted Searchable PDFPrinter DriverMerging and Printing Multiple DocumentsPrinting a Booklet (Windows)Printing a Booklet (Mac)Using Profiles to Print (Windows)Selecting Presets for Printing (Mac)Specifying the Printer Driver Default Settings (Windows)FaxTemporarily Storing and Viewing Received ImageHandling Junk FaxesAutomatically Forwarding Received FaxesAutomatically Forwarding Received Faxes to a ComputerForwarding to a Mobile Computing DeviceForwarding Received FaxesHandling Files with Forwarding ErrorsSharing Received Fax Documents in the Advanced BoxSharing Sent Fax Documents in the Advanced BoxChecking That the Sent Fax Was Delivered SuccessfullyAccessing the Fax Function of a Server MachineE-MailSending an E-mail to Multiple DestinationsUsing a Shared Address BookInternet Fax/Intranet FaxSending a Document via Internet FaxReceiving a Document via Internet FaxDepartment ID ManagementSetting a Department ID for CopyingSetting the Department ID Management on the Printer DriverMail Box and Advanced BoxStoring and Sending a DocumentCreating a Personal Space in the Advanced Box (Open to Public by WebDAV)Creating a Personal Space in the Advanced Box (Open to Public by SMB)Practically Applying Print DataBacking Up the Data Stored in the Mail BoxSecuritySystem ManagementSpecifying Copy Security SettingsPreventing Other Users to See the Printed DocumentsHard Disk Data SecuritySpecifying Send/Fax Security SettingsMail Box SecurityRestricting Access to the Machine (IPv4)Restricting Access to the Machine (IPv6)Advanced Copying and PrintingScanning Originals while the Machine is Processing a Job (Reserve Copy)Copying a Large Number of Documents Effectively with Two imageRUNNER ADVANCE (Cascade Copying)Printing and Copying with the Original Background ImagesPrinting Files Stored in the USB Memory Directly from the MachinePrinting Files Created with Different Applications as a Single FileCreating Address Labels by Scanning Business CardsCustomizing the Screen DisplayMaking Favorite Keys Highly VisibleRegistering a Series of Frequently Used Functions in One Button (Quick Menu)Recalling the Quick Menu of Another Machine
 Linkage between imageRUNNER ADVANCE Desktop and imageRUNNER ADVANCEUsing Advanced Box (imageRUNNER ADVANCE Desktop)Importing Received FAX Documents into Library (imageRUNNER ADVANCE Desktop)Sending Fax from a Computer (imageRUNNER ADVANCE Desktop)Performing Saddle Stitch Printing (imageRUNNER ADVANCE Desktop)Performing Complex Tasks at the Touch of a Button: Workflow ComposerCreating a Flow on a Computer (Workflow Composer)Duplicating/Editing a Flow to Create a Personal Flow (Workflow Composer)Executing a Flow on the Machine (Workflow Composer)
|
Required Condition
|
|
imageRUNNER ADVANCE Desktop is installed.
Booklet printing is supported by the printer.
Printer is equipped with the saddle-stitch finisher.
Printer driver is installed on the printer to perform booklet printing.
|
 (Document Binder) icon.
|
NOTE
|
|
The following procedure assumes that the OS is Windows Vista.
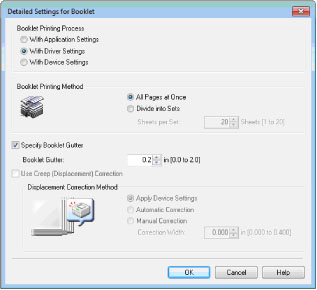
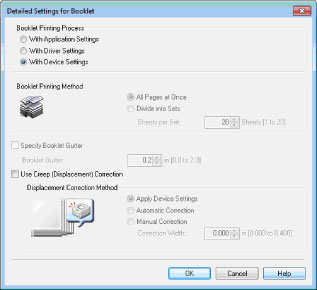
The contents of the [Print Settings] dialog box vary depending on the printer you use.
|
|
NOTE
|
|
If [Classic View] is selected in the [Control Panel] window, select [Printers].
|
|
NOTE
|
|
The contents of the [Print Settings] dialog box vary depending on the printer you use.
For details on how to configure the settings in the [Print Settings] dialog box, see "Reference" and Help of each printer driver.
|
|
NOTE
|
|
If you click [No], you cannot change the printer selection.
|
|
NOTE
|
|
For more information on configuring the layout settings of Document Binder, see the e-manual of Document Binder.
|
|
NOTE
|
|
For more information on the format of the page number, see "Reference".
|
|
|
This is displayed during the period from the beginning of spooling executed by the Windows spooler to the completion of sending the print job to imageRUNNER ADVANCE.
|
|
|
This is displayed during the period from the completion of a print job to imageRUNNER ADVANCE to the completion of printing with imageRUNNER ADVANCE.
|
 (Error) (Error) |
This is displayed when an error occurs in imageRUNNER ADVANCE or the status of imageRUNNER ADVANCE cannot be confirmed due to a network connection failure or power failure during the period from the beginning of spooling executed by the Windows spooler to the completion of printing with imageRUNNER ADVANCE.
|
 (Printing Paused/Locked) (Printing Paused/Locked) |
This is displayed when a job process is paused by instruction from the Windows spooler, operational panel on imageRUNNER ADVANCE or remote UI during the period from the beginning of spooling executed by the Windows spooler to the beginning of sending the print job to imageRUNNER ADVANCE.
|
 (Job is complete) (Job is complete) |
Displayed when the printing is completed successfully.
|
 (Error/Unknown) (Error/Unknown) |
This is displayed when an error occurs in imageRUNNER ADVANCE or the status of imageRUNNER ADVANCE cannot be confirmed due to a network connection failure or power failure.
|
| © CANON Inc. 2011 All Rights Reserved. | Disclaimer CopyrightTrademarksOffice LocationsUSRM1-9634-00 CopyrightTrademarksOffice LocationsUSRM1-9634-00 |
|---|