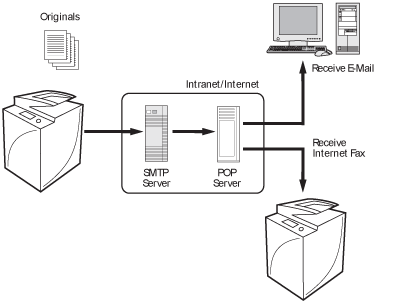
Internet Fax (I-fax) is a function that enables you to send and receive images via internet and not a telephone line.
Reduce transmission cost
G3 FAX transmission cost increases with transmission time and distance. If a line with fixed rate is installed, you can control the transmission cost because the cost of I-fax is fixed regardless of the transmission time and distance. It is recommended that you use this when sending and receiving documents with large number of pages.
High resolution transmission
You can receive at a resolution of up to 600 dpi. (for Full mode)
|
Required Condition
|
|
Network settings are set.
The sender knows the I-fax address for this machine.
|
This section describes how to receive I-fax via Full mode from IPv4 environment.
The screens may differ, depending on the model of the machine and on attached optional products.
1.
Follow the procedures below to check whether the DNS server address settings are set.
Press  (Settings/Registration) → [Preferences] → [Network] → [TCP/IP Settings] → [DNS Settings] → [DNS Server Address Settings].
(Settings/Registration) → [Preferences] → [Network] → [TCP/IP Settings] → [DNS Settings] → [DNS Server Address Settings].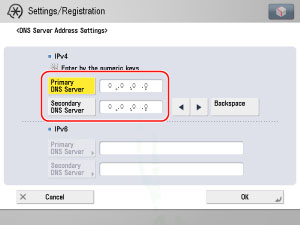
If it is not set, contact the System Manager and set the IP address for DNS primary server and DNS secondary server.
|
NOTE
|
|
DNS server is a server that converts the domain name which is the computer name on the internet into an IP address.
|
2.
Check whether the host name and domain name are set in [DNS Host/Domain Name Settings] for <IPv4> on the DNS Settings screen.
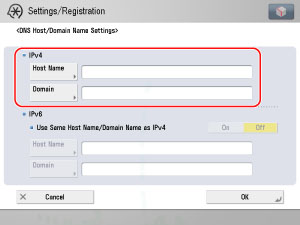
If it is not set, contact the System Manager and set the host name and domain name. For the domain name, enter the domain name of the network to which the machine belongs to.
3.
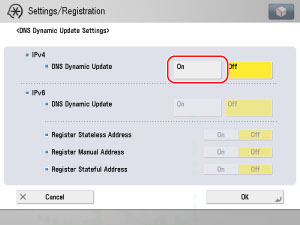
If dynamic DNS server is set, press [On] for <DNS Dynamic Update> in <DNS Dynamic Update Settings> on the DNS settings screen.
4.
Follow the procedures below to check whether the e-mail server is set.
Press (Settings/Registration) → [Function Settings] → [Send] → [E-Mail/I-Fax Settings] → [Communications Settings].
(Settings/Registration) → [Function Settings] → [Send] → [E-Mail/I-Fax Settings] → [Communications Settings].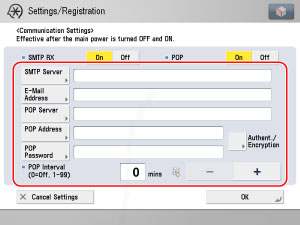
If it is not set, contact the System Manager and set each settings.
|
[SMTP Server]:
|
The IP address or host name of the e-mail server used to for transmission
|
|
[E-Mail Address]:
|
The e-mail address set on the machine
|
|
[POP Server]:
|
The IP address and host name of the e-mail server used to send and receive in "POP before SMTP" send authentication format
|
|
[POP Address]:
|
The log in name used to access the POP server
|
|
[POP Password]:
|
The password used to access the POP server
|
|
[POP Interval]:
|
The time interval in which the machine checks the e-mail on the e-mail server
|
|
NOTE
|
|
It is recommend that you set [POP Interval] to an interval other than '0'.
|
5.
If the receiving server requires authentication, check the authentication system by pressing [Authent./ Encryption].

If it is not set, contact the System Manager and set each settings.
|
[POP Authentication Before Send]:
|
If the provider is in the "POP before SMTP" send authentication system, set this setting to 'On'.
|
|
[SMTP Authentication]:
|
If the environment of the e-mail server requires SMTP authentication, set this setting to 'On' and enter the user name and password.
|
6.
Follow the procedures below to set [Use Send Via Server] to 'On'.
Press (Settings/Registration) → [Function Settings] → [Send] → [E-Mail/I-Fax Settings] → [Use Send Via Server].
(Settings/Registration) → [Function Settings] → [Send] → [E-Mail/I-Fax Settings] → [Use Send Via Server].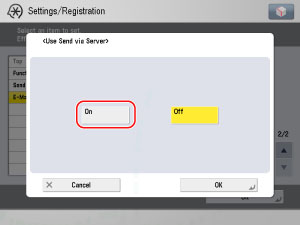
Preparation for receiving I-fax is completed.
7.
Press  (Status Monitor/Cancel) → [Receive] → [Check I-Fax RX] → check that the job was received successfully.
(Status Monitor/Cancel) → [Receive] → [Check I-Fax RX] → check that the job was received successfully.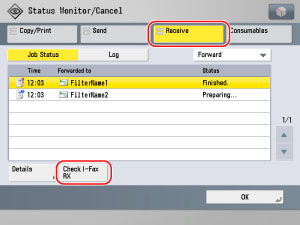
You cannot check whether the data was received correctly by the recipient in the Simple mode. However, you can check whether the data was received correctly by the recipient in the Full mode. Thus, it is recommended that Full mode is set when you are receiving a data.