You can use the document handling software imageRUNNER ADVANCE Desktop to fax a document from a personal computer to an address registered in the shared address book of imageRUNNER ADVANCE.
Prevents registration and transmission errors from personal computers by using the shared address book of imageRUNNER ADVANCE.
Enables paperless fax transmission by directly transmitting files.
|
Prerequisites
|
|
imageRUNNER ADVANCE Desktop is installed.
Network is set up and running.
Fax machine can be used.
Fax address book is created.
imageRUNNER ADVANCE output icon is registered to the imageRUNNER ADVANCE Desktop output bar.
Documents which can be sent via fax is stored in the library.
Desktop Communicator Version 1.0 is installed as a MEAP application in imageRUNNER ADVANCE.
|
The following uses the address book of imageRUNNER ADVANCE to fax a document stored in the library from imageRUNNER ADVANCE Desktop.
Screen shots used in this manual may differ from the ones you actually see, depending on the model of the machine you are using and the optional products available for use.
Use the address book of imageRUNNER ADVANCE to send a fax from imageRUNNER ADVANCE Desktop.
1.
Launch imageRUNNER ADVANCE Desktop.
The [Browser] dialog box is displayed.
2.
Select a library and a folder in the library to display the document to send by fax in the File List View Pane.
|
NOTE
|
|
You cannot fax documents in the Recycle Bin.
|
3.
Select a document to fax in the File List View Pane and click the  (Fax Output) icon.
(Fax Output) icon.
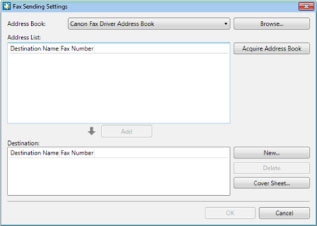
The [Fax Sending Settings] dialog box is displayed.
|
NOTE
|
|
Depending on the setting of imageRUNNER ADVANCE Desktop, a confirmation message may be displayed. In this case, click [Yes]. For more information, see "Reference".
You can fax multiple documents as a single binder document. In this case, the [Multiple Document Order Settings] dialog box is displayed. For more information, see "Reference".
|
4.
Click [Acquire Address Book].
The communicating dialog box is displayed followed by the [Enter Password] dialog box.
5.
Enter the password and click [OK].
The communicating dialog box is displayed again followed by the [Address List] dialog box showing a list of addresses registered in the address book of imageRUNNER ADVANCE.
|
NOTE
|
|
The default user name and password are set as follows. "DtComm7654321"
If you do not know your password, consult the system administrator.
If you enter a wrong password three times consecutively, the process aborts and you will return to the [Fax Sending Settings] dialog box.
|
6.
Select an address to use in [Address List] and click [Add].
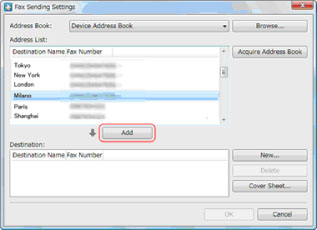
The selected address is displayed in [Destination].
|
NOTE
|
|
To add another address, repeat Step 6.
You can configure the cover sheet in the [Fax Sending Settings] dialog box. For more information, see "Reference".
You can also add an address which is not registered in the address book of imageRUNNER ADVANCE to [Destination]. For more information, see "Reference".
|
7.
Click [OK].
The faxing starts.
|
NOTE
|
|
You can check the fax transmission status on the personal PC. For more information, see "Reference".
|
You can register up to 1600 addresses to the fax address book of imageRUNNER ADVANCE. You can set a password for acquiring the fax address book to ensure security.
imageRUNNER ADVANCE provides the address book sharing function which allows a single address book registered to a single instances of imageRUNNER ADVANCE to be referenced and used by other instances of imageRUNNER ADVANCE on the network.
By using the address book from imageRUNNER ADVANCE Desktop, secure address book sharing is ensured throughout the office including personal computers.
When the fax address book of imageRUNNER ADVANCE is not used, imageRUNNER ADVANCE Desktop can use the address book of the fax driver, imported address book, or an address book specified at fax transmission.
You can fax multiple documents in a single binder document by selecting [Combine selected documents into one document with Document Binder to send fax] in the [Fax Settings] dialog box. This item is selected by default.
While this item is selected, clicking (Fax Output) icon displays the [Multiple Document Order Settings] dialog box. In the [Multiple Document Order Settings] dialog box, specify the order to bind multiple documents as a single binder document.
(Fax Output) icon displays the [Multiple Document Order Settings] dialog box. In the [Multiple Document Order Settings] dialog box, specify the order to bind multiple documents as a single binder document. To change the order, select a document in [Document Processing Order], and click [Up] or [Down]. Click [OK] when finished.
When you click [OK], the [Fax Sending Settings] dialog box is displayed.
If [Combine selected documents into one document with Document Binder to send fax] is not selected, multiple documents selected in the File List View Pane are faxed to the specified address one by one in the order they are displayed in the pane.
In this case, a confirmation message is displayed when you click (Fax Output) icon.
(Fax Output) icon.
In this case, click [Yes] to display the [Fax Sending Settings] dialog box.
Setting Method
Select the [Tools] menu → [Output Bar Settings] → [Settings] → imageRUNNER ADVANCE name defined for the Fax Output icon → [Change] to display the [Fax Setting] dialog box. To fax multiple documents in a single binder document, select [Combine selected documents into one document with Document Binder to send fax].
Click [OK] when finished to close the [Fax Setting] dialog box.
When a fax notification sheet (cover sheet) is not created with Word or Excel in advance, you can create it by displaying the [Cover Sheet Settings] dialog box from the [Fax Sending Setting] dialog box. Click [Cover Sheet] in the [Fax Sending Setting] dialog box to display the [Cover Sheet Settings] dialog box.
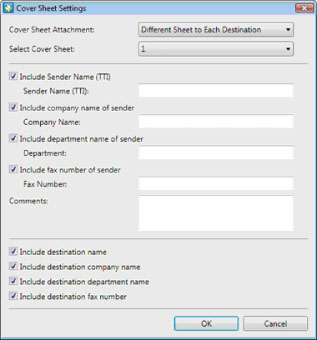
The configurable items in the [Cover Sheet Settings] dialog box are as follows:
|
[Cover Sheet Attachment]:
|
You can select one of the following:
[None] [Different Sheet to Each Destination]
[Same Sheet to All Destinations]
|
|
[Select Cover Sheet]:
|
Select the cover sheet from templates.
|
|
[Include Sender Name]:
|
Select this check box to include the sender name and enter the sender name in [Sender Name].
|
|
[Sender Name]:
|
Enter the sender name.
|
|
[Include company name of sender]:
|
Select this check box to include the company name of the sender and enter the company name in [Company Name].
|
|
[Company]:
|
Enter the company name of the sender.
|
|
[Include department name of sender]:
|
Select this check box to include the department name of the sender and enter the department name in [Department].
|
|
[Department]:
|
Enter the department name of the sender.
|
|
[Include fax number of sender]:
|
Select this check box to include the fax number of the sender and enter the fax number in [Fax Number].
|
|
[Fax Number]:
|
Enter the fax number of the sender.
|
|
[Comments]:
|
Enter comments about the fax.
|
|
[Include destination name]:
|
Select this check box to include the destination name.
|
|
[Include destination company name]:
|
Select this check box to include the destination company name.
|
|
[Include destination department name]:
|
Select this check box to include the destination department name.
|
|
[Include destination fax number]:
|
Select this check box to include the destination fax number.
|
Click [OK] when finished to return to the [Fax Setting] dialog box.
You can add an address not registered in the address book of imageRUNNER ADVANCE as the destination of fax transmission by displaying the [Add New Destination Addresses] dialog box from the [Fax Setting] dialog box.
Click [New] in the [Fax Sending Setting] dialog box to display the [Add New Destination Addresses] dialog box.
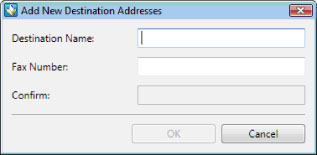
The items to be entered in the [Add New Destination Addresses] dialog box are as follows:
|
[Destination Name]:
|
Enter the destination name.
|
|
[Fax Number]:
|
Enter the fax number of the destination.
|
|
[Confirm]:
|
Enter the fax number of the destination again for confirmation.
|
Click [OK] when finished to return to the [Fax Setting] dialog box.
The selected address is displayed in [Destination].
The newly added address is only used for the current fax transmission. It is not registered to the address book.
You can use Desktop Monitor to monitor fax transmission jobs. By configuring Desktop Monitor, the status display icon and completion notification icon for the latest fax transmission job are displayed. These icons change depending on the processing status of the job.
|
|
This is displayed during the period from the beginning of spooling executed by the Windows spooler to the completion of a send fax job to imageRUNNER ADVANCE.
|
|
|
This is displayed during the period from the completion of a send fax job to imageRUNNER ADVANCE to the completion of sending the fax to imageRUNNER ADVANCE.
|
 (Error) (Error) |
This is displayed when an error occurs in imageRUNNER ADVANCE or the status of imageRUNNER ADVANCE cannot be confirmed due to a network connection failure or power failure during the period from the beginning of spooling executed by the Windows spooler to the completion of sending a fax to imageRUNNER ADVANCE.
|
 (Printing Paused/Locked) (Printing Paused/Locked) |
This is displayed when a job process is paused by instruction from the Windows spooler, operational panel on imageRUNNER ADVANCE or remote UI during the period from the beginning of spooling executed by the Windows spooler to the beginning of sending the send fax job to imageRUNNER ADVANCE.
|
 (Job is complete) (Job is complete) |
This is displayed when the fax was sent successfully.
|
 (Error/Unknown) (Error/Unknown) |
This is displayed when an error occurs in imageRUNNER ADVANCE or the status of imageRUNNER ADVANCE cannot be confirmed due to a network connection failure or power failure.
|
In addition, when a fax transmission job completes, the completion notification message is displayed for ten seconds.
For more information on how to configure Desktop Monitor, see the e-manual of imageRUNNER ADVANCE Desktop.
Desktop Communicator Version 1.0 is an application installed as a MEAP application in a device to reference the fax address book of imageRUNNER ADVANCE from imageRUNNER ADVANCE Desktop. Desktop Communicator Version 1.0 is supplied with imageRUNNER ADVANCE Desktop. "MEAP" (Multifunctional Embedded Application Platform) is the platform where dedicated applications to add and optimize functions as required by the multifunctional machine run.
When no password is defined with Desktop Communicator Version 1.0 to acquire the address book, the [Enter Password] dialog box is not displayed. In this case, the addresses registered to imageRUNNER ADVANCE are displayed in the [Address List] without entering a password.
The default password is "DtComm7654321" but may be changed by the system administrator. If you do not know your password, consult the system administrator.
If you enter a wrong password three times consecutively or click [Cancel] in the [Enter Password] dialog box, the process aborts and you will return to the [Fax Sending Settings] dialog box.
While the communicating dialog box is displayed, click [Cancel]. Acquisition of the address book is canceled and the [Fax Sending Setting] dialog box is displayed again.
For an address registered in the address book of imageRUNNER ADVANCE for which [Destination Name] is blank, the same data for [Fax Number] is shown in [Destination Name]. Specify a correct destination name in the address book of imageRUNNER ADVANCE.
Select an address added to [Destination] and click [Delete] to delete the address from [Destination]. Note that this operation does not delete the address from [Address List]. The address is also not deleted from the address book.