|
|
Top ContentsHelpGlossary ContentsHelpGlossary |
||
|---|---|---|---|
|
Category
|
|
 Category Top
 Flow of Operations on the Settings/Registration ScreenFlow of Operations for Administrators Flow of Operations for General UsersSettings/Registration TablePreferencesAdjustment/MaintenanceFunction SettingsFunction Settings: CopyFunction Settings: PrinterFunction Settings: SendFunction Settings: Receive/ForwardFunction Settings: Store/Access FilesFunction Settings: Encrypted Secure PrintSet DestinationManagement SettingsPreferencesPaper SettingsRegistering the Paper Type for a Paper SourceDistinguishing A5R and STMTR PaperDistinguishing B5 and EXEC PaperRegistering/Editing Custom Paper TypesDesignating the Envelope TypeRegistering Multi-Purpose Tray DefaultsRegistering/Editing/Deleting Custom Paper SizesDisplay SettingsDefault Screen at StartupDefault Screen (Status Monitor/Cancel)Switching the Copy Basic Features ScreenDisplay Fax FunctionStore Location Display SettingsEnabling the Language/Keyboard SwitchChanging the Display Language/Keyboard on the Touch Panel DisplayDisplaying the Remaining Paper MessageNumber of Copies/Wait Time Status DisplayClean the Original Scanning Area Screen PromptSetting the Default Display of the Paper Type Selection Screenmm/Inch Entry SwitchDisplaying the Current Department ID/User NameTimer/Energy SettingsCurrent Time AdjustmentCurrent Date and TimeTime FormatAuto Reset TimeDefault Display after Auto ResetAuto Sleep TimeEnergy Consumption in the Sleep ModeWeekly Timer SettingsSetting the Sleep Mode Exit TimeSilent Mode TimeAccessibilityKey Repetition SettingsInverting the Screen ColorsAdjustment/MaintenanceAdjust Image QualityAutomatic Gradation AdjustmentCorrect DensityFine Adjust ZoomAdjust ActionSaddle Stitch Staple RepositioningSaddle Stitch Position AdjustmentAdjusting the Paper Folding PositionMaintenanceAutomatic Feeder CleaningFunction SettingsCommonPaper Feed SettingsEnabling Paper Drawer Auto SelectionMatching the Print Side for 1-Sided and 2-Sided PrintingEnabling Timeout for Suspended JobsPaper Output SettingsOutput Tray DesignationAlternating the Print Output (Offset Jobs)Inserting a Job Separation Sheet between Print JobsInserting a Job Separation Sheet between Copy SetsOutputting Different Sized Papers to the Same Output TrayPrint SettingsSetting the Printing PrioritySpecifying the Default Settings for Printing from the Remote UIOutputting Reports with Two-Sided PrintingRegistering Forms for the Superimpose Image ModeRegistering/Editing/Deleting User-Defined Text for Page Numbers and WatermarksScan SettingsDistinguishing LTRR and STMT OriginalsSetting the Gamma Value for Remote ScansAutomatically Enabling the Remote Scanner FunctionAuto OfflineGenerate FileHigh Compression Image Quality LevelSettings for Creating Searchable PDF/XPSTrace & Smooth SettingsSpecifying the Minimum Version When Generating a PDFFormatting PDF Files to PDF/AOptimizing PDF for WebCopyRegistering/Editing/Deleting Favorite Settings ButtonsChanging/Initializing the Default Settings for the Copy FunctionRegistering Shortcut KeysRegistering Express Copy Shortcut ButtonsEnabling Auto CollatingEnabling Auto OrientationCopying with the Printed Image ModeSetting a Printer for Cascade CopyingCascade Copy Communication TimeoutSendOutputting ReportsCommon SettingsRegistering/Editing/Deleting Favorite Settings ButtonsDisplaying a Confirmation Screen When Recalling Favorite SettingsChanging the Default Screen for SendChanging the Default Settings for SendRegistering Shortcut KeysSend TX ReportCommunication Management ReportPrinting the TX Terminal IDAutomatically Deleting Failed JobsNumber of Retry AttemptsData Compression RatioGamma Value for YCbCr Send JobsDividing Data Into Chunks When Sending with WebDAVConfirming the SSL Server Certificate When Sending with WebDAVE-Mail/I-Fax SettingsRegistering the Unit's Name for E-Mail/I-FaxCommon Communication Settings for E-Mail/I-FaxConfirming the SSL Server Certificate When Sending with SMTPConfirming the SSL Server Certificate When Receiving with POPMaximum Data Size for SendDefault SubjectApplying SMTP Authentication for Each UserSetting an Authorized User E-Mail Address as the Reply-to DestinationSetting an Authorized User E-Mail Address as the SenderAllowing Users Logged In as Guests to SendFull Mode TX TimeoutPrinting MDN/DSN upon ReceiptSending Via a ServerAllowing MDN Not Via ServerSetting Autocomplete for E-mail Address EntrySpecifying the Fax SettingsChanging the Default Screen for FaxChanging the Default Settings for the Fax FunctionRegistering Shortcut KeysRegistering/Editing/Deleting Sender NamesSetting the Authenticated User Name as the Sender Name (TTI)Enabling ECM TransmissionPause TimeEnabling Auto RedialChecking the Dial Tone before SendingFax TX ReportFax Activity ReportFax Line SettingsSetting the Line to Use when SendingSend Start SpeedPIN Code AccessRemote Fax TX SettingsEnabling Remote FaxReceive/ForwardOutputting ReportsCommon Settings2-Sided PrintingPaper Drawer SelectionReducing a Received FilePrinting Received Images with the 2 On 1 LayoutPrinting Footer Information on a Received DocumentHandling Files That Fail to Be ForwardedForwarding SettingsStoring Forwarding SettingsWhen Forwarding Destinations Do Not Match the Forwarding ConditionsEditing Forwarding SettingsPrinting Forwarding SettingsSpecifying the Fax/I-Fax Inbox SettingsAlways Send Notice for RX ErrorsSpecifying the Fax SettingsEnabling ECM ReceptionFax RX ReportConfidential Fax Inbox RX ReportSetting the Receive Start SpeedSetting the Receive PasswordStore/Access FilesCommon SettingsSpecifying the Scan and Store SettingsSpecifying the Stored File SettingsMail Box SettingsMemory Media Settings
 Set DestinationPrinting the Address ListsRegister DestinationsRegistering an E-Mail AddressRegistering a Fax NumberRegistering an I-Fax AddressRegistering a File Server AddressRegistering a Group AddressAddresses Obtained via a ServerEditing Address DetailsDeleting AddressesNaming an Address BookRegistering One-Touch ButtonsRegistering/Editing One-Touch ButtonsDeleting One-Touch ButtonsChanging the Default Display of the Address BookLDAP Server SettingsRegistering an LDAP ServerEditing LDAP Server SettingsRegistering/Editing LDAP Search AttributesPrinting LDAP Server SettingsLDAP Server Auto SearchObtaining the Remote Address BookRemote Address BookRemote Address Book Server AddressCommunication TimeoutFax TX Line Auto Select Adjustment
 (Settings/Registration).
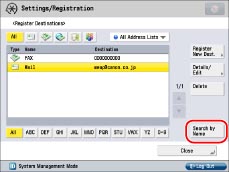
 -
-  (numeric keys). If you press [Addresses without Access Number], the destinations that are not managed with an access number are displayed.
|
NOTE
|
|
[Access No.] appears on the screen only if [Manage Address Book Access Numbers] is set to 'On' in [Set Destination] (Settings/Registration). (See "Managing the Address Book with Access Numbers.")
|
|
NOTE
|
|
For more details on e-mail settings, see "Registering an E-Mail Address."
For more details on fax settings, see "Registering a Fax Number."
For instructions on registering an I-fax address, see "Registering an I-Fax Address."
For instructions on registering a file server address, see "Registering a File Server Address."
For instructions on registering a group address, see "Registering a Group Address."
|
- (numeric keys) → press [Confirm].|
NOTE
|
|
If you want to manage destinations with the Access Number Management mode, set [Manage Address Book Access Numbers] to 'On' in [Set Destination] (Settings/Registration). (See "Managing the Address Book with Access Numbers.")
If there is any required destination setting that has not yet been set after registering the access number, the screen for specifying the destination settings is displayed again.
|
| © CANON Inc. 2011 All Rights Reserved. | Disclaimer CopyrightTrademarksOffice LocationsUSRM1-9634-00 CopyrightTrademarksOffice LocationsUSRM1-9634-00 |
|---|