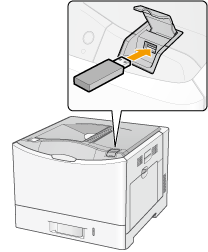

 ] (
] ( Application).
 |
When department ID management is set, the screen is displayed when the departmental ID and PIN are entered. After entering the department ID and PIN, select [<Log In>], and then press [OK].
|

|
NOTE
|
|
In order to automatically display the USB direct print mode screen
When the [Automatically Display USB Direct Print Screen] setting is checked on [USB Direct Print] in the [Edit Management Settings] on the Remote UI, the "USB Direct Print Mode Screen" is displayed automatically when a USB memory device is inserted.
|
 ] and [
 ], and then press [OK].
|
(1)
|
Select [Sort Files] with [
 ] and [ ] and [ ], and then press [OK]. ], and then press [OK]. |
|
(2)
|
When the message is displayed, press [OK].
|
|
(3)
|
Select the sorting criteria with [
 ] and [ ] and [ ], and then press [OK]. ], and then press [OK]. |
 ] and [
 ], and then press [OK].
 ] and [
 ], and then press [OK].
 |
[
 ] will be attached to the file name. If a file with [ ] will be attached to the file name. If a file with [  ] attached is selected, and [OK] is pressed again, the selection is removed. ] attached is selected, and [OK] is pressed again, the selection is removed.If a folder is selected, and [OK] is pressed, the list of files inside the folder is displayed.
If [<Clear All>] is selected, all the file selections are removed.
|
 |
Up to 10 files in the same folder can be selected.
|
 |
If the folder hierarchy is moved, all of the file selections are removed.
|

 ] and [
 ], and then press [OK].
|
(1)
|
Select [<Use Print Ticket>] with [
 ] and [ ] and [ ], and then press [OK]. ], and then press [OK]. |
|
(2)
|
Select [<Start Printing>] with [
 ] and [ ] and [ ], and then press [OK]. ], and then press [OK].It is printed using the print settings specified inside the file.
|
 ] and [
 ], and then press [OK].
 |
To confirm/ change the print settings, select the setting to be confirmed/changed with [
 ] and [ ] and [ ], and then press [OK]. For details on print settings, see "Print Setting Menu List." ], and then press [OK]. For details on print settings, see "Print Setting Menu List." |
