e-ManualTopSite mapHelp

Category Top

Loading Paper

Loading Paper into a Paper Drawer

Adjusting a Paper Drawer to Hold a Different Paper Size

Loading Envelopes

Loading Pre-Punched Paper

Loading Transparencies/Clear Film

Loading Tab Paper

Loading Paper into the POD Deck Lite-B1 (Optional)

Loading Paper into the Multi-drawer Paper Deck-B1 (Optional)

Loading Paper into the Document Insertion Unit-M1 (Optional)

Replacing the Staple Cartridge (For Optional Products)

Replacing the Staple Cartridge in the Stapler Unit (Finisher-AM1/Saddle Finisher-AM2)

Replacing the Staple Cartridge in the Saddle Stitcher Unit (Saddle Finisher-AM2)

Replacing the Staple Cartridge in the Stapler Unit (Staple Finisher-T1/Booklet Finisher-T1)

Replacing the Staple Case in the Saddle Stitcher Unit (Booklet Finisher-T1)

Removing Staple Waste (Finisher-AM1/Saddle Finisher-AM2)

Removing Punch Waste (Puncher Unit-BS1/Puncher Unit-BT1)

Removing Punch Waste (External 2/3 Hole Puncher-C1/External 2/4 Hole Puncher-C1/External 4 Hole Puncher-C1)

Operating the Limited Functions Mode

Replacing the Toner Cartridge

Replacing the Waste Toner Container

Routine Cleaning

Originals Cannot Be Scanned Properly (Cleaning the Platen Glass)

Originals Cannot Be Scanned Properly (Cleaning Method of the Original Scanning Area)

Scanned Originals Become Dirty (Manual Feeder Cleaning)

Scanned Originals Become Dirty (Automatic Feeder Cleaning)

Output Paper Becomes Dirty (Cleaning Inside of the Main Unit)

Output Paper Becomes Dirty (Wire Cleaning)

Output Paper Becomes Dirty (Roller Cleaning)

Output Paper Becomes Dirty (Belt Cleaning)

Streaks and Gloss Unevenness Appear on Output Paper (Refreshing the Fixing Belt)

Streaks and Gloss Unevenness Appear on Output Paper (Adjusting the Fixing Belt Auto Refresh Level)

Cleaning the Touch Panel Display

Consumables

Top » Maintenance » Loading Paper » Loading Paper into the Document Insertion Unit-M1 (Optional)
Loading Paper into the Document Insertion Unit-M1 (Optional)
0L3X-0LC
The location of the Document Insertion Unit-M1 is indicated in the following illustration.
Follow the procedure below to load the paper into the Document Insertion Unit-M1.
CAUTION
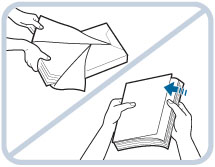
When loading paper, take care not to cut your hands on the edges of the paper.
NOTE
The Document Insertion Unit-M1 is an optional product.
For information on paper that can be loaded, see "Available Paper Stock."

1.
Adjust the slide guides to fit the paper size.
To use the upper tray:
To use the lower tray:
To use the upper tray:
Adjust the slide guide.
To use the lower tray:
Open the tray cover.
Adjust the slide guide.
2.
Prepare the paper to load.
Open the packaging for the paper, and remove the paper stack.
NOTE
For high-quality printouts, use paper recommended by Canon.
Before loading paper, always fan the sheets several times, and align the edges to facilitate feeding. Also, you should always fan paper that has just been removed from a newly opened paper package.
3.
Load the paper stack into the Document Insertion Unit-M1.
If you want to load paper into the upper tray:
If you want to load paper into the lower tray:
If you want to load paper into the upper tray:
Load the paper face up.
If you want to load paper into the lower tray:
Load the paper face up, and close the tray cover.
4.
Select the desired paper type → press [Next].
IMPORTANT
Select the same paper type that is loaded in the Document Insertion Unit-M1.
5.
Select the desired paper size → press [OK].
IMPORTANT
Select the same paper size that is loaded in the Document Insertion Unit-M1.
NOTE
To select an A or B series paper size, press [A/B Size].

IMPORTANT
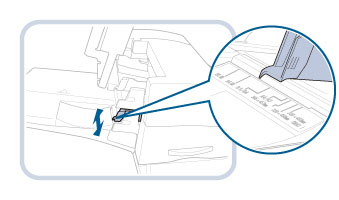
Make sure that the height of the paper stack does not exceed the loading limit mark ().
NOTE
You cannot make copies or prints on paper that is loaded in the Document Insertion Unit-M1.
A maximum of 200 sheets of paper (20 lb bond (80 g/m2)) can be loaded in the tray of Document Insertion Unit-M1.
For instructions on loading tab paper into the Document Insertion Unit-M1, see "Loading Tab Paper."
Rewrap any remaining paper in its original package, and store it in a dry place, away from direct sunlight.