e-ManualTopSite mapHelp

Category Top

Loading Paper

Loading Paper into a Paper Drawer

Adjusting a Paper Drawer to Hold a Different Paper Size

Loading Envelopes

Loading Pre-Punched Paper

Loading Transparencies/Clear Film

Loading Tab Paper

Loading Paper into the POD Deck Lite-B1 (Optional)

Loading Paper into the Multi-drawer Paper Deck-B1 (Optional)

Loading Paper into the Document Insertion Unit-M1 (Optional)

Replacing the Staple Cartridge (For Optional Products)

Replacing the Staple Cartridge in the Stapler Unit (Finisher-AM1/Saddle Finisher-AM2)

Replacing the Staple Cartridge in the Saddle Stitcher Unit (Saddle Finisher-AM2)

Replacing the Staple Cartridge in the Stapler Unit (Staple Finisher-T1/Booklet Finisher-T1)

Replacing the Staple Case in the Saddle Stitcher Unit (Booklet Finisher-T1)

Removing Staple Waste (Finisher-AM1/Saddle Finisher-AM2)

Removing Punch Waste (Puncher Unit-BS1/Puncher Unit-BT1)

Removing Punch Waste (External 2/3 Hole Puncher-C1/External 2/4 Hole Puncher-C1/External 4 Hole Puncher-C1)

Operating the Limited Functions Mode

Replacing the Toner Cartridge

Replacing the Waste Toner Container

Routine Cleaning

Originals Cannot Be Scanned Properly (Cleaning the Platen Glass)

Originals Cannot Be Scanned Properly (Cleaning Method of the Original Scanning Area)

Scanned Originals Become Dirty (Manual Feeder Cleaning)

Scanned Originals Become Dirty (Automatic Feeder Cleaning)

Output Paper Becomes Dirty (Cleaning Inside of the Main Unit)

Output Paper Becomes Dirty (Wire Cleaning)

Output Paper Becomes Dirty (Roller Cleaning)

Output Paper Becomes Dirty (Belt Cleaning)

Streaks and Gloss Unevenness Appear on Output Paper (Refreshing the Fixing Belt)

Streaks and Gloss Unevenness Appear on Output Paper (Adjusting the Fixing Belt Auto Refresh Level)

Cleaning the Touch Panel Display

Consumables

Top » Maintenance » Loading Paper
Loading Paper
0L3X-0L2
This section describes how to load paper.
Caution for Paper Curl
If paper jams or poor print quality occur, paper curl is often the cause. The paper stiffness, direction of curl, and amount of curl have a strong influence on how well the paper is transported through the machine. When loading paper, always adjust the curl amount to the appropriate level as described below.
Correcting Paper Curl
In order to prevent problems resulted from paper curl, it is necessary to uncurl paper appropriately.
The amount of curl that may cause problems depends on the paper type and thickness. Refer to the instructions below to correct the paper curl so that it is within the acceptable range, and then reload the paper.
Measuring Paper Curl
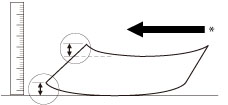
Place the paper on a horizontal surface. Place a ruler against the leading edge relative to the paper transport direction, and measure the curl at both ends. If it is a down curl, flip the paper over before measuring the curl.
Measuring a perpendicular curl
* Transport Direction
Measuring a parallel curl
* Transport Direction
Acceptable Curl Range
Acceptable curl range when the curl is perpendicular to the feed direction
We recommend using paper with a curl less than 1/4" (5 mm). However, paper that is more than 60 lb cover (164 g/m2) in weight and curls down is not recommended.
Acceptable curl range when the curl is parallel to the feed direction
We recommend using paper with a curl less than 1/4" (5 mm). However, you cannot use curled heavy paper (60 lb cover to 110 lb cover (164 g/m2 to 300 g/m2)).