e-ManualTopSite mapHelp

Category Top

Loading Paper

Loading Paper into a Paper Drawer

Adjusting a Paper Drawer to Hold a Different Paper Size

Loading Envelopes

Loading Pre-Punched Paper

Loading Transparencies/Clear Film

Loading Tab Paper

Loading Paper into the POD Deck Lite-B1 (Optional)

Loading Paper into the Multi-drawer Paper Deck-B1 (Optional)

Loading Paper into the Document Insertion Unit-M1 (Optional)

Replacing the Staple Cartridge (For Optional Products)

Replacing the Staple Cartridge in the Stapler Unit (Finisher-AM1/Saddle Finisher-AM2)

Replacing the Staple Cartridge in the Saddle Stitcher Unit (Saddle Finisher-AM2)

Replacing the Staple Cartridge in the Stapler Unit (Staple Finisher-T1/Booklet Finisher-T1)

Replacing the Staple Case in the Saddle Stitcher Unit (Booklet Finisher-T1)

Removing Staple Waste (Finisher-AM1/Saddle Finisher-AM2)

Removing Punch Waste (Puncher Unit-BS1/Puncher Unit-BT1)

Removing Punch Waste (External 2/3 Hole Puncher-C1/External 2/4 Hole Puncher-C1/External 4 Hole Puncher-C1)

Operating the Limited Functions Mode

Replacing the Toner Cartridge

Replacing the Waste Toner Container

Routine Cleaning

Originals Cannot Be Scanned Properly (Cleaning the Platen Glass)

Originals Cannot Be Scanned Properly (Cleaning Method of the Original Scanning Area)

Scanned Originals Become Dirty (Manual Feeder Cleaning)

Scanned Originals Become Dirty (Automatic Feeder Cleaning)

Output Paper Becomes Dirty (Cleaning Inside of the Main Unit)

Output Paper Becomes Dirty (Wire Cleaning)

Output Paper Becomes Dirty (Roller Cleaning)

Output Paper Becomes Dirty (Belt Cleaning)

Streaks and Gloss Unevenness Appear on Output Paper (Refreshing the Fixing Belt)

Streaks and Gloss Unevenness Appear on Output Paper (Adjusting the Fixing Belt Auto Refresh Level)

Cleaning the Touch Panel Display

Consumables

Top » Maintenance » Routine Cleaning » Streaks and Gloss Unevenness Appear on Output Paper (Refreshing the Fixing Belt)
Streaks and Gloss Unevenness Appear on Output Paper (Refreshing the Fixing Belt)
0L3X-0R8
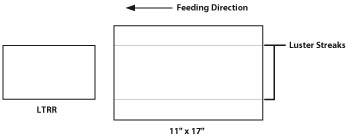
When paper with a longer width is used after copying or printing 100 or more sheets of paper with a shorter width (for example, when you use 11" x 17" paper after LTRR paper), luster streak may appear on both edges in the feeding direction. In addition, patches of uneven gloss may appear in the high density areas of the printed heavy paper or coated paper. In this case, the streaks and patches of uneven gloss may be reduced by refreshing the fixing belt and cleaning its surface.

1.
Press (Settings/Registration).
2.
[Adjustment/Maintenance] → [Maintenance] → [Refresh Fixing Belt].
3.
Press [Start] to start refreshing the fixing belt.
It takes approximately 120 seconds to refresh the fixing belt.
When refreshing the fixing belt is complete, try printing again.
NOTE
Refreshing the fixing belt cannot be performed during printing.