Adjusting Gradation and Density
You can recalibrate the machine when you notice irregularities in the color of the prints, such as when prints turn out to be different from the original in gradation, density, or color.
The following two types of gradation adjustments can be made:
This is a quick and simple adjustment that is made to the gradation, density, and color settings of the machine.
Print the test page and compare it with the color chart. Enter the result into the machine and adjust the gradation, density, and color of images. Visual adjustment adjusts more precisely than automatic adjustment.
|
IMPORTANT
|
|
It is recommended that you select [Visually Adjust] when performing an automatic gradation adjustment. Perform automatic adjustment for a quick but less complete adjustment between regular visual adjustments.
The paper that can be used with [Visually Adjust] is Thin, Plain 1, Plain 2, Recycled 1, and Recycled 2.
|
|
NOTE
|
|
Test pages are not counted as part of the print total page counts.
|
1.
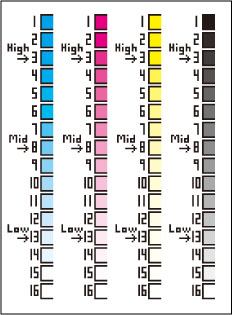
Prepare the color chart.
The color chart is included with the machine.
2.
Press

(Settings/Registration).
3.
Press [Adjustment/Maintenance] → [Adjust Image Quality].
4.
Press [Adjust Gradation] → [Visually Adjust].
|
NOTE
|
|
To initialize the settings and redo visual adjustment, such as when visual adjustment is not performed correctly, press [Use Initial Set. for Adj. Visual.] → [On].
|
5.
Select the paper source of the paper to adjust → press [OK].
6.
Press [Start Printing].
|
NOTE
|
|
If paper appropriate for the test page is not loaded in any paper source, a message asking you to load the appropriate paper appears. Load the appropriate paper in a paper source.
|
The test page is output.
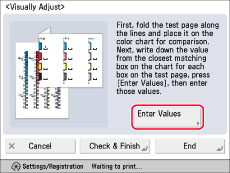
7.
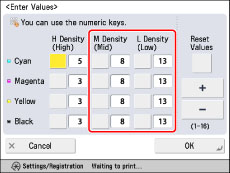
Press [Enter Values].
8.
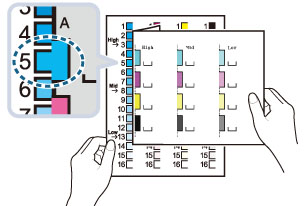
Fold back the test page along the dotted lines. Place the test page over the color chart, compare the colors, and enter the number of the color with the closest density into the machine.
When entering the value for 'H Density (High)' for Cyan:
Fold back the test page along the dotted line 'High', and place it over the color chart.
Search for the color in the color chart that corresponds most closely with the Cyan under 'High' on the test page.
Example: If you determine that the color for '5' on the color chart is closest to that on the test page:
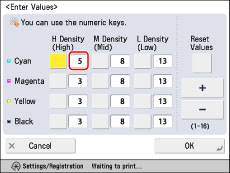
Enter '5' in the 'H Density (High)' field for Cyan on the machine.
Enter the Magenta, Yellow, and Black values for 'H Density (High)' in the same way that you did for Cyan.
|
NOTE
|
It can be helpful to make a note of the values you have selected on  printed on the test page. After comparing and writing down the values for multiple colors, you can enter all these values at once. |
Enter the values for 'M Density (Mid)' and 'L Density (Low)' of each color using the procedure used for 'H Density (High)'.
When comparing the colors for 'M Density (Mid)' and 'L Density (Low)', fold back the printed test page along the dotted lines for 'M Density (Mid)' and 'L Density (Low)', and place the test page over the color chart.
Once you have entered values in each field, press [OK].
9.
Finish adjustment.
To finish without confirming the adjustment results:
Press [End].
The adjusted values are saved.
To finish after confirming the adjustment results:
Press [Check & Finish].
The adjusted values are saved.
Press [Start Printing].
The test page is output.
Confirm the print results of the test page.
Compare the colors on the printed test page and the color chart. Make sure that each color on the test page matches the values (colors) listed below on the color chart.
1.
Press
(Settings/Registration).
2.
Press [Adjustment/Maintenance] → [Adjust Image Quality] → [Adjust Gradation].
3.
Press [Auto Adjust].
4.
Press [Start].