Flow of Operations for Administrators
If the System Manager Settings (System Manager ID/System Manager PIN) Are Set
1.
Press

(Settings/Registration).
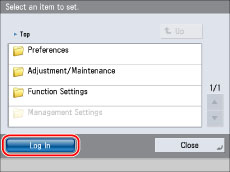
2.
Press [Log In].
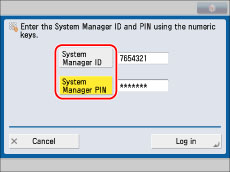
3.
Specify the following.
Press [System Manager ID] → enter the Department ID.
Press [System Manager PIN] → enter the PIN.
4.
Press [Log in].
If the System Manager PIN is still the default setting, a screen prompting you to change the System Manager PIN appears. Change the PIN according to the instructions on the screen.
|
IMPORTANT
|
|
Make sure that you do not forget the System Manager PIN. If you forget the System Manager PIN, contact your local authorized Canon dealer.
|
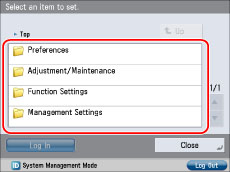
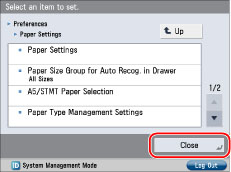
5.
Display the desired setting from the list.
6.
Specify the setting → press [Close].
To move up one level, press [Up].
7.
When you finish specifying the settings, press [Log Out] at the bottom right of the screen to log out.
You can also press

(Log In/Out) to log out.
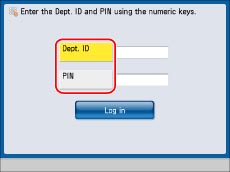
If the System Manager Settings Are Set and Department ID Management Is Used
1.
Specify the following.
Press [Dept. ID] → enter a Department ID.
Press [PIN] → enter a PIN.
2.
Press [Log In].
You can also press
(Log In/Out) to log in.
3.
Press
(Settings/Registration).
4.
Display the desired setting from the list.
5.
Specify the setting → press [Close].
To move up one level, press [Up].
6.
When you finish specifying the settings, press [Log Out] at the bottom right of the screen to log out.
You can also press
(Log In/Out) to log out.
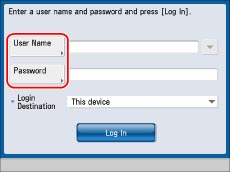
If the System Manager Settings Are Set and SSO-H Is Used
1.
Specify the following.
Press [User Name] → enter a user name → press [OK].
Press [Password] → enter a password → press [OK].
2.
Press [Log In].
You can also press
(Log In/Out) to log in.
3.
Press
(Settings/Registration).
4.
Display the desired setting from the list.
5.
Specify the setting → press [Close].
To move up one level, press [Up].
6.
When you finish specifying the settings, press [Log Out] at the bottom right of the screen to log out.
You can also press
(Log In/Out) to log out.