e-ManualTopSite mapHelp

Category Top

Flow of Operations on the Settings/Registration Screen

Flow of Operations for Administrators

Flow of Operations for General Users

Settings/Registration Table

Preferences

Adjustment/Maintenance

Function Settings

Function Settings: Printer

Function Settings: Store/Access Files

Function Settings: Secure Print

Function Settings: Web Access

Management Settings

Preferences

Paper Settings

Registering the Paper Size and Type for a Paper Source

Setting the Paper Size Group for Auto Recognition in the Paper Source

Distinguishing A5 and STMT Paper

Registering/Editing Custom Paper Types

Registering Multi-Purpose Tray Default Settings

Registering/Editing/Deleting Custom Paper Sizes

Display Settings

Default Screen after Startup/Restoration

Default Screen (Status Monitor/Cancel)

Store Location Display Settings

Enabling the Language/Keyboard Switch

Changing the Display Language/Keyboard on the Touch Panel Display

Changing the Keyboard Shift Lock Feature Settings

Displaying the Remaining Paper Message

Number of Copies/Wait Time Status Display

Setting the Default Display of the Paper Type Selection Screen

mm/Inch Entry Switch

Displaying the Current Department ID/User Name

Displaying the Remaining Toner Error Message

Deleting the Remaining Toner Error Message

Timer/Energy Settings

Current Time Adjustment

Current Date and Time

Time Format

Quick Startup Settings

Auto Reset Time

Default Display after Auto Reset

Auto Sleep Time

Energy Consumption in the Sleep Mode

Auto Sleep Weekly Timer Settings

Setting the Sleep Mode Exit Time

Accessibility

Key Repetition Settings

Inverting the Screen Colors

Adjustment/Maintenance

Adjust Image Quality

Adjusting Gradation and Density

Auto Correct Color Mismatch

Dither Pattern Settings

Reducing Toner Used When Color Printing

Correcting Irregularities in Shaded Areas

Function Settings

Common

Paper Feed Settings

Enabling Paper Drawer Auto Selection
Matching the Print Side for 1-Sided and 2-Sided Printing
Enabling Timeout for Suspended Jobs

Paper Output Settings

Alternating the Print Output (Offset Jobs)
Inserting a Job Separation Sheet between Print Jobs
Inserting a Job Separation Sheet between Copy Sets

Print Settings

Setting the Printing Priority
Outputting Reports with Two-Sided Printing
Registering/Editing/Deleting User-Defined Text for Page Numbers and Watermarks

Access Files

Common Settings

Specifying the Stored File Settings

Memory Media Settings

Top » Settings/Registration » Preferences » Display Settings » Default Screen after Startup/Restoration
Default Screen after Startup/Restoration
0UKW-03W
You can set the default screen displayed at startup.
1.
Press (Settings/Registration).
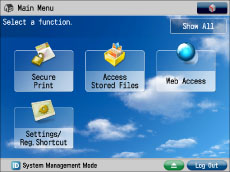
2.
Press [Preferences] → [Display Settings] → [Default Screen after Startup/Restoration].
3.
Specify the settings → press [OK].
If you set the Main Menu as the Default Screen after Startup/Restoration:
If you set [Access Stored Files] as the Default Screen after Startup/Restoration:
If [Open Status Monitor/Cancel] is set to 'On', the Status Monitor/Cancel screen appears on the screen after startup.
IMPORTANT
If [Department ID Management] or [Limit Functions] for [Department ID Management] is set to 'On', the startup screen may differ from the screen set to be displayed as default at startup.
If [Department ID Management] is set to 'On', and if a function restricted by Limit Functions is set for the default screen, the Main Menu screen appears at startup. To display the function you set for the default startup screen, select the function on the Main Menu screen → enter the Department ID/PIN on the Log In screen.
If all functions in [Limit Functions] for [Department ID Management] are set to 'On', even if you set [Open Status Monitor/Cancel] to 'On', the Log In screen appears at startup. If you press [Status Monitor/Cancel], the Status Monitor/Cancel screen is displayed. (If you want to display the Status Monitor/Cancel screen, no Department ID/PIN is necessary.)
For more information on Department ID Management, see "Specifying Department ID Management."
If you are using SSO-H (Single Sign-On H), regardless of the [Default Screen after Startup/Restoration] settings, the Log In screen appears at startup. If you press [Status Monitor/Cancel], the Status Monitor/Cancel screen is displayed. (If you want to display the Status Monitor/Cancel screen, no user name/password is necessary.) For more information on SSO-H, see "SSO-H (Single Sign-On H)."