e-Manual TopContentsHelpGlossary
Category
Top » Security » Specifying Keys and Certificates/CA Certificates » Generating Keys and Certificates

Category Top

Setting the System Manager Information

Attention (Specifying the System Manager Information)

Registering the Name of the Machine and Location

Specifying the Setting for Department ID Management

Registering Departments

Editing Departments

Activating the Department ID Management

Specifying Whether or Not to Receive a Print Job from an Unknown ID

Checking or Clearing the Count Information

Specifying Keys and Certificates/CA Certificates

Generating Keys and Certificates

Installing Keys and Certificates/CA Certificates

Verifying Keys and Certificates/CA Certificates

Registering Keys and Certificates/CA Certificates

Deleting Keys and Certificates/CA Certificates

Specifying SSL

Setting IEEE802.1X Authentication

Setting TLS Authentication Information

Setting TTLS/PEAP Authentication Information

Switching On/Off for IEEE802.1X Authentication

Checking Error Information for IEEE802.1X Authentication

Attention (IEEE802.1X Authentication)

Entering PIN for Printing (Secure Printing)

Setting Secure Printing

Printing by Secure Printing

Configuring the Remote UI

Restricting Network Connections

Restricting Sending/Receiving to/from Specific IP Addresses

Restricting Sending/Receiving to/from Specific MAC Addresses

Monitoring/Controlling Devices by SNMP (SNMP Setting)

Setting SNMPv1

Setting SNMPv3

Obtaining Printer Management Information from Host

Setting the Permission for HTTP Communications

Setting Protocol Port Numbers

Setting the Dedicated Port

Restricting to Specify Destinations and Use the Sending Functions

Setting a PIN for the Address Book

Restricting Destinations that Can Be Specified

Restricting to Send Faxes from Your Computer

Restricting Sending from Job History

Confirming the Entered Fax Number

Restricting Sequential Broadcasts

Specifying Display Settings for the Job History

Restricting USB Port or USB Memory Usage

Restricting External Device Connections via USB

Restricting Storing of Data in Memory Media

Restricting Printing of Data in Memory Media

Collapse all|Expand all
Generating Keys and Certificates
07K4-0K4
Generate keys and server certificates (self-signed certificate) with this product.
It takes 10 to 15 minutes to generate keys and certificates.
1
Start the Remote UI and log on in system manager mode.
2
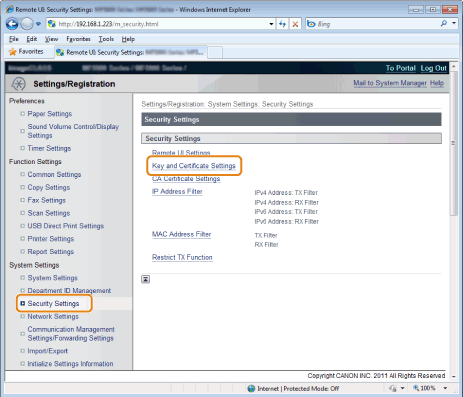
Click [Settings/Registration].
3
Click [Security Settings] -> [Key and Certificate Settings].
4
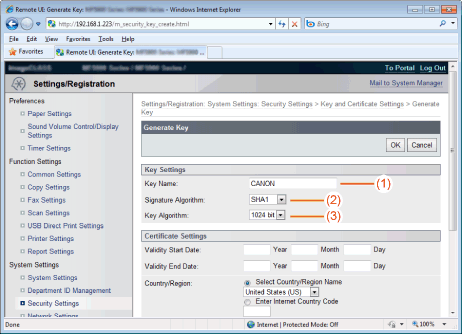
Click [Generate Key].
5
Specify the keys.
(1)
Select an encryption key name.
You can enter up to 24 alphanumeric characters for [Key Name].
(2)
Select the authentication algorithm to be used: [SHA1], [SHA256], [SHA384] or [SHA512].
(3)
Select the key algorithm to be used: [512bit], [1024bit], [2048bit] or [4096bit].
6
Set the certificate.
(1)
Set the expiration date for certificate.
Enter dates (January 1, 2000 to December 31, 2037) to [Validity Start Date] and [Validity End Date].
(2)
Specify Country/Region.
Select the [Select Country/Region Name] check box and for the country/region name, or select [Enter Internet Country Code] to enter the country code.
(3)
Specify a location.
You can enter up to 24 alphanumeric characters for [State] and [City].
(4)
Specify an organization.
You can enter up to 24 alphanumeric characters for [Organization] and [Organization Unit].
(5)
Specify a common name. You can enter up to 48 alphanumeric characters for the [Common Name].
7
Click [OK].