e-ManualTopSite mapHelp

Category Top

What This Machine Can Do

Overview of This Function

Things You Must Do Before Using This Machine

Flow of Sending Operations

Canceling a Job

Specifying Destinations

Specifying Destinations Using the Address Book (Local)

Specifying Destinations Using the Address Book (Remote)

Specifying Destinations Using the Address Book (LDAP Server)

Specifying Destinations Using the One-Touch Buttons

Specifying a Destination by Entering an E-mail Address

Specifying Destinations by Entering an I-Fax Address

Specifying a Destination by Entering a File Server

Specifying a File Server Using the Keyboard

Specifying a File Server Using the Browse Key (Windows (SMB))

Specifying a File Server Using the Search Host Key (Windows (SMB))

Storing in a Mail Box

Setting Cc and Bcc Addresses

Checking/Editing/Deleting the Information for a Destination

Favorite Settings

Recalling Previous Send Jobs

Storing New Addresses

Registering an E-Mail Address

Registering an I-Fax Address

Registering a File Server Address

Registering a Group Address

Registering an Address Obtained via an LDAP Server

Storing/Editing/Deleting One-Touch Buttons

Checking/Editing/Deleting a Stored Address

Registering/Editing/Deleting Favorite Settings

Registering/Editing Favorite Settings

Checking Favorite Settings

Editing a Name/Comment

Deleting Favorite Settings

Assigning Shortcuts

Switching the Color Mode

Setting the Resolution

Specifying/Registering Scan Sizes

Setting the File Format

Trace and Smooth

Compact PDF or XPS

Limited Color PDF

Searchable PDF/XPS/OOXML

Adding a Digital Signature to a PDF or XPS

Encrypting PDF Files

Applying a Policy

Selecting the Original Type

2-Sided Original

Book → 2 Pages

Different Size Originals

Adjusting Density Manually

Adjusting Background Density

Adjusting the Image Sharpness

Changing the Zoom Ratio

Erase Frame

Job Build

Delayed Send

Preview

Job Done Notice

File Name

Subject/Message

Reply-to

Setting E-Mail Priority

Receiving I-Fax Documents

Processing Received Documents

Receiving Documents

Setting the Memory Lock Mode

Forwarding Received Documents

Available Paper Sizes

When Problems Occur

Questions & Answers

Top » Scan and Send » Limited Color PDF
Limited Color PDF
0S9Y-0JL
When you convert originals into a compact PDF, you can reduce the file size by scanning originals with fewer colors at a lower resolution. If you select [Limited Color] as the PDF file format, [Compact] is automatically set to 'On'. [Limited Color] cannot be set by itself.
IMPORTANT
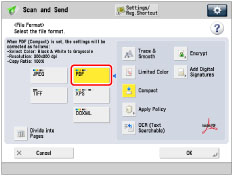
PDF (Limited Color) is only valid with the following settings:
Select Color: Auto (Color/Gray), Full Color, Grayscale
Resolution: 300 x 300 dpi
Copy Ratio: 100% or Auto

1.
Press (Main Menu) → [Scan and Send] → specify the destination → press the file format button.
2.
Select [PDF].
3.
Press [Limited Color] → [OK].
If you want to separate multiple images and send them as separate files, each of which consists of only one page, set [Divide into Pages] to 'On'. If you want to scan the images as a single file, turn the setting 'Off'.

IMPORTANT
If you select [Limited Color] for PDF file format, the color mode is changed from [Auto (Color/B&W)] and [Black & White] to [Auto (Color/Gray)] and [Grayscale]. If you want to scan the document with the color mode that you specify, change the PDF file format to anything other than [Compact], [Limited Color], and [Trace & Smooth].
NOTE
If you convert text original into a compact PDF, you can set to scan it with fewer colors and lower resolution to reduce the file size. For more information, see "Setting the Resolution for Limited Color PDF."