Top Site mapHelpGlossary Site mapHelpGlossary | |
 Category TopOverview of This FunctionFlow of Copy OperationsCanceling a Copy JobReserved CopyingChanging Color ModesCopy SampleRecalling Previous Copy Jobs (Previous Settings)
 Storing, Recalling, and Deleting Favorite Settings (Favorite Settings)Storing Favorite SettingsRecalling and Deleting Favorite SettingsAssigning ShortcutsChanging and Canceling Copy SettingsInterrupt ModeChanging Copy RatiosZoom by LengthSetting the X and Y Axes IndependentlyPosterPaper SelectionBook→2 PagesTwo-Sided CopyingCollating CopiesBooklet ModeJob BuildN on 1Add CoverInserting SheetsDifferent Size OriginalsAdjusting Density ManuallyAdjusting Background DensitySelecting the Original TypeInserting Sheets When Copying Onto TransparenciesAdding a Secure WatermarkDocument Scan LockAdjusting the ColorOne Touch Color ModePage NumberingCopy Set NumberingAdjusting the Image SharpnessErase FrameWatermark PrintingDate PrintingShifting the Original ImageGutter ModePrint & CheckInverting Images (Nega/Posi)Repeat ImagesMirror ImageJob Done NoticeMaking ID Card Copies (Copy ID Card)
 Area DesignationAppendix
|
IMPORTANT
|
|
To use Area Designation (Framing) with the Image Repeat mode, first specify the Image Repeat mode, and then designate the desired area. Only one area can be designated.
The designated area is too small, the color original may be scanned in the Black mode even if the color mode is set to 'Auto (Color/Black)'.
When designating an area, specify an area that is 15 mm or larger on one side. If you specify an area that is less than 15 mm on one side, a message prompting you to change the area size is displayed.
|
|
NOTE
|
|
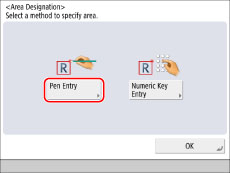
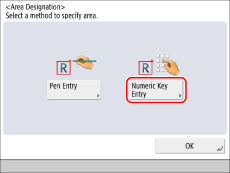
You can use the numeric keys to modify areas designated with the edit pen.
If you designate an area using the edit pen, the output image may not reflect the designated area precisely. To designate an area precisely, enter the values using the numeric keys.
|
|
IMPORTANT
|
|
You cannot copy or scan documents with the Area Designation mode if you place your originals in the feeder.
|

|
IMPORTANT
|
|
Confirm that the original is placed on the platen glass.
|

|
NOTE
|
|
To clear the last point entered, press [Delete Point]. (Once an area is designated, [Delete Point] changes to [Clear Area].)
To clear a designated area, press [Clear Area].
To zoom in on any area on the original, press the ratio drop-down list → select an enlargement ratio → press [
 ], [ ], [ ], [ ], [ ], or [ ], or [ ] to display the desired area. ] to display the desired area. |
|
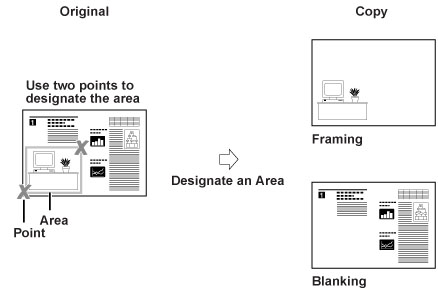
[Framing]:
|
Copy only the contents of the designated area while discarding the rest of the original.
|
|
[Blanking]:
|
Copy the original by blanking out the contents of the designated area.
|
|
NOTE
|
|
To modify a designated area that was specified using the edit pen, press [Fine Adjust] → [Select Point] until the screen displays the desired point that you want to modify → press [
 ], [ ], [ ], [ ], [ ], or [ ], or [ ] to move the point → press [OK] → [Preview] to check the modified area. ] to move the point → press [OK] → [Preview] to check the modified area. |
|
NOTE
|
|
If the Center Shift mode is already specified beforehand, the Center Shift Settings screen does not appear.
The Center Shift settings specified within the Area Designation mode are deleted when the area settings are canceled.
|
 (Start).
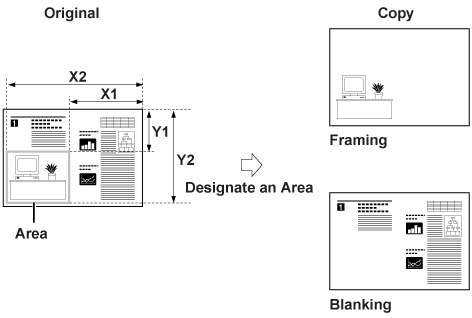
|
NOTE
|
|
For instructions on entering values in inches, see "Basic Operations."
|
|
IMPORTANT
|
|
Before performing the next step, you must manually measure the size and position of the area that you want to designate on the original.
When you measure the XY values, always start measuring from the image out to the right side edge of the original, and up to the top of the original. These measurements tell the machine the desired framed area's size and position.
|
 -
-  (numeric keys).
|
[X1]:
|
The distance of the area's right border to the original's right edge.
|
|
[X2]:
|
The distance of the area's left border to the original's right edge.
|
|
[Y1]:
|
The distance of the area's top border to the original's top edge.
|
|
[Y2]:
|
The distance of the area's bottom border to the original's top edge.
|
|
NOTE
|
|
To change a value you entered, press [X1], [X2], [Y1], or [Y2] → enter the correct value using
- (numeric keys).To check the designated area, press [Check Area].
To clear a designated area, press [Clear Area].
|
|
[Framing]:
|
Copy only the contents of the designated area while discarding the rest of the original.
|
|
[Blanking]:
|
Copy the original by blanking out the contents of the designated area.
|
|
NOTE
|
|
If the Center Shift mode is already specified beforehand, the Center Shift Settings screen does not appear.
Center Shift settings specified within the Area Designation mode are deleted when the area settings are canceled.
|
| Copyright CANON INC. 2015 | Disclaimers CopyrightTrademarksThird Party SoftwareOffice LocationsUSRM2-5563-00 CopyrightTrademarksThird Party SoftwareOffice LocationsUSRM2-5563-00 |
|---|
 Expand all
 Collapse all
 Search options