Problem Solving > Clearing Paper Jams > Screens Indicating the Locations of Paper Jams
*
Screens Indicating the Locations of Paper Jams

Return to Overview


The screen indicating the location of the paper jam and instructions on how to clear the paper jam appear on the touch panel display. This screen repeatedly appears on the touch panel display until the paper jam is entirely cleared.

  • Example of a Screen Indicating the Location of the Paper Jam

You can check the location of the paper jam on the touch panel display.

If you press [Close], you can continue operations, such as setting modes, even if the jammed paper is not removed immediately.


Remark
  • If a paper jam occurs in the Feeder, you cannot continue operating the machine. Follow the directions on the touch panel display to clear the paper jam. (See "Duplex Color Image Reader Unit-A1 (Optional).")

  • Example of a Screen Indicating How to Clear the Paper Jam


Remark
  • There are some areas inside the machine which are subject to high-voltages. When removing jammed paper or when inspecting the inside of the machine, do not allow necklaces, bracelets, or other metal objects to touch the inside of the machine, as this may result in burns or electrical shock.
  • When removing jammed originals or paper, take care not to cut your hands on the edges of the originals or paper.
  • When removing paper which has become jammed inside the machine, take care not to cut your hands or injure yourself on the inside of the machine. If you cannot remove the paper, contact your local authorized Canon dealer.
  • When removing paper which has become jammed inside the machine, take care not to allow the toner on the jammed paper to come into contact with your hands or clothing, as this will dirty your hands or clothing. If they become dirty, wash them immediately with cold water. Washing them with warm water will set the toner, and make it impossible to remove the toner stains.
  • When removing paper which has become jammed inside the machine, remove the jammed paper gently to prevent the toner on the paper from scattering and getting into your eyes or mouth. If the toner gets into your eyes or mouth, wash them immediately with cold water and immediately consult a physician.
  • The fixing unit and its surroundings inside the machine may become hot during use. When removing jammed paper or when inspecting the inside of the machine, do not touch the fixing unit and its surroundings, as doing so may result in burns or electrical shock.
  • When removing jammed paper or when inspecting the inside of the machine, do not be exposed to the heat emitted from the fixing unit and its surroundings for prolonged time, as doing so may result in low temperature burns, even though you did not touch them directly.
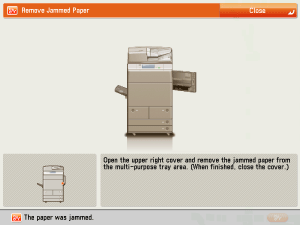
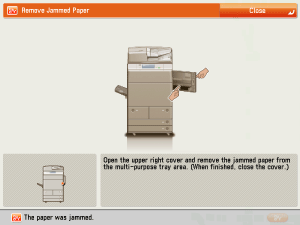
  • If a paper jam occurs, follow the directions on the touch panel display to remove any jammed paper from inside the machine. Do not insert your fingers into the part not indicated on the touch panel display, as doing so may result in personal injury or burns.
  • After clearing all paper jams, remove your hands from the machine immediately. Even if the machine is not in operation, your hands, hair, or clothing may get caught in the feed rollers, which could result in personal injury or damage if the machine suddenly starts printing.
  • If paper is jammed in several locations, remove the jammed paper in the order indicated on the touch panel display.

  1. Inspect all paper jam locations indicated on the touch panel display, and remove any jammed paper.

See the appropriate sections below for instructions on finding and removing jammed paper. Or, you can follow the instructions on the touch panel display.

  • Main Unit (Fixing Transport Unit)
  • Multi-purpose Tray
  • Right Cover of the Machine (When the Multi-drawer Paper Deck-A1 is attached)
  • Right Cover of the Machine
  • Left Cover
  • Left Part of the Machine (When the Buffer Pass Unit-F1 is attached)
  • Paper Drawers 3 and 4
  • Paper Drawer (Right)
  • Paper Drawer (Left)
  • Buffer Pass Unit-F1

If jammed paper tears while it is being removed, be sure to remove any remaining pieces from inside the machine.

  • If the machine's power is turned OFF when there is a paper jam, detection of paper jams in the paper drawers is not possible after the power is turned back ON. Clear paper jams without turning the power OFF.
  • Some areas that are shown to have paper jams may not actually have paper jams. However, always check all locations indicated on the touch panel display in the order that is given.
  1. If a paper jam occurs inside an optional unit, see the instructions in the following sections.
  • Duplex Color Image Reader Unit-A1 (Optional)
  • Paper Deck Unit-A1/POD Deck Lite-A1 (Optional)
  • Front Cover of the Multi-drawer Paper Deck-A1 (Optional)
  • Paper Decks of the Multi-drawer Paper Deck-A1 (Optional)
  • Document Insertion Unit-H1 (Optional)
  • Insertion Unit of the Document Insertion/Folding Unit-G1/Document Insertion Unit-J1 (Optional)
  • Inside the Insertion Unit of the Document Insertion/Folding Unit-G1/Document Insertion Unit-J1 (Optional)
  • Document Insertion/Folding Unit-G1 (Optional)
  • Paper Folding Unit-G1 (Optional)
  • Inside of the Staple Finisher-A1/Booklet Finisher-A1 (Optional)
  • Saddle Stitcher Unit of the Booklet Finisher-A1 (Optional)
  • Inside the Top Cover of the Staple Finisher-B1/Booklet Finisher-B1 (Optional)
  • Output Area of the Staple Finisher-B1/Booklet Finisher-B1 (Optional)
  • Front Cover of the Booklet Finisher-B1 (Optional)
  • Saddle Stitcher Unit of the Booklet Finisher-B1 (Optional)
  • Professional Puncher Integration Unit-B1 (Optional)
  • External 2/3 Hole Puncher-A1 (Optional)

  1. After you have removed all of the jammed paper in the locations indicated on the touch panel display, restore all levers and covers to their original positions.
  1. Continue to follow the procedure and instructions on the touch panel display.

Once you have removed all of the jammed paper in locations other than the feeder, printing or copying resumes.

If there is paper that still needs to be removed, a screen indicating how to clear that paper jam appears on the touch panel display. Repeat the procedure from step 1.

  • You do not have to re-enter the number of copies or prints, even if you are printing multiple sets. The machine automatically recalculates the number of copies or prints to make based on the number of sheets that have jammed.

  • Back To Top