|
IMPORTANT
|
|
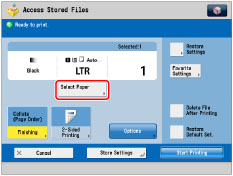
Be sure to correctly set the paper type. If the type of paper is not set correctly, it could adversely affect the quality of the image. Moreover, the fixing unit may become dirty, or the paper could jam, and a service repair may be needed.
|
|
NOTE
|
|
If paper is being fed from the multi-purpose tray for the current job, you can select the paper for the next job from [Change MP Tray Paper]. (See "Reserving a Print Job Using the Multi-Purpose Tray.")
|
|
NOTE
|
|
If [Paper Drawer Auto Selection On/Off] is set to 'Off' for a particular paper source, you cannot print on paper loaded in that paper source in the Automatic Paper Selection mode. (See "Enabling Paper Drawer Auto Selection.") Also, even if Paper Drawer Auto Selection On/Off] is set to 'On' for a paper source, depending on the paper type, automatic paper selection may not be performed. To use paper loaded in a paper drawer for which automatic paper selection cannot be performed, manually specify the paper drawer and perform printing.
Icons indicating the type of paper loaded in each paper drawer can be displayed on paper selection screens, if you store that information into the machine beforehand. (See "Registering/Editing Custom Paper Types.")
 indicates that the paper is loaded vertically, and indicates that the paper is loaded vertically, and  indicates that the paper is loaded horizontally. The suffix <R> (such as in STMTR) used in paper size designations indicates that the paper is loaded in a paper drawer or the multi-purpose tray horizontally. indicates that the paper is loaded horizontally. The suffix <R> (such as in STMTR) used in paper size designations indicates that the paper is loaded in a paper drawer or the multi-purpose tray horizontally.You can use 5 1/2" x 7 1/8" to 13" x 19 13/64" (139.7 mm x 182.0 mm to 330.2 mm x 487.7 mm) size paper as nonstandard size (custom size) paper.
If you want to use nonstandard size paper, it is necessary to first register paper size. (See "Registering/Editing/Deleting Custom Paper Sizes.")
|
|
NOTE
|
|
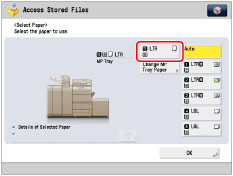
If the paper loaded in the multi-purpose tray is not the paper that you want to specify, remove any paper and load the paper you want to specify into the multi-purpose tray. (See "Loading Paper into the Multi-Purpose Tray.")
If paper is being fed from the multi-purpose tray for the current job, you can select the paper for the next job from [Change MP Tray Paper]. (See "Reserving a Print Job Using the Multi-Purpose Tray.")
|
|
IMPORTANT
|
|
For information on the modes which cannot be set in combination with this mode, see "Unavailable Combination of Functions."
If you want to print a scanned file whose size has been specified as [11x17+] in Document Size Select, load the paper source with 12" x 18" or 12 5/8" x 17 11/16" paper.
|
|
NOTE
|
|
If [Register Multi-Purpose Tray Defaults] is set to 'On' in [Preferences] (Settings/Registration), the stored default values appear. (See "Registering Multi-Purpose Tray Defaults.")
For instructions on loading paper into the multi-purpose tray, see "Loading Paper into the Multi-Purpose Tray."
For more information on paper types, see "Available Paper Stock."
The following paper sizes can be used only when printing the stored file in a mail box: 13" x 19", 12" x 18", 12 5/8" x 17 11/16", 11" x 17", Free Size, or Custom Size.
|
