 e-Manual e-Manual | Top Site map Site map Help Help Glossary Glossary |
|---|---|
 Category Top
 Overview of This Function
 Advanced Box/Network Settings
 Mail Box
 Advanced Box
 Network
 Memory Media
 Flow of Operations for Accessing Stored Files
 Printing Files Stored in a Mail Box
 Printing Files Stored in the Advanced Box
 Printing Files Stored on the Network
 Printing Files Stored in Memory Media
 Canceling a Job While Printing
 Reserving Jobs
 Arranging Files Stored in a Mail Box
 Checking File Information
 Previewing a File
 Operations for Files Stored in a Mail Box
 Printing Lists
 Arranging Files and Folders Stored in the Advanced Box
 Checking Detailed Information of the Advanced Box
 Personal Space Operations
 Folder Operations
 Checking File Information
 Previewing a File
 Operations for Files Stored in a Folder
 Arranging Files and Folders Stored on the Network
 Checking Storage Information
 Folder Operations
 Checking File Information
 Previewing a File
 File Operations
 Arranging Files and Folders Stored in Memory Media
 Checking the Detailed Information for Memory Media
 Folder Operations
 Checking File Information
 Previewing a File
 File Operations
 Printing a Sample
 Storing Print Settings
 Adjusting Density During Printing
 Merging Files When Printing
 Favorite Settings
 Storing Favorite Settings
 Recalling/Deleting Favorite Settings
 Paper Selection
 Collating Prints
 Two-Sided Printing
 Convenient Modes for Printing
 Adding a Cover
 Inserting Sheets
 Booklet Mode
 Job Separator
 Shifting the Original Image Using the Numeric Keys
 Adding a Secure Watermark
 Document Scan Lock
 Document Scan Lock
 Superimpose Image
 Gutter
 Page Numbering
 Copy Set Numbering
 Watermark Printing
 Date Printing
 Print on Tab
 Adjusting the Print Resolution
 Printing with Halftones
 Adjusting Printing to Fit the Paper Size
 Enlarging the Print Area
 Printing Files with Multiple Pages on One Page (N On 1)
 Printing Comments
 Printing Password Protected PDF Files
 Enlarging and Reducing Prints
 Setting the Print Orientation
 Setting the Print Position
 Sending a File
 Unavailable Combination of Functions
|
IMPORTANT
|
|
This mode can be used only for printing a file stored in a mail box.
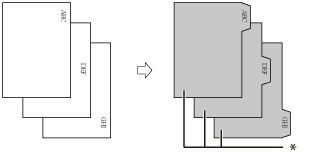
Only LTR originals can be used with the Print on Tab mode.
You can load tab paper in Paper Drawer 2 only if the Tab Feeding Attachment Kit-B1 is attached.
|
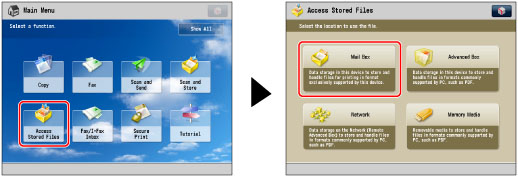
 ).
).
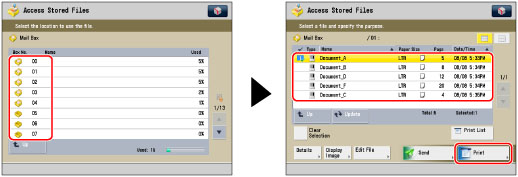


|
NOTE
|
|
Make sure that the Number of Tabs shown on the touch panel display is the same as the number of tabs on the tab paper loaded in the paper source.
|
|
IMPORTANT
|
|
For information on the modes which cannot be set in combination with this mode, see "Unavailable Combination of Functions."
|
|
NOTE
|
||
|
If you are feeding tab paper from a paper drawer, you must register the paper type in the paper source as tab paper beforehand. (See "Registering the Paper Size and Type for a Paper Source.")
For instructions on loading tab paper into the paper source, see "Loading Tab Paper Using the Tab Feeding Attachment Kit-B1 (Optional)."
Load the paper in reverse order and face down, with the tabs on the left side.
 If [Unfinished Tab Paper Forced Output] in [Function Settings] (Settings/Registration) is set to 'On', the extra amount of tab paper sheets that were not required for the job are forced out of the machine.
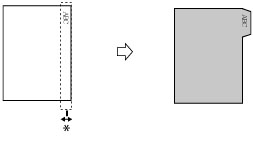
Example: If the number of tabs is set to 5 and the machine estimates that seven sheets of tab paper are needed for the print job, you must prepare two sets of tab paper each containing five tabs (10 total). Therefore, if the machine only uses seven tab paper sheets, three tab paper sheets will remain. Areas of images shifted outside the tab paper cannot be printed on the paper, and may cause the following prints to have black streaks or appear dirty.
|