Top Site mapHelpGlossary Site mapHelpGlossary | |
 Category Top
 Overview of This FunctionFlow of Copy OperationsCanceling a Copy JobReserved CopyingRecalling Previous Copy Jobs (Previous Settings)
 Storing, Recalling, and Deleting Favorite Settings (Favorite Settings)Storing Favorite SettingsRecalling and Deleting Favorite SettingsAssigning ShortcutsChanging and Canceling Copy SettingsInterrupt ModeChanging Copy RatiosSetting the X and Y Axes IndependentlyPaper SelectionSpecifying the Orientation of the Original ImageTwo-Sided CopyingCollating CopiesN on 1Adjusting Density ManuallyAdjusting Background DensitySelecting the Original TypeAdding a Secure WatermarkPage NumberingCopy Set NumberingAdjusting the Image SharpnessErase FrameWatermark PrintingDate PrintingShifting the Original ImageMaking ID Card CopiesAppendix
|
1
|
[Direct]
Press to make copies the same size as your original.
|
|
2
|
[Copy Ratio]
Press to specify the desired copy ratio.
|
|
3
|
[Select Paper]
Press to select the paper size/type and the paper source.
|
|
4
|
 You can specify the following settings:
Register/Edit Favorite Settings
Register to Quick Menu (See "Quick Menu.")
Change Default Settings
Register Options Shortcuts
|
|
5
|
[Check Settings]
Press to check, edit, or clear the current copy settings.
|
|
6
|
Shortcuts to [Options]
These are shortcuts to the [Options] modes. [Orig. Content Orientation], [2-Sided], [Density], [Original Type], and [Favorite Settings] are set as default. |
|
7
|
[Options]
Press to specify other settings. You can configure a range of copy functions.
|
|
8
|
[Interrupt]
The interrupt mode enables you to pause a reserved or current job to make higher priority copies.
|
 or
or  to display the next or previous screen. All special copy modes appear on these screens.
 after selecting a mode to display a Tutorial screen containing guidance information. This is useful when you want to learn more about the selected mode.
|
1
|
[Favorite Settings]
Press to register frequently used copy settings. You can also recall registered settings. |
|
2
|
[Previous Settings]
Press to recall the three most recent copy settings. |
|
3
|
[Orig. Content Orientation]
Press to specify the orientation of the original.
|
|
4
|
[2-Sided]
Press to specify the 2-Sided Settings. Press to make [1-Sided
 2-Sided], [2-Sided2-Sided], or [2-Sided1-Sided] copies. 2-Sided], [2-Sided2-Sided], or [2-Sided1-Sided] copies. |
|
5
|
[Original Type]
Press to select the type of original ([Text/Photo], [Printed Image], [Photo Printout], or [Text]) you are going to copy.
|
|
6
|
[Density]
Press to adjust the copy density.
|
|
7
|
[N on 1]
Press to automatically reduce two or four page originals to fit onto a one-sided or two-sided copy sheet. |
|
8
|
[Finishing]
Press to select the Collate, Group, or Staple mode. |
|
1
|
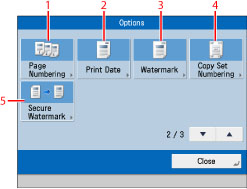
[Page Numbering]
This mode enables you to print page numbers. |
|
2
|
[Print Date]
This mode enables you to print the date. |
|
3
|
[Watermark]
This mode enables you to print a watermark. |
|
4
|
[Copy Set Numbering]
This mode enables you to print copy set numbers. |
|
5
|
[Secure Watermark]
Press to embed hidden text in the background of the print. The hidden text will become visible if the resulting output is copied. |

|
1
|
[Sharpness]
Press to sharpen or soften the original image on the copy. |
|
2
|
[Erase Frame]
Press to eliminate dark border areas, lines that appear around original images, or shadows from binding holes. |
|
3
|
[Shift]
Press to shift the position of the original image on the copy. |
|
4
|
[Copy ID Card]
Press to line up and copy both the front and back of a card onto a single sheet of paper. |
| © CANON Inc. 2013 All Rights Reserved | Disclaimers CopyrightTrademarksOffice LocationsUSRM2-3062-01 CopyrightTrademarksOffice LocationsUSRM2-3062-01 |
|---|
 Expand all
 Collapse all
 Search options