
 on the lower right of the screen, and replace the cleaning web unit of the corresponding fixing part. on the lower right of the screen, and replace the cleaning web unit of the corresponding fixing part.

 CAUTION CAUTION |
|
The fixing part remains hot after printing. Wait until it cools before replacing the cleaning web unit.
|
|
IMPORTANT
|
|
Your local authorized Canon dealer will dispose of the cleaning web unit. Store the removed cleaning web unit in the box.
|
|
NOTE
|
|
The cleaning web units in the primary and secondary fixing parts are replaced using the same method. This section explains the replacement method of the primary fixing part.
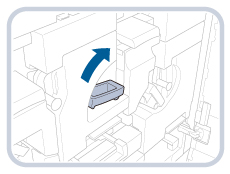
The fixing part and the lever for pulling out the fixing part are shown in the figure below.
 *1: Primary fixing part (C-A4)
*2: Secondary fixing part (C-B4)
Prepare a new cleaning web unit before starting the replacement process.
Press [Previous] and [Next] displayed on the touch panel display to review the replacement process.
Jobs that are interrupted by replacing the cleaning web unit restart automatically after replacement is complete.
|
.|
NOTE
|
|
This step is not necessary if there is no cleaning web unit set.
|


|
CAUTION |
|
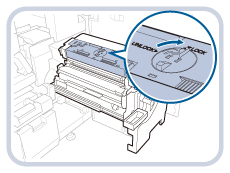
The cleaning web unit is hot immediately after printing. Wait until it cools down before turning the knob.
|

 symbols each that are printed on the cleaning web unit and fixing part match.
|
IMPORTANT
|
|
Do not touch the roller part and web sheet when holding the new cleaning web unit. Errors or print stains may occur if the web sheets is creased or sagging.
 Your local authorized Canon dealer will dispose of the cleaning web unit. Store the removed cleaning web unit in the box.
|


|
CAUTION |
|
Be careful not to catch your fingers when closing the cover.
|
|
IMPORTANT
|
|
If the screen display does not change even after replacement, check that the knob on the cleaning web unit is set to the LOCK position.
If the cleaning web unit is replaced before the replacement message is displayed, initialize the cleaning web unit.
The cleaning web unit is initialized automatically in the regular replacement process. Do not initialize it from the menu.
|