e-ManualTopSite mapHelp

Category Top

What This Machine Can Do

Overview of This Function

Things You Must Do Before Using This Machine

Flow of Sending Operations

Canceling a Job

Specifying Destinations

Specifying Destinations Using the Address Book (Local)

Specifying Destinations Using the Address Book (Remote)

Specifying Destinations Using the Address Book (LDAP Server)

Specifying Destinations Using the One-Touch Buttons

Specifying a Destination by Entering an E-mail Address

Specifying Destinations by Entering an I-Fax Address

Specifying a Destination by Entering a File Server

Specifying a File Server Using the Keyboard

Specifying a File Server Using the Browse Key (Windows (SMB))

Specifying a File Server Using the Search Host Key (Windows (SMB))

Storing in a Mail Box

Storing in an Advanced Box

Setting Your Personal Folder as the Destination

Setting Your Own E-Mail Address as the Destination

Setting Cc and Bcc Addresses

Checking/Editing/Deleting the Information for a Destination

Favorite Settings

Recalling Previous Send Jobs

Storing New Addresses

Registering an E-Mail Address

Registering an I-Fax Address

Registering a File Server Address

Registering a Group Address

Registering an Address Obtained via an LDAP Server

Registering an Advanced Box Address

Storing/Editing/Deleting One-Touch Buttons

Checking/Editing/Deleting a Stored Address

Registering/Editing/Deleting Favorite Settings

Registering/Editing Favorite Settings

Checking Favorite Settings

Editing a Name/Comment

Deleting Favorite Settings

Assigning Shortcuts

Switching the Color Mode

Setting the Resolution

Specifying/Registering Scan Sizes

Setting the File Format

Trace and Smooth

Compact PDF or XPS

Limited Color PDF

Searchable PDF/XPS/OOXML

Adding a Digital Signature to a PDF or XPS

Encrypting PDF Files

Applying a Policy

Selecting the Original Type

2-Sided Original

Book → 2 Pages

Different Size Originals

Adjusting Density Manually

Adjusting Background Density

Adjusting the Image Sharpness

Changing the Zoom Ratio

Erase Frame

Job Build

Delayed Send

Preview

Job Done Notice

File Name

Subject/Message

Reply-to

Setting E-Mail Priority

Receiving I-Fax Documents

Processing Received Documents

Receiving Documents

Setting the Memory Lock Mode

Forwarding Received Documents

Available Paper Sizes

When Problems Occur

Questions & Answers

Top » Scan and Send » Specifying Destinations » Specifying Destinations Using the Address Book (LDAP Server)
Specifying Destinations Using the Address Book (LDAP Server)
0L3X-115
You can specify a destination by searching the directory listings on the network using LDAP (Lightweight Directory Access Protocol) servers.
You can also register the search conditions specified in this procedures as the default search condition.
NOTE
You may have to set up the LDAP servers beforehand, depending on the network environment. (See "LDAP Server Settings.")

1.
Press (Main Menu) →[Scan and Send] → [Address Book].
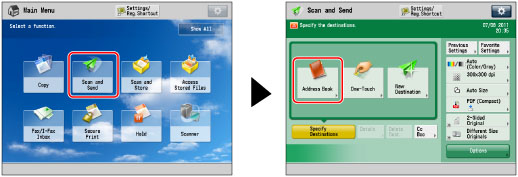
2.
Press [Change Addr. Book].
NOTE
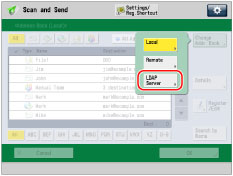
[Change Addr. Book] appears only if you register both the Remote Address Book and LDAP server. If only the LDAP server is registered on the machine, [To LDAP Server] is displayed.
3.
Press [LDAP Server].
The Enter Network Password screen appears if the settings for [Register LDAP Server] are as follows:
<Display Authentication Screen When Searching> is set to 'On'.
The user name, password, or domain name is incorrect.
IMPORTANT
You cannot search for a destination via an LDAP server if the time settings of the server and this machine are more than five minutes apart. If you cannot search even when the user name and password are correct, check the time settings for the server and this machine.
The number of search results displayed will not exceed the maximum limit set in [LDAP Server]. If the desired destination does not appear, either increase the maximum number of addresses to search, or change the search criteria. (See "LDAP Server Settings.")
4.
Search for a destination.
NOTE
If you perform a new destination search when a search result is already displayed on the destination list screen, the displayed search result is cleared.
If the search result for specified criteria is displayed, the search result is cleared and search for all criteria is processed when you press [All].
If you set [Auto Search When Using LDAP Server] to 'Off', nothing appears on the destination list screen until you perform a search.
If the search result from [Search by Conditions] is displayed on the search list screen, you cannot additionally press [Search by Name] to narrow the search by name.
If a destination is registered with an e-mail address and a fax number, you can search for the e-mail address by entering the fax number as the search criterion, and vice versa.
If you want to narrow the search for destination by entering characters of the name on the keyboard:
If you want to search for destination by entering search criteria:
If you want to narrow the search for destination by entering characters of the name on the keyboard:
Press [Search by Name].
Enter the text to search on the keyboard screen → press [OK].
Enter characters from the first character of the name. You cannot search if you enter a character other than the first character of the name.
If you want to search for destination by entering search criteria:
Press [Search by Conditions].
Press the search category drop-down list → select the desired search category.
The available search categories are:
[Name]:
Search by name.
[E-Mail]:
Search by e-mail address.
[Fax]:
Search by fax number.
[Organization]:
Search by organization name.
[Org. Unit]:
Search by organization unit (e.g., departments in an organization).
For example, if the name that identifies a user in the LDAP server directory is cn(common name)=user1, ou(organization unit)=salesdept, o(organization)=canon, c(country)=jp, enter the organization/organization unit of the user as follows:
organization=canon
organization unit=salesdept
NOTE
You can only use organization/organization unit as search categories if the information has been registered on the LDAP Server.
You may be unable to search using organization/organization unit, depending on the type of server application.
You can also add additional user-defined search attributes. (See "Registering/Editing LDAP Search Attributes.")
Press the search criteria drop-down list → select the desired search criteria.
The available criteria are:
[Contains]:
The result must contain the entered text.
[Does Not Contain]:
The result must not contain the entered text.
[Equals]:
The result must equal the entered text.
[Differs from]:
The result must not equal the entered text.
[Begins with]:
The result must begin with the entered text.
[Ends with]:
The result must end with the entered text.
Press [Set].
Enter text to search for → press [OK].
To edit the stored search criteria, press [Set] → enter the new search criteria.
To continue adding search criteria, press [Add Search Condition] → [or] or [and] → repeat the steps to add more search criteria as necessary.
[or]:
The machine searches and returns a result that matches any of the specified search criteria.
[and]:
The machine searches and returns a result that matches all of the specified search criteria.
To delete the search criteria, press [Delete]. If you want to change set search criteria, press [Delete] → repeat the steps to specify the search criteria.
To use the criteria you have entered next time you search, press → [Change Default LDAP Search Conditions] → [Yes].
You can also press  
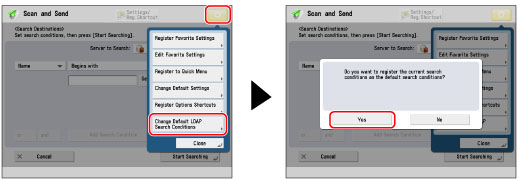
to change the default condition after entering the criteria.
Press [OK] when the <Change Default LDAP Search Conditions: Register> screen appears with all the criteria you entered.
NOTE
You can specify up to four different search criteria at a time.
If you specify three or more search criteria, you cannot use both [or] and [and] together.
Press [Start Searching].
To cancel searching while the machine is searching, press [Cancel]. If the machine finds results before you press [Cancel], those search results are displayed.
NOTE
If you press [Start Searching] without specifying any search criteria, all of the addresses stored on the LDAP server appear.
5.
Select the destination from the search results → press [OK].
You can select multiple destinations.
If you press [Specify E-Mail Address as I-Fax], the key lights to show that this setting is turned on, and the selected e-mail address can be specified as an I-fax destination.
If you specify an I-fax address as the destination, read the displayed message → press [OK].
NOTE
To cancel a selected destination, select the destination again.
If you specify an e-mail address as an I-fax destination, the only information that you can retrieve from the server is the I-fax address. To specify settings to match the recipient's receiving conditions, press [Details] on the Scan and Send screen.
If you select only one destination, press (Start) to send from the Address Book screen.

NOTE
The information that can be obtained from the LDAP server consists of only names and e-mail addresses.
You cannot directly specify a destination obtained via a server as a forwarding destination. To specify it as a forwarding destination, you must first store it in the Local Address Book. (See "Registering an Address Obtained via an LDAP Server.")