Top Site mapHelpGlossary Site mapHelpGlossary | |
 Category Top
 Overview of This FunctionNetwork Settings
 Mail BoxNetworkMemory Media
 Flow of Scan and Store OperationsStoring Scanned Originals in a Mail BoxStoring Originals on the NetworkStoring Originals into Memory MediaCanceling a Job While ScanningStoring Originals While PrintingFavorite SettingsStoring Favorite SettingsRecalling and Deleting Favorite SettingsSwitching the Color ModeChanging the Zoom RatioSetting the ResolutionSpecifying/Registering Scan SizesSetting the File FormatTrace and SmoothCompact PDF or XPS FilesSearchable PDF/OOXML FilesPDF or XPS Files with a Digital SignatureEncrypting PDF FilesApplying a PolicySelecting the Original TypeAdjusting Density ManuallyAdjusting Background Density2-Sided OriginalBook → 2 PagesErase FrameDifferent Size OriginalsJob BuildAdjusting the Image SharpnessUnavailable Combination of Functions
 is the icon for an empty mail box.
 is the icon for a mail box with files.
 is the icon for a mail box that is set with a PIN.
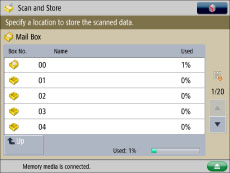
|
1
|
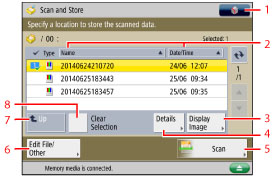
 You can specify the following settings:
Register to Quick Menu (See "Quick Menu.")
|
|
2
|
[Name]
Press to sort the files by name, in ascending or descending order.
[Date/Time] Press to sort the files by date/time, in ascending or descending order.
|
|
3
|
[Display Image]
Press to view the contents of the selected file.
|
|
4
|
[Details]
Press to check the details of a file stored in a mail box.
|
|
5
|
[Scan]
Your original is scanned and stored in a mail box.
|
|
6
|
[Edit File/Other]
Press to edit or check a file in a mail box.
|
|
7
|
[Up]
Press to return to the upper level.
|
|
8
|
[Select All (Max 100 Files)]
Press to select all of the files in a mail box. If a file is selected, this key changes to [Clear Selection].
|
|
1
|
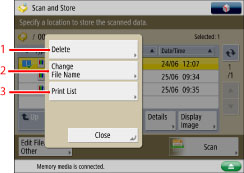
[Delete]
Press to delete a file stored in a mail box.
|
|
2
|
[Change File Name]
Press to change a file name.
|
|
3
|
[Print List]
Press to print a list of the files stored in a mail box.
|
|
1
|
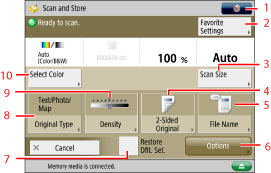
You can specify the following settings:
Register/Edit Favorite Settings
Register to Quick Menu(See "Quick Menu.")
Change Default Settings
|
|
2
|
[Favorite Settings]
Press to recall scan settings or register frequently used settings in the Favorite Settings.
|
|
3
|
[Scan Size]
Press to set the size of the original that you are going to scan.
|
|
4
|
[2-Sided Original]
Press if you are scanning a two-sided original.
|
|
5
|
[File Name]
Press to assign the file a name.
|
|
6
|
[Options]
Press to specify useful scan settings, such as scanning different size originals together or dividing originals into multiple batches.
|
|
7
|
[Restore Dflt. Set.]
Press to cancel all settings. (The machine restores the default settings for Scan and Store.)
|
|
8
|
[Original Type]
Press to select the type of original ([Text/Photo/Map], [Printed Image], [Photo Printout], or [Text]) you are going to scan. |
|
9
|
[Density]
Press to adjust the density for scanning. |
|
10
|
[Select Color]
Press to select the color for scanning.
|
|
IMPORTANT
|
|
You cannot store files in a mail box in the cases described below. (These numbers may vary depending on the remaining capacity of the memory.)
When more than 2,000 files are stored in the selected mail box.
When more than 2,000 files are stored in all of the mail boxes.
When a total of approximately 6,000 pages of files are stored in all of the mail boxes.
|
|
NOTE
|
|
For more information on the icons displayed in the Mail Box, see "Types of Mail Box Icons."
We recommend that you delete unwanted files or image data from your Mail Box to make space for storing new files.
|
| Copyright CANON INC. 2015 | Disclaimers CopyrightTrademarksThird Party SoftwareOffice LocationsUSRM2-5563-00 CopyrightTrademarksThird Party SoftwareOffice LocationsUSRM2-5563-00 |
|---|
 Expand all
 Collapse all
 Search options