Top Site mapHelpGlossary Site mapHelpGlossary | |
 Category Top
 Overview of This FunctionNetwork SettingsMail BoxNetworkMemory MediaFlow of Scan and Store OperationsStoring Scanned Originals in a Mail BoxStoring Originals on the NetworkStoring Originals into Memory MediaCanceling a Job While ScanningStoring Originals While PrintingFavorite SettingsStoring Favorite SettingsRecalling and Deleting Favorite SettingsSwitching the Color ModeChanging the Zoom RatioSetting the ResolutionSpecifying/Registering Scan SizesSetting the File FormatTrace and SmoothCompact PDF or XPS FilesSearchable PDF/OOXML FilesPDF or XPS Files with a Digital SignatureEncrypting PDF FilesApplying a PolicySelecting the Original TypeAdjusting Density ManuallyAdjusting Background Density2-Sided OriginalBook → 2 Pages
 Erase FrameDifferent Size OriginalsJob BuildAdjusting the Image SharpnessUnavailable Combination of Functions
|
IMPORTANT
|
|
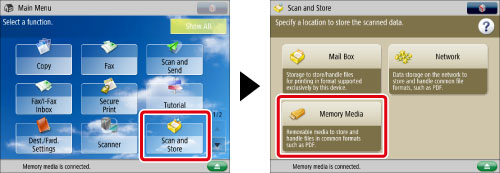
Make sure to place your original on the platen glass. If you place originals with binding holes in the feeder, it may damage the originals.
|
|
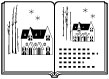
Erase Original Frame Not Selected
|
Erase Original Frame Selected
|
|||
 |
 |
 |
 |


|
IMPORTANT
|
|
You can set the Erase Original Frame mode only for the original sizes shown on the touch panel display.
|

|
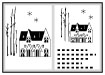
Erase Book Frame Not Selected
|
Erase Book Frame Selected
|
|||
 |
 |
 |
 |

|
IMPORTANT
|
|
You can set the Erase Book Frame mode only for the original paper sizes shown on the touch panel display.
|

|
Erase Binding Not Selected
|
Erase Binding Selected
|
|||
 |
 |
 |
 |

|
IMPORTANT
|
|
For information on the modes which cannot be set in combination with this mode, see "Unavailable Combination of Functions."
If you are using [Erase Binding], the borders you do not select are also erased by 1/8" (4 mm).
|
| Copyright CANON INC. 2015 | Disclaimers CopyrightTrademarksThird Party SoftwareOffice LocationsUSRM2-5563-00 CopyrightTrademarksThird Party SoftwareOffice LocationsUSRM2-5563-00 |
|---|
 Expand all
 Collapse all
 Search options