
|
1
|
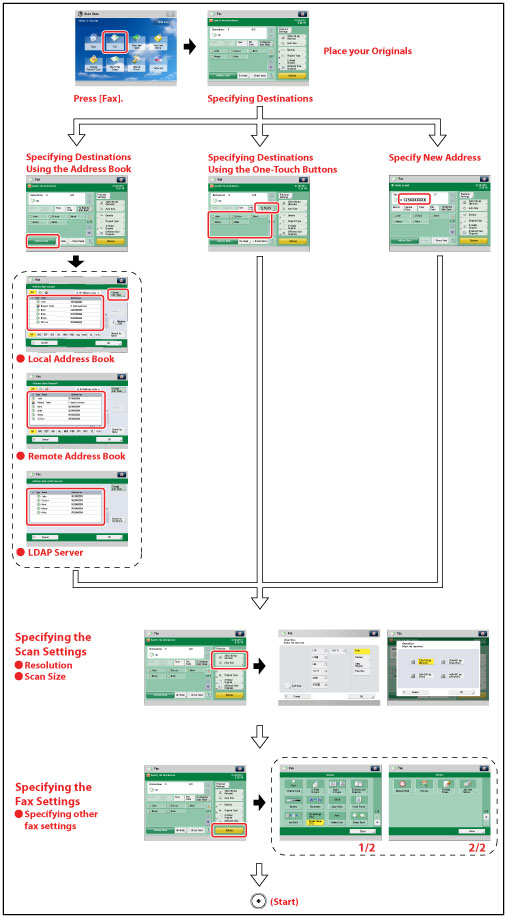
Destinations
Displays the number of specified destinations.
|
|
2
|
Destination
Displays the destination entered using the numeric keys.
|
|
3
|
 You can specify the following settings:
Register to Quick Menu
Change Default Settings
Register Options Shortcuts
Change Default LDAP Search Conditions
Register/Edit Information for Each User
[Register/Edit Information for Each User] appears only if you are managing users by login service such as SSO-H. For more information, see "Authentication Method Settings for Sending Operations."
|
|
4
|
[Previous Settings]
Press to recall the last three send jobs, including the destinations, scan settings, and send settings.
|
|
5
|
Resolution
Press to specify the resolution.
|
|
6
|
Scan Size
Press to specify the size for scanning.
|
|
7
|
Shortcuts to [Options]
Press to select an [Options] mode. [Density], [Original Type], [2-Sided Original], and [Different Size Originals] are set as default. (See "Assigning Shortcuts.")
|
|
8
|
[Options]
Press to set useful fax functions such as sending different sized originals together or 2-sided originals.
|
|
9
|
One-Touch Button Number Entry Button
Press to specify the destination by entering the number for a one-touch button.
|
|
10
|
One-Touch Buttons
Press to specify destinations stored in one-touch buttons.
|
|
11
|
Register One-Touch Button
Press to register destinations in one-touch buttons.
|
|
12
|
[On-Hook]
Press to use tone dialing or to send a fax document manually. (See "Fax Information Services.")
|
|
13
|
[Address Book]
Press to select a destination from the Address Book.
|
|
14
|
[Direct Send]
Press to send documents directly to the recipient. If you do not select Direct Sending, Memory Sending is used instead. (See "Switching to Direct Sending.")
|
|
15
|
[PIN Code]
Press to enter the PIN (Personal Identification Number) code. You can press this key only if [Option] is selected for PIN code position. If [Prefix], [Suffix], or [Off] is selected for PIN code position, this key is grayed out. (See "Using a PIN Code.")
|
|
16
|
[Details]
Press to check or change the selected destination.
|
|
17
|
[Delete Dest.]
Press to delete the selected destination.
|
|
18
|
[To Remote Add. Book]
Press to specify destinations registered in the one-touch buttons of a server machine by accessing from a client machine on the network.
|
|
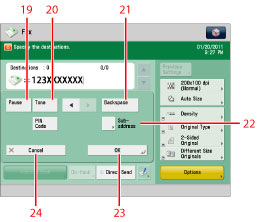
19
|
[Pause]
Press to insert a pause of several seconds in the fax number that you are dialing. If you press [Pause] betwewn numbers, the letter <p> appears between the numbers. If you press [Pause] at the end of a number, the letter <P> appears at the end of the number. When dialing an overseas number, insert a pause after the country code, and at the end of the telephone number. (See "Pause Time.")
|
|
20
|
[Tone]
Press when you want to directly call an extension line that is connected to a PBX (Private Branch eXchange) which accepts only tone signals. If you press [Tone], the letter <T> appears.(See "Fax Information Services.")
|
|
21
|
[Backspace]
Press when you enter an incorrect number to delete the number before the cursor.
|
|
22
|
Subaddress
Press to set an optional subaddress and password. Specify the settings as necessary.
[Set Details]
Displayed when multiple lines are set to be used. Press to set the subaddress and password, or to select the telephone line to use for transmission.
|
|
23
|
[OK]
Press after specifying a destination using
 to to  (numeric keys). You can specify another destination. (numeric keys). You can specify another destination. |
|
24
|
[Cancel]
Press to return to the previous screen.
|
|
NOTE
|
|
If you set [Display Fax Function] to 'Off', [Fax] does not appear in the Main Menu. (See "Display Fax Function.")
You can use multiple lines in the following cases:
If the Super G3 2nd Line Fax Board is installed in addition to installing the Super G3 FAX Board, or the Super G3 3rd/4th Line Fax Board is installed in addition to installing the Super G3 2nd Line Fax Board and Super G3 FAX Board.
If [No. of TX Lines] is set to two lines when using the Fax function with the Remote Fax Kit. (See "Remote Fax TX Settings.")
|
|
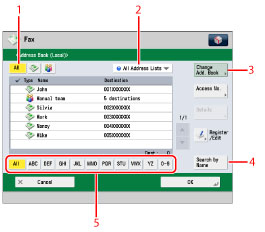
1
|
Specify Type of Destination drop-down list
If you press [All],
 (Fax) or (Fax) or  (Group), destinations for each type appear. (Group), destinations for each type appear. |
|
2
|
Address List drop-down list
Press the Address List drop-down list to display a list of Address Lists 1 to 10 or one-touch buttons. Address lists categorize the addresses stored in the Address Book.
|
|
3
|
Change Address Book
If you press [Change Add. Book], you can switch the display to the [Local], [Remote], or [LDAP Server] address book.
|
|
4
|
[Search by Name]
If you press [Search by Name], a pop-up screen for refining the address book appears.
|
|
5
|
Search Initial Letter button
Press the alphanumeric keys (e.g., [ABC]) to display the individual keys for each letter or number. You can select a letter or number to restrict the displayed range of entries. Press [All] to return to the full address list.
|
|
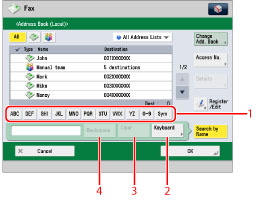
1
|
[ABC] - [Sym]
Displays the characters you can enter. The range of letters or the symbols you can enter are displayed.
|
|
2
|
[Keyboard]
Displays the keyboard on the touch panel display.
|
|
3
|
[Clear]
Press to delete all of the text entered.
|
|
4
|
[Backspace]
Press to delete the last letter entered.
|
|
NOTE
|
|
Press [Search by Name] to close the screen for refining the address book and return to the previous screen.
If you select [All], destinations registered in one-touch buttons also appear. However, you cannot delete destinations registered in one-touch buttons. For instructions on deleting one-touch buttons, see "Storing/Editing/Deleting One-Touch Buttons."
To cancel a selected destination, select the destination again.
[Access No.] appears only on the screen if [Manage Address Book Access Numbers] is set to 'On'. (See "Managing the Address Book with Access Numbers.")
|
