Top Site mapHelpGlossary Site mapHelpGlossary | |
 Category Top
 Sending/Receiving a FaxMain Features for Sending FaxesOverview of This FunctionAdditional Lines
 Things You Must Do Before Using This MachineFlow of Sending Fax OperationsSending Fax Documents ManuallyCanceling a Job
 Specifying DestinationsSpecifying Destinations Using the Address Book (Local)Specifying Destinations Using the Address Book (Remote)Specifying Destinations Using the Address Book (LDAP Server)Entering a New Fax NumberSpecifying Destinations Using One-Touch ButtonsRecalling Previous Settings and Sending a FaxChecking/Editing/Deleting the Information for a DestinationStoring New AddressesStoring Fax NumbersStoring Group AddressesStoring Addresses Obtained via an LDAP ServerStoring/Editing/Deleting One-Touch ButtonsChecking/Editing/Deleting a Stored AddressAssigning ShortcutsSetting the ResolutionSpecifying/Registering Scan SizesSwitching to Direct SendingPreview2-Sided OriginalAdjusting Density ManuallyAdjusting Background DensitySetting Original TypeAdjusting the Image SharpnessErase FrameDelayed SendSelecting the Sender's Name When Sending a FaxSelecting the Telephone Line When Sending a FaxProcessing Received DocumentsReceiving DocumentsSetting the Memory Lock ModeForwarding Received DocumentsAvailable Paper SizesSending with a SubaddressFax Information ServicesWhen Problems OccurTrouble Sending Fax DocumentsTrouble Receiving Fax DocumentsTrouble in Other SituationsQuestions & AnswersSending a Fax from a Computer (Windows)System RequirementsBefore Sending a Fax from a ComputerInstallationSetting the Fax OptionsFaxing FundamentalsFaxingSpecifying the Default Fax SettingsViewing the Online HelpSetting the Fax Send TimeAttaching a Cover SheetRegistering a Profile for FaxingSelecting a Profile for FaxingRegistering a Person in an Address BookRegistering a Group in an Address BookImporting Address Book EntriesExporting Address Book EntriesChanging the Address Book Export DestinationSending a Fax from a Computer (Mac)System RequirementsBefore Sending a Fax from a ComputerInstallationSetting the Fax OptionsVerifying the Fax InformationManually Setting the Fax OptionsFaxing FundamentalsFaxingViewing the Online HelpOutputting Multiple Pages on One SheetSetting the Output RangeSetting the Fax Send TimeAttaching a Cover SheetRegistering a Person in an Address BookRegistering a Group in an Address BookImporting an Address BookExporting an Address Book
|
IMPORTANT
|
|
If you attempt to use the machine without registering the necessary information correctly, the machine may not function properly.
|
|
NOTE
|
|
If this setting is incorrect, you will be unable to communicate with other machines. Be sure to check the type of telephone line that you are using, and make the correct setting. You can also register the type of telephone line for added fax lines.
|
|
<Time Zone>:
|
The standard time zones of the world are expressed globally in terms of the difference in hours (± up to 12 hours) from GMT*1 (± 0 hours). A time zone is a region throughout which this time difference is the same.
|
|
<Daylight Saving Time>:
|
In some countries, time is temporarily advanced throughout the summer season. This practice is called "Daylight Saving Time."
|
|
IMPORTANT
|
|
It is necessary to register a separate fax number if you have an additional line. (See "Fax Line Settings.")
|
|
NOTE
|
|
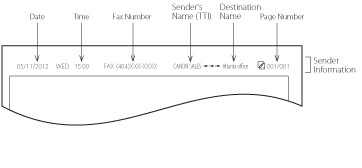
It is necessary to register a separate unit name if you have an additional line. (See "Fax Line Settings.")
You can set the machine so that the sending record is not printed. (See "Printing the TX Terminal ID.")
If you set the machine to print the sending record at the top of the recording paper, and not all of the items are registered, only the registered items and the total number of original pages are printed.
To print the destination's name on the recipient's paper, set <Display Destination Unit Name> to 'On' in [TX Terminal ID]. (See "Printing the TX Terminal ID.")
You can select the login user's name as the Sender Name if you are using the SSO-H login service. (The login name appears in <100> of Sender Names (TTI).) For more information on the SSO-H login service, see "SSO-H (Single Sign-On H)."
To display/print the Sender Name instead of the unit name, set [Sender Name (TTI)] in Options. (See "Selecting the Sender's Name When Sending a Fax.")
|
| © CANON Inc. 2013 All Rights Reserved | Disclaimers CopyrightTrademarksOffice LocationsUSRM2-3062-01 CopyrightTrademarksOffice LocationsUSRM2-3062-01 |
|---|
 Expand all
 Collapse all
 Search options