e-ManualTopSite mapHelpGlossary

Category Top

What This Machine Can Do

Overview of This Function

Things You Must Do Before Using This Machine

Flow of Sending Operations

Canceling a Job

Specifying Destinations

Specifying Destinations Using the Address Book (Local)

Specifying Destinations Using the Address Book (Remote)

Specifying Destinations Using the Address Book (LDAP Server)

Specifying Destinations Using the One-Touch Buttons

Specifying a Destination by Entering an E-mail Address

Specifying Destinations by Entering an I-Fax Address

Specifying a Destination by Entering a File Server

Specifying a File Server Using the Keyboard

Specifying a File Server Using the Browse Key (Windows (SMB))

Specifying a File Server Using the Search Host Key (Windows (SMB))

Storing in a Mail Box

Storing in an Advanced Box

Setting Your Personal Folder as the Destination

Setting Your Own E-Mail Address as the Destination

Setting Cc and Bcc Addresses

Checking/Editing/Deleting the Information for a Destination

Favorite Settings

Recalling Previous Send Jobs

Storing New Addresses

Registering an E-Mail Address

Registering an I-Fax Address

Registering a File Server Address

Registering a Group Address

Registering an Address Obtained via an LDAP Server

Registering an Advanced Box Address

Storing/Editing/Deleting One-Touch Buttons

Checking/Editing/Deleting a Stored Address

Registering/Editing/Deleting Favorite Settings

Registering/Editing Favorite Settings

Checking Favorite Settings

Editing a Name/Comment

Deleting Favorite Settings

Assigning Shortcuts

Switching the Color Mode

Setting the Resolution

Specifying/Registering Scan Sizes

Setting the File Format

Trace and Smooth

Compact PDF or XPS

Searchable PDF/XPS/OOXML

Adding a Digital Signature to a PDF or XPS

Encrypting PDF Files

Reader Extensions

Applying a Policy

Selecting the Original Type

2-Sided Original

Book → 2 Pages

Different Size Originals

Adjusting Density Manually

Adjusting Background Density

Adjusting the Image Sharpness

Changing the Zoom Ratio

Erase Frame

Job Build

Delayed Send

Preview

Finished Stamp

Job Done Notice

File Name

Subject/Message

Reply-to

Setting E-Mail Priority

Receiving I-Fax Documents

Processing Received Documents

Receiving Documents

Setting the Memory Lock Mode

Forwarding Received Documents

Available Paper Sizes

When Problems Occur

Questions & Answers

Top » Scan and Send » Adjusting Background Density
Adjusting Background Density
08KY-111
This mode enables you to remove the background color from originals when scanning. This mode is useful for scanning originals such as catalogues with background coloring, and paper that has turned yellow from age.
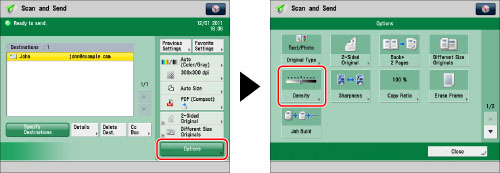
1.
Press [Scan and Send].
2.
Specify the destination → press [Options] → [Density].
3.
Press [Adjust] for <Background Density>.
To automatically adjust the quality of the background, press [Auto].
4.
Press [-] and [+] to adjust the background density → press [OK].
[-]: Prevents dark background color from being copied, but light areas on the original may not be copied either.
[+]: You may not be able to completely prevent dark background color from being copied, but light areas on the original are always copied.
Press [Adjust Each Color] to adjust the density of red, green, and blue color independently. Press [-] or [+] to adjust the density of each color → press [OK].
NOTE
[Adjust Each Color] is displayed only when the Additional Memory Type D (512MB) is installed to expand the memory capacity of the machine.
If you press [Adjust All Colors] for [Adjust Each Color] on the color adjustment screen, the screen returns to the Adjust All Colors screen.
5.
Press [OK] → [Close].

IMPORTANT
If you adjust the background density by pressing [Adjust] for <Background Density>, the [Auto] setting is canceled. Similarly, if you press [Auto] while making manual adjustments in [Adjust], your adjustments are canceled. The machine automatically adjusts the density to match the background.